 |
| Carol is teaching them the correct way to prune fruit trees. Right now she is working on a fig. All participants got a chance to prune a tree. |
Green Meadows Community Garden
Sunday, March 31, 2013
Pruning the Fruit Trees
Tomato Hornworm Pupa
During Saturday's workday Wendy found 3 pupa and Mark found one. At first we thought they were luna moth pupa but after consulting the bug book in the shed we discovered they were HIGHLY undesirable pupa as they are tomato hornworms waiting to emerge.
If you want to learn more about tomato hornworms in all stages of their life cycle, this link tomato hornworms has great pictures and information about hornworms.

If you want to learn more about tomato hornworms in all stages of their life cycle, this link tomato hornworms has great pictures and information about hornworms.
Notice the handle like thing on the pupa on the left. Hornworms
have "handles" and luna moth pupa don't. Also, hornworm pupa are
found in the soil and luna moth pupa are found in cocoons above ground.
Saturday, March 30, 2013
Checkbooks, Stools and the Three Bears
Growing Vegetables is
like:
Maintaining a healthy
checking account
A 3 legged stool – all
legs have to be in balance to stay up right
Using the 3 Bears scale

Remember we talked about the Three Bears Scale previously when it came to the soil level in the garden beds? Well, the Three Bears scale applies to all aspects of gardening.
Too much – Too little – Just right
Too much or too little water. Too much or too little fertilizer. Too much or too little sun. To achieve that Happy Medium (as in getting the scales to balance to Just Right) think of your bed as a checking account.
Besides watering and fertilizing, there is a 3rd component to a happy garden. Mulching.
 |
| photo by Bob Myers |
Gardening is a never ending cycle of adding water, fertilizer and mulch to maintain the health and productivity of the plants we are growing. There is one more aspect you could add to this so that instead of a 3 legged stool it is a 4 legged table - amending the soil.
To amend your soil properly every year, work in 1 – 2 inches of organic matter into the top 6-8 inches of soil. Adding organic amendments increases moisture holding capacity in sandy soils and drainage in clay soils. It also breaks down further to stabilize soil structure and feed microorganisms and add micro nutrients. Denise talked about her favorite method of amending her soil a couple of days ago in her post on Prepping Garden Beds.
Amy Whitney at the Cobb County Extension Office made a post on her blog about Plant Health Management. It is really excellent reading about how important it is to prevent problems from occurring in the first place.
If we water, fertilize, mulch and choose the right plants for the right time of year, we can prevent many of our problems.
Tomatoes - to Plant or Not to Plant
 That is the question. In our zone (7b) it is generally advised to wait until April 15th before planting out tomato plants. Soil and air temperatures aren't dependably warm until then and even then it can be iffy.
If you do decide to go for it and risk it, read these two articles to make an educated decision.
Cold weather effects on Tomatoes
Cold Damage to Tomato Plants
 If cold weather does move back in you really DO need to cover any warm weather crops with row covers and anchor the cover completely to the ground so that no air gets in. You want to trap the radiant heat energy coming up from the ground and not let in any cold drafts. Just like you wrap a scarf around your neck tightly to keep drafts from going down your back.
I found a really interesting article Temps for tomatoes and peppers that details what various low temperatures do at various stages of the life cycle of tomato and pepper plants. The article mostly has temperatures in C versus F degrees but it does show enough F degree temps to use it. To convert any temperature from C to F - here is a Temperature Converter.
Friday, March 29, 2013
FACES - a GREAT resource for us to use
FACES ? A resource? Yes, it is a great resource to use.
Georgia FACES is the online news service of the University of Georgia College of Agricultural and Environmental Sciences, including UGA Cooperative Extension and the Georgia Agricultural Experiment Stations. They publish all kinds of great research based articles and information.
Here is a link to the Spring Garden 2013 media kit. I haven't had time to look at everything in it but I've included links to three of the interesting articles in the kit.
Remove all blossoms on new fruit trees and bushes
 I hate the idea of having to remove ALL the blossoms on my 3 blueberries that I just planted but I guess I'll be out there cutting them off this weekend. And I'm thinking we'll have to go up to the orchard at the garden and remove ALL the blooms that appear on our pears, plums, apples, & figs as well. Boo hoo hoo.
Adding Organic Matter and Growing Tomatoes
This article addresses the importance of adding organic matter to your garden as well as fertilizing and watering tomatoes to make them healthy.
 Deadheading pansies
Why should you deadhead pansies? Because if you don't deadhead them, they convert their energy into making seeds versus blooms.
How many pansies do you see in this picture that have started this process? (By the way, after this picture was taken, they were cut off!)
This is actually important to remember all year round. The purpose of a plant is to make seeds and fruit.
If you don't dead head flowers (zinnias, marigolds, etc.) or pick the fruit (tomatoes, cucumbers, beans, etc.) the plant says AH HA! I'm going to succeed and quits making new flower buds.
Once you've dead headed the plant or picked the fruit, the plant goes Dang It! and starts making new buds to make new flowers.
Georgia FACES is the online news service of the University of Georgia College of Agricultural and Environmental Sciences, including UGA Cooperative Extension and the Georgia Agricultural Experiment Stations. They publish all kinds of great research based articles and information.
Here is a link to the Spring Garden 2013 media kit. I haven't had time to look at everything in it but I've included links to three of the interesting articles in the kit.
Remove all blossoms on new fruit trees and bushes
I hate the idea of having to remove ALL the blossoms on my 3 blueberries that I just planted but I guess I'll be out there cutting them off this weekend. And I'm thinking we'll have to go up to the orchard at the garden and remove ALL the blooms that appear on our pears, plums, apples, & figs as well. Boo hoo hoo.Adding Organic Matter and Growing Tomatoes
This article addresses the importance of adding organic matter to your garden as well as fertilizing and watering tomatoes to make them healthy.
Deadheading pansiesWhy should you deadhead pansies? Because if you don't deadhead them, they convert their energy into making seeds versus blooms.
How many pansies do you see in this picture that have started this process? (By the way, after this picture was taken, they were cut off!)
This is actually important to remember all year round. The purpose of a plant is to make seeds and fruit.
If you don't dead head flowers (zinnias, marigolds, etc.) or pick the fruit (tomatoes, cucumbers, beans, etc.) the plant says AH HA! I'm going to succeed and quits making new flower buds.
Once you've dead headed the plant or picked the fruit, the plant goes Dang It! and starts making new buds to make new flowers.
Don't be seduced by this warm weather
This warm weather makes you want to go out and plant! plant! plant!
Read this great article about Soil Temperature and why it is so crucial to wait to plant our warm weather crops (tomatoes, beans, squash, cucumbers, etc) until the soil temperatures have risen.
In other words, if you plant now, you'll end up crying later.
Have a little patience, no crying later. But patience is hard to have when there are beautiful plants in the store and beautiful weather outside.
But you can plant the cool weather crops! In fact, now is the perfect time for them.
 |
| Soil Temperature probe - Photo by Sharon Dowdy |
Read this great article about Soil Temperature and why it is so crucial to wait to plant our warm weather crops (tomatoes, beans, squash, cucumbers, etc) until the soil temperatures have risen.
In other words, if you plant now, you'll end up crying later.
Have a little patience, no crying later. But patience is hard to have when there are beautiful plants in the store and beautiful weather outside.
But you can plant the cool weather crops! In fact, now is the perfect time for them.
Weekly Calendar 3/29 - 4/4
 March 30
2:00 - 4:00 pm
Saturday Workday
Surprises
April 2
5:00 - 7:00 pm
Gardeners on Duty
(note the time change)
From Your Garden to your Table
6:30 - 8:30 pm
Cobb Extension Program
Pre-registration required
Cost $10.00
Wednesday, March 27, 2013
Door Prize Bonanza!
Hey Everyone,
The upcoming weather for the workdays on Thursday and Saturday looks wonderful! How nice would it be to come to the garden and support the Master Gardeners who do so much for us and assist with the spring clean-up. This month is a Gardener's Door Prize Bonanza!
Whether working on your beds or helping in the garden, this is always a wonderful opportunity to socialize, share ideas, get advice if needed, and put your name in a drawing for some great door prizes. This month is a bonanza of
a giveaway and the prizes are more than delightful! It may be wise to bring your own garden tools for working as we are expecting a good turnout.
Happy Gardening,
Denise, Beds 25 & 29
The upcoming weather for the workdays on Thursday and Saturday looks wonderful! How nice would it be to come to the garden and support the Master Gardeners who do so much for us and assist with the spring clean-up. This month is a Gardener's Door Prize Bonanza!
| Thought you were getting a sneak peek, didn't ya? |
a giveaway and the prizes are more than delightful! It may be wise to bring your own garden tools for working as we are expecting a good turnout.
Happy Gardening,
Denise, Beds 25 & 29
Tuesday, March 26, 2013
Prepping the Garden Beds for Spring!
Hey Everyone,
Isn't this an exciting time of year? I stand and stare at my little 4 x 8 field of dreams with such anticipation of all the wonderful plants and produce to come. The last of the carrots have been pulled, the dreaded grub search (Yuk) performed, and I am well on my way preparing for a good old-fashioned spring sow down.
Many have asked why is it so important to check for grubs and for better details on how to revitalize their soil for planting, so I thought it would make an excellent post. If you look back to the post, "When is it Warm Enough to Plant", I have some details for you there as well.
The main reason to check your soil thoroughly is not just for the grubs, but to assist in promoting a healthy organic garden. In a garden of this size we will be faced with many a pest and that is why it is so imperative to be preemptive. We will have two choices, deal with pests now and reduce their numbers, or deal with even more of them later. Decreasing their numbers and interrupting their life cycles, as best we can, is a proactive approach that will serve us very well down the road. It will also assist us in growing healthier plants with increased vigor, better disease resistance, and greater yields.
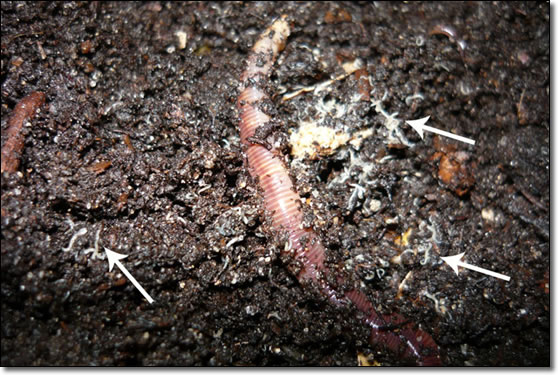
The soil in your bed can potentially harbor many undesirable pests. Several will either feed on the roots of your plants (decreasing their vigor and potentially killing) while others will hatch and do their damage above ground to foliage and fruit. Many will also spread disease throughout the garden. I was surprised to find bugs in my bed that are actually very dangerous to young earthworms. These
little guys to the right had to go!
In prepping Bed 29 for spring sowing, I felt fortunate not to be loaded with grubs as many have found. However, in thoroughly checking
the soil, I did find several undesirable pests that had the potential to damage many root crops and other young seedlings.
Aside from the grubs, each of the photos in this post represent what was found and the potential damage it can cause. I put liquid soap in a five-gallon bucket, added about 3 inches of water, and proceeded to drown to kill all the undesirables. The total findings were a wealth of earthworms at every stage of growth, including egg cases, four soil centipedes, several wireworms, three carrot beetles, a half dozen carrot rust fly larvae, and a partridge in a pear tree. Okay, I just wanted to make sure you were still reading.
The only disappointing action I took was to drown several of the earthworm egg cases. I have not seen these before and followed my instinct to get the undesirables out of the soil. After running across one hatching, well let's just say, my badness! You know what they say about those garden lessons learned, that was definitely one of them. Next time, I will take the unfamiliar egg cases home and identify them first.
As far as revitalizing the soil, you will notice that everyone has a special recipe, and in time you will find what works the best for you. Mike and Sue of beds 30 & 51 have a wonderful philosophy of feeding the soil and treating the plants if any problems arise. Jim of beds 34 & 35 has a recipe that requires very little additional fertilization.
I follow this practice both here and at home. Most often, I will remove a small amount of soil that will be used elsewhere for fill dirt or for tilling into new planting beds (non-vegetable). Next, a complete and thorough search is done for everything detrimental needing removed. This allows an excellent opportunity to learn from what is in the soil and anticipate what measures to take early on for a more proactive and preventive approach to pests. Imagine planting carrot seed with rust fly larvae left in the soil. Now that those are removed, dusting with a little wood ash at planting, inter-cropping with some green garlic or radishes, and using a yellow sticky trap should work at keeping those pests at bay.
The addition of organic matter is next. It is important to add several types of organic matter into the soil as each will possess different beneficial bacteria and food that create the environment of success for your plants. Bed 29 was home to several Brassica's this past season, which are very good at depleting the soil of nutrients. To maintain a high fertility, one bag of Jungle Growth Professional, one bag of Composted Cow Manure, two bags of Mushroom Compost, four cups of dried Pelletized Garden Compost, fifteen cups of coffee grounds, and a dozen or so biodegradable filters, cut into small pieces, were all added. The coffee filters and coffee grounds are used to feed the worms that are now becoming active as the soil warms. I also am going to add some of the black gold delivered to the garden as well in specific areas to see how it performs. Do I need to add all this? That would be a question for the Master Gardener's; however, this is my recipe that brings me great success. These amendments are all worked well into the soil until I have a nice loam and consistency for planting. If my soil isn't crumbly or loamy enough, I will then add some vermiculite to improve its texture. Some people use peat for this process, however, that can have an effect on your soil's ph, resulting in the need for a lime application.
Lastly, is addressing the needs of fertilization. Once your bed is revitalized with organic matter, you need to make sure food will be available for young plants and seedlings. Vicki had some excellent information on this at her last class. Whatever type of fertilizer you choose to utilize, scratch it into the top six inches of your bed before seeding or planting for the best results. Chemical based fertilizers can be appealing based on the claims touted. And yes, you can get impressive results. For me the choice is always an organic one. That is just my preference. I am trying to eat cleaner, if that makes any sense at all. I like the EB Stone products from Pike's as a starter fertilizer. However, I will tell you that if you are new to gardening, do not have a soil test, or know how your soil performs, it is best to start with a 10-10-10 fertilizer, and then use something more organic for side-dressing after that.
Much like my soil, I have my own little fertilizer recipe as well. I use the recommended EB Stone rate on the box for a starter, adjusted for the square footage of my bed. I then add two products I have much success with. One is Actino-Iron, the other is Azomite. I utilize these sparingly and only on beds that have seen several seasons of growth or when I start to notice a decline in yield. Lastly, are the worm castings for water retention. One half cup of these goes into each planting hole to retain water for release at night when the plants are recovering from the heat of the day. After plants are up and flourishing for about 6 weeks, I side-dress with chicken manure and pelletized garden compost every 15th and 30th like clockwork. I love Vicki's example of making a deposit. I make a deposit into my garden twice a month, so the produce will be there when I want to make the withdrawal. I use the monthly rate and break it down to a bi-monthly schedule, as my plants seem to flourish that way. I keep all side-dressings 6 inches out from any stems to prevent burning.
Much attention is focused on the soil, its structure, drainage, organic matter, and fertility. I can't tell you if what I do is right or wrong. What I can tell you is in time you will find what works well for you and it will become your "go to" garden prep each season. I hope this helps our new gardeners prepare their beds for spring and maybe others could post their recipes to share. This would be a wonderful way for us all to learn from each other.
As we all prepare for spring, may the grubs in your bed be few, your soil be enriched with fertility, and the harvest you reap full of bounty!
Happy Gardening,
Denise, Beds 25 & 29
Isn't this an exciting time of year? I stand and stare at my little 4 x 8 field of dreams with such anticipation of all the wonderful plants and produce to come. The last of the carrots have been pulled, the dreaded grub search (Yuk) performed, and I am well on my way preparing for a good old-fashioned spring sow down.
Many have asked why is it so important to check for grubs and for better details on how to revitalize their soil for planting, so I thought it would make an excellent post. If you look back to the post, "When is it Warm Enough to Plant", I have some details for you there as well.
| Grubs - feed on the roots of plants in the soil. Beetles that hatch commonly feed on the foliage or fruit. Grubs are known to attract raccoon's. |
The main reason to check your soil thoroughly is not just for the grubs, but to assist in promoting a healthy organic garden. In a garden of this size we will be faced with many a pest and that is why it is so imperative to be preemptive. We will have two choices, deal with pests now and reduce their numbers, or deal with even more of them later. Decreasing their numbers and interrupting their life cycles, as best we can, is a proactive approach that will serve us very well down the road. It will also assist us in growing healthier plants with increased vigor, better disease resistance, and greater yields.
| Soil Centipede - While these guys will feed on the larvae of other insects, they are especially fond of earthworms. |
little guys to the right had to go!
In prepping Bed 29 for spring sowing, I felt fortunate not to be loaded with grubs as many have found. However, in thoroughly checking
the soil, I did find several undesirable pests that had the potential to damage many root crops and other young seedlings.
| Wireworms- damage the roots of herbs and feed on potatoes, onions, beets, carrots, and the like. Can feed for several years. |
Aside from the grubs, each of the photos in this post represent what was found and the potential damage it can cause. I put liquid soap in a five-gallon bucket, added about 3 inches of water, and proceeded to drown to kill all the undesirables. The total findings were a wealth of earthworms at every stage of growth, including egg cases, four soil centipedes, several wireworms, three carrot beetles, a half dozen carrot rust fly larvae, and a partridge in a pear tree. Okay, I just wanted to make sure you were still reading.
The only disappointing action I took was to drown several of the earthworm egg cases. I have not seen these before and followed my instinct to get the undesirables out of the soil. After running across one hatching, well let's just say, my badness! You know what they say about those garden lessons learned, that was definitely one of them. Next time, I will take the unfamiliar egg cases home and identify them first.
| Earthworm Egg Cases - so disappointed in my actions! Hopefully this photo will keep someone else from making the same mistake! |
As far as revitalizing the soil, you will notice that everyone has a special recipe, and in time you will find what works the best for you. Mike and Sue of beds 30 & 51 have a wonderful philosophy of feeding the soil and treating the plants if any problems arise. Jim of beds 34 & 35 has a recipe that requires very little additional fertilization.
I follow this practice both here and at home. Most often, I will remove a small amount of soil that will be used elsewhere for fill dirt or for tilling into new planting beds (non-vegetable). Next, a complete and thorough search is done for everything detrimental needing removed. This allows an excellent opportunity to learn from what is in the soil and anticipate what measures to take early on for a more proactive and preventive approach to pests. Imagine planting carrot seed with rust fly larvae left in the soil. Now that those are removed, dusting with a little wood ash at planting, inter-cropping with some green garlic or radishes, and using a yellow sticky trap should work at keeping those pests at bay.
| Carrot Beetle - form from grubs. Adults feed on beets, carrots, corn, parsnips, potatoes, sunflowers, and sweet potatoes. Can cause serious damage to all small seedlings. |
 |
| Carrot Rust Fly Larvae - laid by the carrot rust fly. Starts out as a small brown colored pupa, hatches into a yellowish-white maggot and then feeds on the roots of carrots, celery, parsley, and dill. |
Much like my soil, I have my own little fertilizer recipe as well. I use the recommended EB Stone rate on the box for a starter, adjusted for the square footage of my bed. I then add two products I have much success with. One is Actino-Iron, the other is Azomite. I utilize these sparingly and only on beds that have seen several seasons of growth or when I start to notice a decline in yield. Lastly, are the worm castings for water retention. One half cup of these goes into each planting hole to retain water for release at night when the plants are recovering from the heat of the day. After plants are up and flourishing for about 6 weeks, I side-dress with chicken manure and pelletized garden compost every 15th and 30th like clockwork. I love Vicki's example of making a deposit. I make a deposit into my garden twice a month, so the produce will be there when I want to make the withdrawal. I use the monthly rate and break it down to a bi-monthly schedule, as my plants seem to flourish that way. I keep all side-dressings 6 inches out from any stems to prevent burning.
 |
| Newly hatched earthworms will be small and most often white in appearance. Many say they resemble apiece of string. |
As we all prepare for spring, may the grubs in your bed be few, your soil be enriched with fertility, and the harvest you reap full of bounty!
Happy Gardening,
Denise, Beds 25 & 29
Sunday, March 24, 2013
Harvest Soup With Garden Fresh Veggies!
Hey Everyone,
This is a wonderful dish for utilizing fresh produce pulled from the garden. A dear friend of mine gave me this recipe a few years back and it is such a nice one to share. The touch of lemon really adds elegance and lightness to the dish while enhancing the flavor of the other ingredients. White Satin carrots can stand alone in this recipe; however, I enjoy throwing in some of my Mokum's for color and added sweetness. Simply delightful!
This is a wonderful dish for utilizing fresh produce pulled from the garden. A dear friend of mine gave me this recipe a few years back and it is such a nice one to share. The touch of lemon really adds elegance and lightness to the dish while enhancing the flavor of the other ingredients. White Satin carrots can stand alone in this recipe; however, I enjoy throwing in some of my Mokum's for color and added sweetness. Simply delightful!
HARVEST SOUP
 |
| Yummy Yum! |
Ingredients:
1 (32-ounce) container fat-free, less-sodium chicken broth, divided (Swanson)
1/2 heaping cup uncooked orzo
2 teaspoons to 1 tablespoon Bertolli Extra Light Tasting Olive Oil
1 cup garden fresh carrots cut into thin rounds
3/4 cup chopped fresh garden onions (yellow granex work well or anything sweet)
1/2 cup diced celery
3/4 pound cooked chicken breast cut into bite size pieces (A fresh roasted chicken from the deli or the Purdue Grilled Chicken Breast available in a box work wonderfully)
1 1/4 cups water
3 garden fresh parsley sprigs
1 extra-large garden fresh lemon thyme sprig
4 - 5 cups washed and dried garden fresh baby spinach leaves
1 heavy tablespoon fresh squeezed lemon juice (1 - 2 lemons)
1/4 tsp. salt
1/8 tsp. fresh ground black pepper
Directions:
Bring 1 3/4 cups chicken broth to a boil in a medium saucepan. Add the orzo and cook 9 - 10 minutes until barely done. Remove from heat, set aside, and do not drain.
While the orzo is cooking, heat oil in a 3 qt. saucepan over medium heat. Swirl to coat the bottom of the pan. Add carrots, chopped onions, celery, and cooked chicken. Sauté 3 minutes, stirring constantly.
Stir in the remaining 2 1/4 cups chicken broth, 1 1/4 cups water, parsley, and thyme. Bring to a boil. Reduce heat; cover and simmer for about 10 minutes or until the vegetables are tender. Be careful not to overcook.
Remove and discard the herb sprigs.
Add orzo, lemon juice, salt, and pepper. Stir thoroughly to break up the orzo. Add the spinach and simmer 1 minute or just until it barely wilts.
Serve with nice quality Italian bread from the deli.
Serves 3-4
I always take the above recipe and make a batch and a half since this soup holds so well for up to a week. I go heavy on all the garden ingredients as they just melt in your mouth. The batch and a half makes four good size entrees like the photo above with a couple sides left over for lunch! This recipe lends itself quite well to entertaining.
Hope you enjoy,
Denise, Beds 25 & 29
Friday, March 22, 2013
Weekly Calendar March 22 - March 29
 |
| Rue-anemone (Thalictrum thalictroides) A native wildflower blooming now. |
2:00 - 4:00
Gardeners on Duty
March 26
4:00 - 5:30
Gardeners on Duty
March 28
10:00 - 12:00
Thursday Monthly Workday
March 30
2:00 - 4:00
Saturday Monthly Workday
Thursday, March 21, 2013
Fresh off the Truck!
Hey Everyone,
I was at the Pike's on Barrett Parkway this past evening and the trucks have just come in with a wealth of wonderful vegetable and herb plants for this coming weekend! With the exception of their cool weather vegetables (those were terrible), everything I viewed was incredibly healthy and displayed no signs of disease or any unwanted pests such as aphids, mites, or white-flies. All plants are still on the racks from the trucks as they are bringing them into the store to ride out the cold weather after closing hours. While it is still too cold for in ground planting of warm weather vegetables, those who are anxious and want to ensure the freshest plants, can obtain these off the racks, and then keep them healthy and protected from any adverse weather until the appropriate time for in-ground planting arrives.
If choosing any tomatoes, it is wise to up-plant them into a larger container, set them out during the day, and bring them indoors at night. Remember to choose a pot large enough to bury three quarters of the plant for the best results. It is quite important to protect warm weather vegetables from low temperatures as this can damage their cell structures resulting in the plants being more prone to disease and loss of overall yield. An exception to this is some of the black variety tomatoes. For example, Black Prince is an heirloom out of Irkutsk, Siberia and does well as long as the lows stay in the mid 40's or above. It actually produces its best fruit during the cooler weather of mid-spring and early summer.
Keep in mind that some of the local stores do not bring their warm weather vegetables indoors at night. It is in your best interest to know what you are purchasing at this time of year to ensure the greatest success in your garden.
Happy Gardening,
Denise, Beds 25 & 29
I was at the Pike's on Barrett Parkway this past evening and the trucks have just come in with a wealth of wonderful vegetable and herb plants for this coming weekend! With the exception of their cool weather vegetables (those were terrible), everything I viewed was incredibly healthy and displayed no signs of disease or any unwanted pests such as aphids, mites, or white-flies. All plants are still on the racks from the trucks as they are bringing them into the store to ride out the cold weather after closing hours. While it is still too cold for in ground planting of warm weather vegetables, those who are anxious and want to ensure the freshest plants, can obtain these off the racks, and then keep them healthy and protected from any adverse weather until the appropriate time for in-ground planting arrives.
 |
| Organic Italian Oregano at Pikes $3.99 Welcome to my garden little one! |
If choosing any tomatoes, it is wise to up-plant them into a larger container, set them out during the day, and bring them indoors at night. Remember to choose a pot large enough to bury three quarters of the plant for the best results. It is quite important to protect warm weather vegetables from low temperatures as this can damage their cell structures resulting in the plants being more prone to disease and loss of overall yield. An exception to this is some of the black variety tomatoes. For example, Black Prince is an heirloom out of Irkutsk, Siberia and does well as long as the lows stay in the mid 40's or above. It actually produces its best fruit during the cooler weather of mid-spring and early summer.
Keep in mind that some of the local stores do not bring their warm weather vegetables indoors at night. It is in your best interest to know what you are purchasing at this time of year to ensure the greatest success in your garden.
Happy Gardening,
Denise, Beds 25 & 29
Well Aren't You a Chilly Nilly!
Hey Everyone,
Well since we had our "Garden Hottie" last week, I thought it might be fun to award something on the cooler side of things this time. Vicki, you are just way too cool for the rest of us!
The ground temperatures have seen a nice rise this past weekend. Those who are turning their beds and prepping for planting have noticed a slight cool down, however, these same beds are recovering their heat quite rapidly. As an example, Vicki's bed lost quite a bit of heat performing her grub search and was down to 52.5 degrees on Friday. Sunday, her bed recovered nicely and was 61.2 degrees, and Tuesday, after Monday's rain, it was 60.6 degrees.
The garden average is now at 60.1 degrees. Readings have run from our chilliest at 52.5 to our warmest at 65.6. It is a wonderful time to start direct sowing carrots, lettuce, rat-tail radishes, and such. Please remember to choose heat tolerant varieties for planting in the spring.
Depending on weather, I will run a check either this weekend or the first part of next week and keep us all posted.
I will drop the prize by the shed for you Vicki. Congrats!
Happy Spring,
Denise, Beds 25 & 29
And the winner of the Green Meadows "Chilly Nilly" Prize is Vicki Williams in Bed 41!
Well since we had our "Garden Hottie" last week, I thought it might be fun to award something on the cooler side of things this time. Vicki, you are just way too cool for the rest of us!
Once again, I have taken all readings between 4:30 p.m. and 6:30 p.m. using a digital thermometer and then running a spot check with the compost thermometer to ensure accuracy. Temperatures were taken last Friday, Sunday, and this past Tuesday. Here are our results.
 |
| Vicki's "Chilly Nilly" Prize! Enjoy choosing a wonderful plant for your garden at Pike's! |
The garden average is now at 60.1 degrees. Readings have run from our chilliest at 52.5 to our warmest at 65.6. It is a wonderful time to start direct sowing carrots, lettuce, rat-tail radishes, and such. Please remember to choose heat tolerant varieties for planting in the spring.
Depending on weather, I will run a check either this weekend or the first part of next week and keep us all posted.
I will drop the prize by the shed for you Vicki. Congrats!
Happy Spring,
Denise, Beds 25 & 29
Tuesday, March 19, 2013
Sweet Potatoes
A couple of us had more thoughts on potatoes and someone wanted to know the difference of potatoes and sweet potatoes so I found this article in another blog about Sweet potatoes.
You may not know this, but sweet potatoes and potato potatoes are nothing alike. Sure, they are both tasty treats that grow underground. But, that’s where the similarities end. Sweet potatoes are related to morning glories, which explains their cheerful purple flowers and their rambling vines. But, those trusty Irish spuds? They belong to the tomato family, and are cousins to peppers, tomatillos and eggplants — the nightshades. Sweet potatoes like the heat. They need the heat. Potato potatoes? Well, they thrived in Ireland (until they didn’t). Heat is not something they really appreciate. Cool and moist suits them just fine. This is why we plant our spuds in the early spring, and wait until the real heat sets in to introduce the sweets to the garden.
To make new sweet potatoes, we start with an old sweet potato. An organic sweet potato (the non-organic sweet potatoes may be treated with sprout-suppressing chemicals). Ideally, you’ll start with a locally-grown organic sweet potato, because then you’ll know that variety will thrive in your region. But, don’t sweat this step too much. A sweet potato from the grocery store should also work just fine. Just, really, buy an organic one.
Ok. So, you’ve got your organic sweet potato. Great. Now, we’re going to cut it up. Just slice it in half, across the middle.
Next, place each section of sweet potato into a container with water. Plenty of people use toothpicks to suspend their sweet potato halves in a glass of water, but I think it’s easier to just set the whole thing into a casserole dish. Use enough water so that about an inch or two of the potato is submerged.
Set the container near a window, and you’re done. Over the next few weeks, the sweet potatoes will send out little baby plants. Your only responsibility during this time is to keep that water level fairly constant. The sweet potatoes will take care of everything else.
After four to six weeks, you should have a nice growth of little baby sweet potato plants. These will become your slips.
With any luck, some of your sweet potato sprouts will already have roots. Excellent. These little plants-to-be are ready for planting. Others won’t have any roots at all. No worries, those laggards will catch up real fast.
Remove the sprouts by snapping them off at the point where they emerge from the sweet potato tuber. Congratulations! You have your first sweet potato slip!
Once you’ve got all your sweet potato slips in their pots, all you need to do is keep them happily watered until it’s warm enough for them to move outdoors. I like to keep mine in a big styrofoam box. Easy to water. Easy to transport outside for some sunlight during the day. And, easy to bring inside again before the evening chill.
No styros? Well, anything that holds water should do fine. A casserole dish. A plastic storage tub. A big pot. It’s just easier if it holds water and holds a bunch of seedlings, because you could be doing a daily shuffle from inside to outside to inside again for a while now.
Whatever you keep them in, it’s best to coddle your sweet potato seedlings until two or three weeks after your last frost date. Then, once the nights are reliably above 50°F, you can plant them out into the garden. Most people grow their sweets in the ground. I prefer containers, because it makes the harvest easier. Last year, I tried bushel baskets with great success. This year, I’m building a big potato planter. And, yes, I’ll be doing bushel baskets too. A gardener can never have too many sweet potatoes.
Freeze Warning! Freeze Warning!
 If you have baby plants, just put out tender transplants, or even not so tender plants....this post is for YOU!
 Thursday morning there is a freeze warning from 4:00 am until 11:00 am. If you have brand new seedlings you definitely need to cover and fix the cover so it doesn't blow off and expose the tender growth. If those tender plants are exposed they will get frost bite or even get killed.
Saturday, March 16, 2013
Treasures from the Book Sale
Last week at the Cobb County Library Book Sale I found 3 books to add to the Community Garden Library. If you are interested in looking at one of these books, they are in the shed on the counter in the box labeled Reference Books. There are quite a few other good books in that box as well. There will soon be a Square Foot Garden book to refer to as well.


Friday, March 15, 2013
Weekly Calendar March 16 - March 22
March 15 - 17
Southeast Flower Show at the Cobb Galleria
This is a great event to attend!
Gardens to explore. Speakers to listen to.
Lots of free literature and ideas to spark the imagination.
March 16
2:00 - 4:00
 Gardeners on Duty
March 19
4:00 - 5:30
Gardeners on Duty
Vegetable Gardening Basics
6:30 - 8:00 pm
Cobb County Extension Office
678 South Cobb Drive
Cobb County Extension
Pre-registration is required
Southeast Flower Show at the Cobb Galleria
This is a great event to attend!
Gardens to explore. Speakers to listen to.
Lots of free literature and ideas to spark the imagination.
March 16
2:00 - 4:00
Gardeners on DutyMarch 19
4:00 - 5:30
Gardeners on Duty
Vegetable Gardening Basics
6:30 - 8:00 pm
Cobb County Extension Office
678 South Cobb Drive
Cobb County Extension
Pre-registration is required
Fruits in the Future
Green Meadows Preserve now has an Orchard!
Last Saturday (March 9th) we had a wonderful morning planting several types of fruiting trees. The morning was a bit chilly and sunny but we had plenty of smiling faces.
Green Meadows Gardeners and Master Gardeners came out to participate in the early morning fun. Many hands made light work of this project.
Rusty Simpson, Cobb County Parks and Recreation Unit Manager along with Jimmy Barnett and his associates were on hand early and completed a large part of the work prior to the early morning start time.
The holes for the new orchard had been dug a few days prior and the trees were set near their prospective holes by Cobb Parks and Recreation staff.
 Water crystal packs and dirt were placed in the holes and and the mulch was crowned around the trunks of the trees. Water wells were placed around each of the trees for later watering. (Water wells are also known as Gator Bags and provide reservoirs of water to help get the trees established during their first year.)
The trees might or might not produce fruit this year but the exciting start will be the fun colors of spring blooms we will have in a month or so.

The new Green Meadows Orchard consists of:
What a nice addition to Green Meadows Preserve! It will be fun to see how the trees grow and learn more about taking care of fruit trees.
Last Saturday (March 9th) we had a wonderful morning planting several types of fruiting trees. The morning was a bit chilly and sunny but we had plenty of smiling faces.
 |
| Gopher Holes! |
Rusty Simpson, Cobb County Parks and Recreation Unit Manager along with Jimmy Barnett and his associates were on hand early and completed a large part of the work prior to the early morning start time.
The holes for the new orchard had been dug a few days prior and the trees were set near their prospective holes by Cobb Parks and Recreation staff.
The trees might or might not produce fruit this year but the exciting start will be the fun colors of spring blooms we will have in a month or so.
The new Green Meadows Orchard consists of:
- 4 figs
- 3 Bartlett Pears
- 2 Shinseiki Asian Pears
- 1 Red Delicious Apple
- 1 Golden Delicious Apple
- 3 Macintosh Apples
- 4 Green Gage Plums
- 4 French Prune Plums
What a nice addition to Green Meadows Preserve! It will be fun to see how the trees grow and learn more about taking care of fruit trees.
Thursday, March 14, 2013
Early Gardening
I was watching the news early his morning and channel five gave these facts.
The average last freeze is March 23.
Last freeze in 2012 - February 13.
Last freeze in 2011 - February 12.
Last freeze in 2010 - March 7.
Latest recorded freeze - April 23. So we had a freeze last night which went to 28 degrees. Is this the last? Who can say. Be careful with your tender new plants and seeds. I don't think we have seen the last of the frost blankets over our beds for a few more weeks.
Latest recorded freeze - April 23. So we had a freeze last night which went to 28 degrees. Is this the last? Who can say. Be careful with your tender new plants and seeds. I don't think we have seen the last of the frost blankets over our beds for a few more weeks.
Tuesday, March 12, 2013
You're So Hot!
Hey Everyone,
Yes Chuck, it is you! You are hotter than all the rest. Turns out taking the garden temperatures this past weekend has been rather interesting, as the numbers have continued to rise. I consistently took all readings late day between 4:30 p.m. and 6:30 p.m. I used a digital meat thermometer and then spot checked with the compost thermometer to ensure accuracy. Here are the findings!
And the weekend "Garden Hottie" Prize goes to Chuck Surdi in Bed 23!
 |
| Chuck's "Garden Hottie" Prize! Some wonderful varieties for Spring or Fall with a wonderful way to preserve the harvest 6 months without canning! |
On Friday, the normal readings fell anywhere between 37.3 degrees to 41.6 degrees for uncovered beds and for those who cover on a regular basis, temperatures were consistently 10 to 12 degrees higher.
On Saturday, the temps in uncovered beds rose considerably while those who normally cover seemed as if they were stabilizing and really didn't change all that much.
By late Sunday afternoon, as many would anticipate, temperatures were doing really well. Those who normally cover are seeing their increase and range from 54.1 degrees to 55.7 degrees. All other beds are running between 49.8 degrees to 52.6 degrees. That is except for our Garden Hottie! Chuck's bed was 41.6 on Friday, 52.3 on Saturday, and Sunday, he was the hottest at 56.3 degrees. Whatever you are doing over there Chuck, it is certainly working for you!
I will do some checking mid-week through next weekend and keep us all posted.
Prize is the shed for you Chuck!
Hope you enjoy,
Denise, Beds 25 & 29
Monday, March 11, 2013
What a Wonderful Few Days at the Garden!
Hey Everyone,
What a wonderful few days it has been at the garden. So many have been out working on their beds, visiting, and volunteering their time. We are rapidly becoming a wonderful community and it is such a pleasure to garden among each of you. A special shout out to our young visitors on Friday. Eli, Lily, and Josh all made my day so enjoyable and you are welcome to visit our garden anytime. Thank you so much for helping our new gardeners prepare their bed and placing compost in Miss Nancy's bed. She is very grateful for your help! Eli, please keep me posted on your mantis egg case. I cannot wait to see how they do for you. Lily, I plan on releasing ladybugs in the garden within the next week or two and if you are down for helping, make sure I have your contact information and I will let you know when. Maybe Miss Vicki will even help us! Pretty Please, Miss Vicki?
On a side note for gardeners - two items.
Have a great start to the week!
Denise, Beds 25 & 29
What a wonderful few days it has been at the garden. So many have been out working on their beds, visiting, and volunteering their time. We are rapidly becoming a wonderful community and it is such a pleasure to garden among each of you. A special shout out to our young visitors on Friday. Eli, Lily, and Josh all made my day so enjoyable and you are welcome to visit our garden anytime. Thank you so much for helping our new gardeners prepare their bed and placing compost in Miss Nancy's bed. She is very grateful for your help! Eli, please keep me posted on your mantis egg case. I cannot wait to see how they do for you. Lily, I plan on releasing ladybugs in the garden within the next week or two and if you are down for helping, make sure I have your contact information and I will let you know when. Maybe Miss Vicki will even help us! Pretty Please, Miss Vicki?
 |
| Yes, these are actually chillin' in my fridge! Yikes! |
On a side note for gardeners - two items.
- Just a friendly reminder to let everyone know that the shed and front gate have been found open on several occasions in the last couple of weeks. If you are in the garden, please be sure and lock up. It would also be nice to stroll by and check to be sure that the shed is locked in case someone else has forgotten. Thanks so much for your help while we all get in the routine!
 |
| Newly hatched mantis's on oregano! These were Fred & Wilma a few hours after birth! They are in the lower right quadrant. |
- Part of gardening organically requires the utilization of beneficial insects in the garden to assist in keeping undesirable pests to a minimum. Ladybugs are wonderful to have around as they feed on small soft-bodied insects with a voracious appetite. The first release will be to assist us in building numbers before aphids arrive. Subsequent releases will follow. I also have praying mantis egg cases in incubation for future releases. If anyone has young children or grandchildren this is a wonderful way to have them involved and be a garden helper.
Have a great start to the week!
Denise, Beds 25 & 29
Friday, March 8, 2013
When is it Warm Enough to Plant?
Hey Everyone,
With the warmer days of spring just around the corner, everyone will be anxious and eager to get out and enjoy his or her garden. I hope that many will want to try direct sowing some seeds. I ran across this chart on the Gardener's Supply website and thought we would all appreciate the guidelines for soil temperature to ensure good germination rates. Remember the green dots are far from optimum and will produce results that are more erratic.
With the warmer days of spring just around the corner, everyone will be anxious and eager to get out and enjoy his or her garden. I hope that many will want to try direct sowing some seeds. I ran across this chart on the Gardener's Supply website and thought we would all appreciate the guidelines for soil temperature to ensure good germination rates. Remember the green dots are far from optimum and will produce results that are more erratic.
 |
| When is it Warm Enough to Plant? |
To obtain the most success with direct sowing seed, it is important to follow a few simple steps.
 |
| Bed 50 is a wonderful example of well worked soil with a nice loam to it. |
- Take the time to do a little garden prep work. Thoroughly check your bed for the presence of any undesirables (grubs, cutworms, vine borer larvae, etc.). Turn in plenty of soil amendments (free compost is available) and work the soil so it is a nice loose consistency with no heavy clumps of dirt. Fertilize properly and level the bed nice and neat.
- Look for the seasonal benchmark. The best advice I ever received was to look for the sweet spot when planting. This is a great weekend for prepping the soil and then letting the bed rest a few days to a week before sowing. When turning your bed, you will be bringing the cooler soil to the top and it will take a few days to warm. We can still have harsh weather and some young seedlings will easily succumb to the freezing temperatures. Tip: Unless you are using a frost blanket, it is still too early for sowing carrots, beets, turnips, and lettuce. However, it is a perfect time for bulbing onions, peas, parsley, radishes, spinach, and mustard greens. I will start taking soil temperatures this weekend and post them so we have an idea of where things stand. Temps taken this afternoon ran approx. 37.3 to 41.6 degrees depending on where you were in the garden. Those who have consistently been covering were substantially higher by 10 to 12 degrees.
- Follow the seed packet instructions for the depth and spacing requirements. Some seeds require light to germinate and if sown too deep will not sprout. A nice rule of thumb is to sow no more than two to three times as deep as the seeds diameter. However, if your packet states to barely cover the seeds, follow these instructions.
 |
| Freshly watered soil with a desirable loam and consistency. |
- Keep the seedbed evenly moist and do not let it dry out. Use a fine mist or shower nozzle to prevent dislodging of the seeds and eroding of the soil. Tip: Nothing hinders the process more than allowing the seedbed to dry out during germination. I actually try to mist my bed roughly the same time every day to ensure success.
- Make sure to know what your seedlings will look like and mark them properly. Pull all competing spring weeds as they have the potential to harbor disease and insects as well as compete for your seedlings nutrients. Once sprouted, gradually wean to your regular watering schedule, however, please remember raised beds do dry out rapidly and young seedlings need consistency.
The attached sowing guides should get everyone off to a wonderful season of growing. Devra at Botanical Interests has been kind enough to give me their permission to use these charts for our garden needs! They have excellent recommendations for good germination rates of what is safe to put in now and what you should wait a bit on. If I can be of any assistance, please don't hesitate to ask or post a comment.
http://www.botanicalinterests.com/img/site_specific/uploads/OutSpgSowGuideVegHerb.pdf - link to outdoor edible spring sowing guides
Enjoy the wonderful weather this weekend!
Denise, Beds 25 & 29
Weekly Calendar - March 8 - 15
 March 8, 9, 10
Cobb County Library Book Sale
More information about the Book Sale
March 9
2:00 - 4:00 pm
Gardener on Duty
8:30 - 10:30 am
Fruit Tree Planting in the Orchard
See email sent on Mon 3/4/13 for more details
March 12
NO Gardener on Duty
How to keep your Veggies Happy, Healthy and Productive
6:30 - 7:30
Class on watering, fertilizing and mulching
Class Details on the blog
March 14
9:30 am
Monthly Planning Meeting
Christ Lutheran Church, 176 West Sandtown Road Marietta, 30064
All gardeners at the Green Meadows Community Garden are invited to attend the Planning Meeting. You have a vested interest in the day to day operation and the future of the garden.
Thursday, March 7, 2013
Eggs, Calcium and Pinterest
The relationship between eggs and calcium is clear but how does Pinterest come in to play
 And then the next question is - what IS Pinterest?
Pinterest is a really cool way to organize information you find online but don't really want to print. If you just save a file on your home computer, the chances of finding it when you need it aren't that good. Or at least not easily. Pinterest works like an online bulletin board and "pins" what you find on a virtual bulletin board using pictures with descriptions.
If you have heard of Pinterest you may think, oh, it is just for recipes, crafty projects, home decor, etc. Not true! Over the last few months I've used it frequently to find gardening information about row covers, square foot gardening, trellis options, community gardens, growing lettuce indoors, carrots, potatoes, etc. There is a wealth of information out there to find and looking at Pinterest sparks ideas and AH HA! moments.
 As always, remember that not everything you find is true so verify before you totally believe it. There are a number of old, unscientific ideas that have been pinned.
One thing I came across on Pinterest (and pinned to save it) recommended saving the water you boil eggs in and using it on your plants because calcium leaches out of the egg shells. I didn't really know whether to believe it or not but said what the heck, I'll try it.
pHydrion tape is used to measure the acidity of fluids. I tested a glass of fresh tap water and a glass full of egg water. The egg water really did have more calcium! (The dark green tape is the egg water.)
Calcium is essential for all plants, but the following are especially responsive: apples, broccoli, brussels sprouts, cabbage, carrots, cauliflower, celery, curcurbits, legumes, lettuce, peppers, potatoes, and tomatoes. This link has a lot of interesting information: Plants Need Calcium Too
Pinterest is a really cool way to organize information you find online but don't really want to print. If you just save a file on your home computer, the chances of finding it when you need it aren't that good. Or at least not easily. Pinterest works like an online bulletin board and "pins" what you find on a virtual bulletin board using pictures with descriptions.
If you have heard of Pinterest you may think, oh, it is just for recipes, crafty projects, home decor, etc. Not true! Over the last few months I've used it frequently to find gardening information about row covers, square foot gardening, trellis options, community gardens, growing lettuce indoors, carrots, potatoes, etc. There is a wealth of information out there to find and looking at Pinterest sparks ideas and AH HA! moments.
One thing I came across on Pinterest (and pinned to save it) recommended saving the water you boil eggs in and using it on your plants because calcium leaches out of the egg shells. I didn't really know whether to believe it or not but said what the heck, I'll try it.
pHydrion tape is used to measure the acidity of fluids. I tested a glass of fresh tap water and a glass full of egg water. The egg water really did have more calcium! (The dark green tape is the egg water.)
Guess I'll save my egg water and use it on plants that really need it. I could always take it to the garden and put it on my tomato plants to help prevent blossom end rot.
Calcium is essential for all plants, but the following are especially responsive: apples, broccoli, brussels sprouts, cabbage, carrots, cauliflower, celery, curcurbits, legumes, lettuce, peppers, potatoes, and tomatoes. This link has a lot of interesting information: Plants Need Calcium Too
Wednesday, March 6, 2013
Welcome to the Shed
Everyone should have the code to the lock on the shed door by now. If you haven't been inside, there are all kinds of useful tools in there. As well as a First Aid Kit which we hope no one will need to use. There may be other things you would like to use like a Bad Bug Kit, paper, pens, etc.


 Please put everything back in a neat manner and if you track dirt or wood chips in, sweep them out. We do have a very nice broom to go along with the great tools and kneelers!
If you have plastic grocery bags you need to recycle, we have a huge pink bag that needs more bags. It is so nice to have access to bag when you need it!
If you have plastic grocery bags you need to recycle, we have a huge pink bag that needs more bags. It is so nice to have access to bag when you need it!
Tuesday, March 5, 2013
Bluebird Trail Tour in the Snow

Snow? Yes indeed it snowed on us at the garden during the Bluebird Trail Tour! Maybe we should have called it the Snow Bird Tour. At one point Jim called out "It is snowing!" and when we looked, he was rather blurry it was snowing so hard.
But that didn't keep this hardy bunch of people from bundling up and spending time in the garden and walking the trails.

It was colder standing in the garden with the wind whipping around us then it was once we started walking.
I was impressed that everyone had a hat of some kind on!

Cobb County Book Sale
The Cobb County Library and The Friends of the Library are hosting their semi-annual book sale at Jim Miller Park from March 8-10, 2013. Over 100,000 items are for sale at the event which takes place in the spring and fall for three days beginning on Friday. Sale items include books both hardbound and paperback for children, young adults and adults; audio-visuals including books on tape and compact disc; videocassettes; compact discs; records; magazines; and comic books. All proceeds are used to purchase new books and other library materials.
Date:
 March 8-10, 2013
Time:
Friday - 9am to 5pm
Saturday - 9am to 5pm
Sunday - 1pm to 5pm
Prices
Books, Magazines, Videos, Records, CDs, and More!
Hardbacks – Adult $1.50
Hardbacks – Juvenile $1.00
Paperbacks – Select (i.e. Travel & Computer) $1.00
Paperbacks - Large Format $1.00
Paperbacks – Mass Market Size 50¢
Paperbacks – Juvenile 50¢
Reader’s Digest Condensed Books 25¢
Harlequin & Silhouette Romances 50¢
Magazines 10¢
Comic Books $1.00
Puzzles, Records, Audio & Videocassettes, & Computer Programs $1.00
Magazines by the Box $2.00
Address:
Jim Miller Park
2245 Callaway Road
Marietta, GA 30008
Date:
March 8-10, 2013Time:
Friday - 9am to 5pm
Saturday - 9am to 5pm
Sunday - 1pm to 5pm
Prices
Books, Magazines, Videos, Records, CDs, and More!
Hardbacks – Adult $1.50
Hardbacks – Juvenile $1.00
Paperbacks – Select (i.e. Travel & Computer) $1.00
Paperbacks - Large Format $1.00
Paperbacks – Mass Market Size 50¢
Paperbacks – Juvenile 50¢
Reader’s Digest Condensed Books 25¢
Harlequin & Silhouette Romances 50¢
Magazines 10¢
Comic Books $1.00
Puzzles, Records, Audio & Videocassettes, & Computer Programs $1.00
Magazines by the Box $2.00
Address:
Jim Miller Park
2245 Callaway Road
Marietta, GA 30008
Monday, March 4, 2013
How to keep your Veggies Happy, Healthy and Productive
Tuesday March 12, 2013
6:30 - 7:30 pm
Lost Mountain Park
Western District Operations Building
You are invited to attend a free gardening class sponsored by The Green Meadows Preserve Community Garden.
How to Keep your Vegetable plants Happy, Healthy and Productive
 Come learn more about the Three Bears Scale -
Too Much, Not Enough and Just Right
See how it applies to:
Please RSVP to greenmeadowscg@gmail.com
We want to make sure we have enough handouts for everyone.
Directions From the Community Garden:
Take Dallas Hwy West 2.0 miles (to the 2nd traffic light from the garden.)
Turn left at the traffic light into Lost Mountain Park .
Take the first left.
Once you turn, go straight and the road dead ends into a parking lot between Boots Ward Recreation Building and the Western District Operations Building. If the parking lot is full, park in the parking lot in front of the ball fields.
Lost Mountain Park
Western District Operations Building
4845 Dallas Highway
Powder Springs, GA 30127
6:30 - 7:30 pm
Lost Mountain Park
Western District Operations Building
You are invited to attend a free gardening class sponsored by The Green Meadows Preserve Community Garden.
How to Keep your Vegetable plants Happy, Healthy and Productive
Come learn more about the Three Bears Scale - Too Much, Not Enough and Just Right
See how it applies to:
- Fertilization
- Watering
- Mulching
Please RSVP to greenmeadowscg@gmail.com
We want to make sure we have enough handouts for everyone.
Directions From the Community Garden:
Take Dallas Hwy West 2.0 miles (to the 2nd traffic light from the garden.)
Turn left at the traffic light into Lost Mountain Park .
Take the first left.
Once you turn, go straight and the road dead ends into a parking lot between Boots Ward Recreation Building and the Western District Operations Building. If the parking lot is full, park in the parking lot in front of the ball fields.
Lost Mountain Park
Western District Operations Building
4845 Dallas Highway
Powder Springs, GA 30127
Green Weed Prevention
Now is the time to really jump on the weeds around your bed and in the community areas. We've been working on it but there is more to be done.

True, weeding isn't very exciting but it is even less interesting when you have double the amount of weeds to pull. My philosophy has always been -while the ground is soft, pull them out. There are kneelers on the wall in the shed and great tools to help with the chore.
 One way to prevent weeds from sprouting up around your beds is to rake back the mulch and spread newspaper on the ground. Once the paper is down, put the mulch back over the newspaper. This really does help, especially while our mulch is thin.

There are two piles of newspaper in the corner of the shed that can be used to do this. Or you can bring the newspaper you were planning on recycling and use it around your bed.
Unfortunately this won't do away with the onions - the only way to get rid of them is to dig them out. Each and every time you see one.
True, weeding isn't very exciting but it is even less interesting when you have double the amount of weeds to pull. My philosophy has always been -while the ground is soft, pull them out. There are kneelers on the wall in the shed and great tools to help with the chore.
One way to prevent weeds from sprouting up around your beds is to rake back the mulch and spread newspaper on the ground. Once the paper is down, put the mulch back over the newspaper. This really does help, especially while our mulch is thin.There are two piles of newspaper in the corner of the shed that can be used to do this. Or you can bring the newspaper you were planning on recycling and use it around your bed.
Unfortunately this won't do away with the onions - the only way to get rid of them is to dig them out. Each and every time you see one.
Subscribe to:
Posts (Atom)