Monday, July 7, 2014

Boo hoo.....tomatoes being eaten

Last week I saw a squirrel lazily sauntering through the garden with a grape tomato in his mouth towards his favorite tree. I've also found tomato parts scattered all over the garden as well.

Here someone lost a beautiful vine ripe tomato because those squirrels said YUM! and stayed to dine. They tend to carry off cherry, grape and small tomatoes but eat the big ones "in house".

 Unfortunately for us, leaving tomatoes to get to the vine ripe stage is dangerous...you might get the tomato or the squirrels might get the tomato.

Vicki - Bed 41

Friday, July 4, 2014

Cucumber-leaf Sunflower

Last year I planted Helianthus debilis ssp. cucumerifolius, Cucumber-leaf Sunflower at the far end of the sunflower/herb border. These annual sunflowers are a native of  southwestern Georgia but have spread further north. Interestingly, they have only spread as far north as Macon in the interior of the state but they have spread all the way up the coast to New England.


When my friend Hal gave them to me, he warned me that they reseeded readily. The plants he gave me came from middle Georgia in the sandhill region so I wasn't sure they would really grow well up here.

I think I've proved (at least so far this year) that they will thrive and do well up here. In fact, the plants at the garden are bigger and started blooming before the plants 100 miles south of here! Very odd if you ask me since spring comes earlier to the south of us.  It will be interesting to see how well they do the rest of the year and what happens next year.

Vicki - Bed 41

Wednesday, July 2, 2014

Disease and Insect Control, Part 2

Do not use a glass where
small children will have
access to it.!!
There are several important things to remember when using chemicals.

READ THE LABEL! Use ONLY as much as you need. More is not better.

Use dedicated measuring containers/utensils.

Use proper personal protection - at a bare minimum, use disposable gloves!

Avoid standing where the chemical will drift onto you or you will inhale it with every breath.  If you have a windsock, watch what direction the wind is blowing. Windsock and when to spray

Wash your skin with soap and water when you are finished.

Below is the instruction sheet we use for mixing and using chemicals at the Community Garden.

***********************************************************

Procedure and Directions on how much to mix and spray

Caution: Do not spray if rain is expected within 4 hours. Spraying without having time for the chemical to bond with the leaves means you have to respray. AzaMax stays on better than Actinovate or Serenade as they are water soluble. If it only rains a little bit you are fine. 5 days of rain or a down pour means you should respray for continued protection.  Also water your plants BEFORE spraying any chemicals.

You can combine the pesticide ( Azamax) with1 fungicide (Actinovate  or  Serenade) so that you spray for bugs and disease at the same time. Only use both chemicals if you need both. If you only need one (fungicide or pesticide), only use the one chemical.

Spray every 7 to 10 days depending on how much rain we have and what kind of problems you are having.
                                                       ****************

AzaMax (pesticide to use on plants):
               bean beetles, cucumber beetles, squash bugs, etc.
  Shake concentrate container before measuring out

1/2 gallon - use 1 1/2 teaspoons of concentrate
1 Quart    - use 3/4th  teaspoon of concentrate
  if you can't beat back the bugs, ask about what amount to increase to
                                                                             
Actinovate (fungicide for fungus/disease control for plants)
             powdery mildew, tomato blight, viruses, curly top, etc
1/2 gallon - use  1/2 teaspoon of powdered concentrate
1 quart     - use  1/4 teaspoon of powdered concentrate
   if disease pressure is  high, ask about what amount to use

Serenade ( another fungicide chemical for fungus/disease control for plants)
            powdery mildew, tomato blight, viruses, curly top, etc
Shake concentrate container before measuring out

1/2 gallon - use 2 ounces of concentrate        
1 quart     - use 1 ounce of concentrate
   if disease pressure is high, ask about what amount to use
                                                                 
WEAR GLOVES!! Even when mixing the chemical. Definitely while spraying.

Watch the windsock when spraying to make sure you are upwind from the chemical you are spraying.

Put water in the container and then add the concentrate. Make sure it gets completely mixed/dissolved before using.

Shake very well to mix.

Then pour your chemical solution in one of the half gallon sprayers but only up to the round indented spots towards the top of the sprayer. If you go above those indentions, when you put the sprayer in, the chemical will overflow.

Tighten sprayer and pump to create pressure.  (If pressure doesn’t build, try tightening the sprayer in the bottle again). Test to see if you need to adjust the nozzle before spraying your plants. You want a spray, not a stream.

Once you are finished spraying your plants, you need to empty and rinse out everything you used. Sprayer, mixing bottle/jug, measuring spoons and/or measuring cup.  Be sure to pump clean water through the sprayer to clean out that part as well as the sprayer bottle.

Return everything to the proper shelf in the shed so the next person can find everything.

Thanks! 

Vicki - Bed 41

Disease and Insect Control, Part 1

The one thing I hate about vegetable gardening in Georgia is fighting disease and bugs in the summer. If you are growing your vegetables at home, you won't have nearly the disease and bug pressure that we do at the Community Garden.

If you use the proper chemical at the correct time and use the correct amount you will increase your success.

Of course, you will have even better success if you use IPM (Integrated Pest Management) techniques. Healthy soil. Healthy plants  Watch for bugs. Hand pick bugs when there are only a few. When the numbers get too high, then use the correct pesticide but not too much.

At the Community garden, we have an organic garden and use Serenade or Actinovate for plant diseases and AzaMax for our pesticide. All these products can be ordered through Amazon. Early in the season the prices are much better than during peak demand times.  Pike's does carry a small bottle of Serenade that is premixed and ready to spray. This is economical if you have a small garden or while your plants are small. If you have a large garden, it is more economical to get the large bottle of concentrate.

The sprayer we use is a Flo Master from Home Depot. It holds
a half gallon of mixed chemical and is easy to use.
 As for disease in the garden...well....it is easy for it to spread like wildfire so a good offense is an excellent defense. With as much rain as we've been having, conditions are ripe for all the different blights that affect tomatoes as well as powdery mildew attacking the cucumbers and squashes.

Since the chemicals we use are water soluble,  they wash off after frequent rains or if the rain was especially heavy. The AzaMax does stay a bit longer than the Serenade and Actinovate. Generally, spraying every 7 to 10 days is the recommended time frame. But if you spray on Day 1 and it then rains for 5 days straight, you should spray again as all your chemical has washed off.

Part Two will have the  mixing instructions that we use at the garden.

Vicki - Bed 41

Monday, June 30, 2014

Ellie's Molasses Cookies

 
Dalita brought some super delicious molasses cookies to the Ice Cream Social.  So delicious there weren't any left to take home. YUM!


Ellie's Molasses Cookies

3/4 C butter
1 1/4 C granulated sugar
1/4 molasses
1 egg
2 C all purpose flour
1 tsp. baking soda
1 tsp. cinnamon
1/2 tsp. ground cloves
1/2 tsp. ground ginger
pinch of salt

Melt butter in 3 cup saucepan. (I don't melt the butter.) Remove from heat and allow to cool. 


 Add 1 cup sugar, molasses, and egg.  Beat well.  Sift flour and spices.  Add to butter and mix well.  Chill in pan for 2 hours or overnight. 


Roll into a ball (1 tsp.) and coat with sugar.  Flatten with bottom of a glass coated with sugar.  Bake 8 - 10 minutes at 350 degrees.  Makes 72 cookies.


Saturday, June 28, 2014

Comfrey - a great plant for pollinators


Last week was National Pollinator Week but it is never too late to write about pollinators. It is really cool when you really "SEE" what is happening under your very nose when it comes to pollinators in your front yard.

Why are pollinators a good thing? Some plants use the wind to spread their pollen but most plants need assistance from an animal or insect to get their flowers pollinated.

If a flower doesn't get pollinated, it won't set seed i.e. make the fruits, vegetables and nuts that we (as well as the rest of the animal kingdom) eat. If we didn't have something to pollinate our fruits and vegetables, we'd be very hungry and not have such a diverse diet.

I've grown comfrey for years but never realized until this year what a great pollinator plant it is. It is hardy, lives in pots or the ground, reseeds readily, is easy to pull up when you don't want it where it has appeared and blooms from April until the end of October.

This afternoon I went outside and glanced over at my thicket of comfrey and found half a dozen bumble bees buzzing around. They make a circuit of the flowers, disappear from view then come back for another circuit around the flowers. Over and over and over again. Besides the bumble bees there are tiny native bees that are buzzing around and crawling in the flowers themselves.

Comfrey has been used for healing purposes since at least 400 B.C. I've used it as a salve to heal small "ouchies" and I have a friend that uses the dried leaves in bathwater to get rid of the itch of chiggers and ticks.  When I read up on comfrey, I found that it had been used for food, as a dye, in cosmetics and as an ornamental. (Internal use is NOT recommended any more.)

I've planted a baby plant by the birdbath at the garden and we'll see how well it does there.  Anything that blooms at least 7 months of the year and is used by multiple pollinators deserves a home in one of our pollinator borders.

Friday, June 27, 2014

Horticulture Week at Green Meadows Preserve Park - July 8th

This year marks the 100th anniversary of the founding of the Cooperative Extension. To celebrate the 100th anniversary and Horticulture Week, Cobb County Cooperative Extension is holding a series of classes and events the week of July 7 thru July 12th.  Extension Horticulture Week Events

Tuesday July 8th from 9:00 am to 1:00 pm
Green Meadows Community Garden will be featured as well as the Cherokee Garden and the historic Period Gardens around the house. Feel free to come at any point between 9:00 am and 1:00 pm.  There are only 2 events with specific times.

9:00 am General Welcome and Thank You for coming

9:30 am  Bluebird Trail walk (2.3 miles) for those who want to take a walk on the trail system and learn more about bluebirds and bird habitat.

9:00 am to 1:00 pm
Tour the gardens and talk to gardeners and Extension staff.

Gardens and Orchard:
Community Garden
Cherokee Garden
Historic Period Garden around the House
Organic Orchard

Additional Activities:
Bee Hive exhibit
Scavenger Hunt for children in the Community Garden
   (no collecting, just marking off the list)
Bug Talks in the garden
Watch the birdfeeders behind the garden

Feel free to bring a picnic lunch to eat under the Pecan Trees behind the house. Port-a-potties will be available for this event.

3780 Dallas Hwy, Powder Springs, 30127 (Intersection of Dallas Hwy and Old Hamilton Road).
Free and open to the public. For information, call 770-528-4070.


Thursday, June 26, 2014

Community Education Lecture Series - Saturday June 28

This morning I received a last minute announcement about a Community Education Lecture Series and Garden Open House at Fountain Gate Gardens in Kennesaw.

When:        Saturday June 28th
Where:       Fountain Gate Gardens
Time:         9:00 am to 12:30 pm
Location:   3007 Cherokee Street
                   Kennesaw, GA 31044

During the open house, drop in to tour the gardens and ask any gardening questions you might have. Free Seed packets while supplies last.  Learn more about their Plant A Row program.

Three short classes to be held in the Brown House in front of the gardens

9:30 am - 10:15 am     Planning for a Fall/Winter Garden

10:30 am - 11:15 am   Vegetable Garden Basics  

11:30 am - 12:15 pm   Fundamentals of Organic Gardening

 For more information you can email garden@fountaingate.com

Wednesday, June 25, 2014

Traffic Delays This Weekend - 150th Commemoration of the Battle of Kennesaw Mountain

This is to give everyone a heads up that there are going to be significant traffic delays starting Thursday evening, June 26th through Sunday June 29th.

 In fact, you might want to avoid all roads going East that go anywhere near any part of Kennesaw Mountain or into Marietta.  Certain sections of  Barrett Parkway and Highway 41 will also be jammed up.

(Remember Burnt Hickory between Due West Road and Barrett Parkway is still closed and won't reopen until the end of July.)

The 150th Commemoration of the Battle of Kennesaw Mountain is this weekend and 60,000 visitors are expected to attend the events.  Schedule of events for 150th

Satellite parking for Kennesaw Mountain and 24 Gun Battery events will be at Mount Paran Christian School and the Bell's Ferry Parking lot (actually located near the corner of Bell's Ferry and Hwy 41). Marietta High School is providing parking for all activities at Cheatham Hill. Shuttles will be provided. Event Parking for 150th

Marietta also has many activities that tie into the events being held at Kennesaw Mountain this weekend.   http://www.mariettacivilwar.com/

Tuesday, June 24, 2014

Honeyed Applesauce

Honeybee hard at work!
I always have such fond memories whenever making this old family recipe.  As kids, we would ride in the back end of an old 50's station wagon and make our pilgrimage to White House Fruit Farm so mom could get the bushels of apples in season for her "special sauce".  We would all help dad pick out the apples, carry the bushel baskets to the car, and for a twenty-five cent glass of cider promise to stay out of them on the car ride back. Dad would willingly hand over the cider knowing every bit that promises made when it came to fresh apples weren't our strong suit.

Once home, cleaning, coring, and peeling were a chore none of us kids minded and a simple sliver of apple here and there kept us all happy and out of trouble.  The smell of apples, cinnamon, and honey permeated the house for days.

Later in years, Rick and I would take our own boys up to Mercier Orchards in Blue Ridge to pass down a tradition as sacred as making the sauce itself.  They too would enjoy the ride sitting in the back end of our station wagon.   After an enjoyable day of gathering different types of apples for what is now entrusted to my care, we would sip some cider, grab some tasty snacks, and make the return drive home.  Seeing the boys sneak an apple or two from the visor mirror brought both a snicker and realization that the apple doesn't fall far from the tree.  No pun intended!

With the kids now grown and gone Rick and I still make our own pilgrimage to the orchards each year celebrating something constant in a life so full of change.  The kitchen is a little quieter and Van Morrison's soulful song, Tupelo Honey, softly plays while we cook.  While not his best album, the song is wonderful and somehow it has seemingly been deemed appropriate for the occasion!  One hopes as the boy's age they will find orchards rich in history with stories of their own and enjoy a tradition of gathering apples and making sauce with their families.  One hopes the glance in the rear-view mirror brings them a warm smile and the memory of how kind and gentle life can be.  One hopes...........  

Nothing beats local honey or farm fresh apples in season when making this recipe.  Macintosh apples paired with Clover, Tupelo, or Wildflower honey are among my favorite combinations to use.  I am so excited to try the recipe with some of the local honey from Rita, who is one of our Master Gardener's, as well as some from the hives of Mike and Sue at Green Meadows.  One hopes I can hang on to a few jars until the Macintosh are in season as well.  One hopes..........
Hives at Green Meadows!
INGREDIENTS:

9 - 10 medium Macintosh apples
1-cup honey (Tupelo, Clover, or Wildflower are wonderful choices)
4 tablespoons distilled white vinegar
½-teaspoon salt
½-teaspoon fresh ground cinnamon (optional)

DIRECTIONS:

In a 4 – 5 qt. saucepan, combine the honey, vinegar, salt, and cinnamon.  Mix well and heat on low.

Prepare all apples.  Wash, dry, core, and peel.  Cut the apples into wedges.  Add the apple wedges to the honey mixture as you prepare, making sure to have them completely coated.  This will keep them from browning.

Bring the honey mixture and the apples right to the point of a boil.  Stir frequently.  Once you have the mixture going good, reduce its heat to a lower temperature that just barely keeps it bubbling.  Set partially off the burner if necessary.

Cook down to a desired consistency, mashing the apples with a spoon as they become tender.  Stir frequently.  Usually takes about 30 minutes.

Top with an extra dash of fresh ground cinnamon and serve. Works amazingly well hot or cold.

Serves 6 - 8.  This recipe may easily be divided; however, the size of the saucepan should be reduced to a 3 qt. for the best results.  Freezes extremely well for making extra-large batches.

For those that like a little soulful music while you cook........................

https://www.youtube.com/watch?v=Eq3YLhtuzTQ - link to Van Morrison's Tupelo Honey released in the early 70's.

Happy Gardening,

Denise, Beds 25 & 29

Plants in Peat Pots

If you buy plants in peat pots there is one thing you should always make sure you do - bury the edge of the peat pot completely under the soil. When it is sticking up it acts like a wick and causes moisture to evaporate faster from the area surrounding your plant.

Myself, I like to totally remove the peat pot from the roots (gently to minimize damage to the roots) so I don't have to worry that the soil level will go down around the pot. I always put the peat pot remains under the mulch so it will decay and add organic matter to the soil.

Monday, June 23, 2014

Two Upcoming Vegetable Gardening Classes

Extension has two vegetable gardening classes coming up. One is this Wednesday and the other one is in July.  Pre-registration is required.

Try New Vegetables
  June 25  11:30 am to 12:30 pm
  North Cobb Senior Center
  Registration Required - 770-528-4070

Planning Fall Vegetable Garden
  July 24  6:30 to 8:00 pm
  Cobb County Extension Office
  Registration Required - 770-528-4070

As a bonus you can take a class on:

Smart Irrigation
  July 12  9:00 am to 12:00 pm
  Cobb County Extension Office
  Registration Required - 770-528-4070

Classes are free and taught by Extension staff and Master Gardeners. For more details go to
cobbextension.blogspot

updated 7:58 pm 6/23/2014

Saturday, June 21, 2014

Easy Strawberry Ice Cream

For the Ice Cream Social today, I made ice cream using strawberries I picked when I went to the Lcclstrawberry Farm in Rome with Mike last month.  This is a really easy ice cream recipe if you want to make a quick, no cook, egg free ice cream.

1 1/2 pints (3 cups) half and half

16 ounces of Sweetened Condensed Milk

1 1/2 to 2 cups strawberries, pureed or mashed (they can be fresh or frozen as long as they are in small bits)

1 Tablespoon Vanilla

Combine all ingredients and mix well.

Pour into ice cream canister and freeze according to your ice cream maker's directions.

Makes 1/2 gallon

To Make Vanilla instead of Strawberry:
Omit Strawberries
Increase half and half to 2 pints (4 cups)

Friday, June 13, 2014

Summer of 1864

JUNE

The Sounds of Battle drew closer and closer. Cannon Fire. Rifle and Musket Fire. Drums pounding out the beat. Feet thudding on the ground. Battle Yells. Screams.

Smoke and the stench of fighting filled the air.

Regardless of which side you were on, it was a horrific time.  It didn't matter if you were a civilian or a part of the military. It was pure hell.

Visualize Green Meadows Preserve and Community Garden as it is today. Then think back 150 years ago today - this area was a constant battlefield. All through the month of June, West Cobb County was a battlefield with thousands of Confederate and Union soldiers marching to and fro.

As the summer progressed, the war crept closer.

Military action
New Hope Church - May 25
Picketts Mill - May 27
Lost Mountain - June 5-9
Gilgal Church June 15 - 17
Mud Creek Line - June 17
Kennesaw Mtn - June 27


Picture a summer like this one in 2014. Lush foliage. Crops growing well. Rains coming every afternoon.

Then imagine what it looked like after the battles in 1864. Splintered and cut down trees. Torn up earth. Buildings destroyed to make fortifications. Gilgal Church was dismantled and used (as well as the pews)  to build fortifications by the Confederate Army.

As the crow flies, small battles and military actions weren't far from the Green Plantation marker in front of the house at Green Meadows Preserve.

Military Action at Gilgal Church (1.1 miles)
Due West Community (1.2 miles)
Battle of Gilgal Church (1.3 miles)
Mud Creek Line (1.6 miles)
Battle of Pine Knob (1.7 miles)
Darby Plantain  (.8 miles)
Main Confederate Battle Line (2 miles)

To visualize the movement of the various armies using current roads, zoom in to see all the Historical markers in Cobb County.

Visit Kennesaw Mountain National Battlefield Park between June 26 and June 29 to learn more about how the Civil War impacted the civilian population, medicine was practiced on the battlefield, hear music from the era and see demonstrations of cannons and rifles being fired. Kennesaw Mountain National Battlefield Park is having a huge series of events and programs (link to schedule)  commemorating the 150th Anniversary of the Battle of Kennesaw Mountain.

The City of Marietta is also having a variety of events all summer long as is the The Southern Museum of Civil War and Locomotive History.

All clipart images proved by Classroom Clipart. Photo provided by Victor Williams.

Saturday, June 7, 2014

2nd Annual Ice Cream Social - Saturday June 21st

Last year we had such a great time, we decided to make the Ice Cream Social a yearly event. Below are the details for our event this year.
 
When: Saturday, June 21, 2014
 
Time: 11:30 am to 1:30 pm
 
The concept is simple. Bring your frozen home made ice cream  to the garden with a label saying what kind it is. (And an ice chest to keep it cold until the end of the meal!)
 
We will happily supply hot dogs, buns, chips and water. If you want to bring a side dish to round out your hot dog and ice cream, please do.
 
Vote for your favorite flavor to find the best of the garden! Last year we had 10 flavors I think - yum yum.
 
Prizes to be awarded for Best Ice Cream and Most Unusual Ice Cream.


Tuesday, June 3, 2014

Black Gold - Your Compost at Work

Look what was under all the green compost in Bin #1 !  Rich black soil, roly-poly composters and microbes, then most likely worms under that!  This soil was moved to Bin #2 where partially composted material belongs to give it more time for the compost process to complete.  The next step (which could have been done today) is to screen the dirt through a coarse screen in the shed and send it to garden beds.  Thanks to all who've contributed to Bin #1 and SPECIAL KUDOS to those who chopped the waste material before tossing it in!  I wish I had a LEGO prize to give little Wayne who did just that today ... without even being told! 


Friday, May 30, 2014

Toasted Slaw & Cheese!

Hey Everyone,

Simple and Delicious!
I don't know if anyone has ever tried these but I found the recipe a few weeks back and it has been screaming fix me ever since!  Days have come and gone where the simplest of a toasted cheese sandwich has stuck with me as something I haven't had in a while.  As most Fridays go, I wanted something easy and fast and the fridge seemed to be barren of anything remotely resembling a left over meal.  Its time had come.

For ease in preparation, I did purchase a ready - made slaw mix and found the one Kroger's carries with the kale to have worked quite well.  Yes Rick, you did eat kale and loved it!  Nobody spill the beans on that one, our little secret!

Ingredients:

1 cup coleslaw mix per sandwich, no dressing.  The pre-packaged one with kale blended flavors quite well with the Havarti cheese.
Sprouts - Optional
1- 2 slices of Havarti cheese per sandwich
Sourdough bread - thick slices
Honey mustard
Margarine

Directions:

Mix together the slaw mix and sprouts if using.  I left the sprouts off as I didn't have any fresh in the jar and wasn't sure which ones would provide the best mix of flavor with the kale.

Spread margarine on the outside of sandwich slices.  Spread the opposite side with a light covering of honey mustard.  Place the slaw mixture on top of the honey mustard and top with Havarti cheese.

Skillet grilling on medium heat took about 2 - 2 1/2 minutes per side for the cheese to melt thoroughly and the butter to brown.

Dinner was delicious..........  Does anyone have some ideas what type of side dish would go well with this?

Happy Gardening,

Denise, Beds 25 & 29

Friday, May 23, 2014

YES! Steps and another Picnic Table!


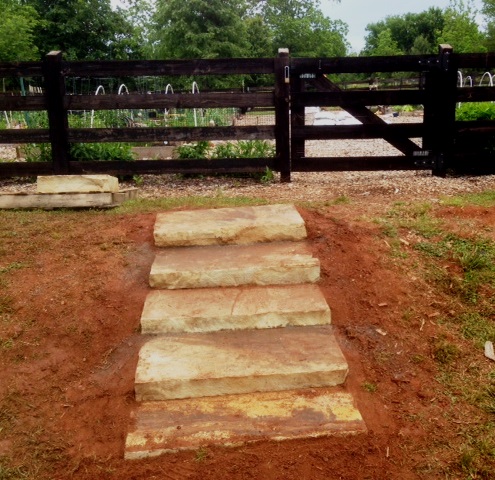
Last weekend Austin Flippo made our dream come true...we got a set of steps put in the terrace at the garden! We've been wishing, whining and wailing for ages and then they appeared.  Or at least that is how it may have appeared to anyone who wasn't at the May 17th workday.
 
Thanks very much goes to Austin Flippo for choosing us as his Eagle Scout Project and for all the hard workers in his Scout Troop. They did a great job! And thanks also to Rusty Simpson and John Purcell with Cobb County Parks, Recreation and Cultural Affairs for finding a way to make our dream come true.
 
Actually, the construction of the steps wasn't that easy as there was a lot of hard work to dig out the spots for the steps and then move those heavy slabs of stone into place. I truly love how the steps are so broad and easy to walk on - you don't have to worry about where to place your feet, even when carrying a basket. Even better, now we don't have to worry about tumbling down the hill when it is wet.

We had been wishing we had a second picnic table to give us more seating when we have events in the garden. Voila! Now we do. Luckily for us, they are positioned so one is in morning shade and the other in afternoon shade.  Good thing since summer is here.

I didn't watch how the table was made since I was busy doing work day tasks but it was amazing how fast it came together from just a pile of lumber to a finished product.

It made our workday end on a wonderful note.

Yes - the steps are off set from the gate on purpose.
They didn't want to accidentally puncture the water line.


Saturday, May 10, 2014

It's Tea Time!

Hey Everyone,

One of the best ways to enhance the growth of your plants while fostering long-term soil fertility is with the use of compost teas.  For organic gardeners, these teas are excellent tools for providing the bacterial nutrition that vegetables seem to love.  The beneficial microbes and organisms found in these teas also work hard as a first line of defense against many of the pathogens that can cause disease.  In addition, they work extremely well at keeping many pesky insects at bay.

There are several applications where compost and/or worm teas can be effective:

Both effective and inexpensive!
  • A seed treatment - Soaking seeds in a solution of compost tea prior to planting inoculates your seeds against harmful fungi and speeds the germination process. 
  • Transplant time - When the time comes to move plants up in pot size or transplant directly into the garden, this is a wonderful opportunity to use a compost tea solution.  The tea's not only provide a healthy dose of nutritious food but go a long way in preventing transplant shock as well as disease resistance, getting your plants off to a fast and healthy start.
  • Foliar applications - Whenever you need nutrition to plants in a hurry, a foliar application of tea gets the nutrition there immediately.  Foliar applications are also an excellent method for awakening your plants defense mechanisms early.
  • Root and/or soil drenches - Using compost teas as a root and/or soil drench promotes healthy plant development and growth as well as long-term soil fertility.  
  • Standard fertilization - Compost teas are wonderful as part of a standard fertilization practice. Routine applications not only keep plants healthy and happy but are also known to increase both flower and fruit production.  
For the home gardener, there are two simple methods for brewing compost tea with an aerated system providing the best quality brew.  For those who may be interested a link is below to a previous post with instructions on how to make the tea using both methods.  I also included a link to One Yard Revolution that has an informative video on making the tea with worm castings and using it appropriately.

My Favorite Recipes for Simple 5-Gallon Bucket Brew's
Worm Based -
  • 5 gallons de-chlorinated or rain water
  • 2 1/2 - 3 cups quality worm castings
  • 1 - 2 oz. Grandma's Original All Natural Unsulphured Molasses
Compost Based -
  • 5 gallons de-chlorinated or rain water
  • Good quality compost - Biodynamic Blends such as Malibu Compost or Farmer D Compost are incredible for the garden and provide increased production.  Biodynamic blends also provide some systemic insect resistance due to their ingredients.  It is also possible to use things as simple as Black Kow Composted Cow Manure and make additions depending on your specific needs.
  • 1 - 2 oz. Grandma's Original All Natural Unsulphured Molasses
  • Extra additions of worm castings, liquid fish, seaweed, or kelp depending on application and foliar manipulation desired.

Green Meadows Healthy Garden Tip:

For compost teas to be effective, it is important to cover at least 70% of all plant surfaces. The pores or tiny openings on the leaves (mainly the underside) and stems called stomata act as a catalyst for the uptake of nutrients as well as aid in photosynthesis and transpiration.  When the temperatures reach 80 degrees, the stomata start to close and at temperatures above 85 degrees, they close completely as part of a defense mechanism to prevent moisture loss within the plant.  Therefore, by using teas in either the morning or early evening and making sure to coat the undersides of all vegetation, your plants will get the most value from the application.   Please keep in mind that compost and/or worm teas are not a substitute for good soil fertility practices but rather a partner in the process of keeping your vegetables healthy and productive.
Yummy!

For those who enjoy additional reading, the book "Teaming with Microbes" by Jeff Lowenfels & Wayne Lewis has excellent information on compost teas and their use.  The National Sustainable Agriculture Information Service also has some reading that is interesting on teas at the agricultural level.  This information is easily applicable to home garden practices. Their links are excellent and also below for your convenience.


Links:

http://greenmeadowscommunitygarden.blogspot.com/2013/04/making-worm-tea.html - link to previous post on making worm tea

http://www.youtube.com/watch?v=_4VKLtDuzD8 - link to One Yard Revolution's video on making worm tea and using it appropriately 

https://attra.ncat.org/attra-pub/viewhtml.php?id=125 - link to "Notes on Compost Teas" from the National Sustainable Agriculture Information Service

https://attra.ncat.org/attra-pub/viewhtml.php?id=286 - link to "Foliar Fertilization" from the National Sustainable Agriculture Information Service

Happy Gardening,

Denise, Beds 25 & 29

Wednesday, May 7, 2014

Maybe, possibly your Fig Tree is still alive

This winter was disastrously cold and one plant that is still showing signs of it are fig trees My neighbor has a huge fig tree that is taller than my (and his) 2 story house and it has JUST this week decided to attempt to leaf out. It will be interesting to see how much of it does leaf out.

Notice how sparse the leaves are so far. A couple here and there. I'm
wondering if the light colored branches are in fact dead as a door nail.

This morning my friend Rita emailed me telling me the status of  her two figs. Her fig trees are only 1 year old and therefore more twiggy than big like my neighbors tree.  One shows signs of leafing out and the other is still..... waiting.....  thinking.... maybe..... going to leaf out.

Walter Reeves was asked about figs being slow to leaf out this year in his column in the Atlanta Journal Constitution several weeks ago. His reply was - wait until the end of May to see if the figs really are going to come back or not. There was also a post about figs not leafing out on the Cobb County Extension Blog  Figs Slow to Leaf Out?  It has links to various publications and websites that talk about figs in Georgia and the southeast.

It will definitely be interesting to see what DOES happen with the figs this year. The next questions are - Is there even going to be any fruit if they do leaf out? And the 2nd question is -how much of the plant will leaf out?