Showing posts with label pest control. Show all posts

Saturday, July 26, 2014

Is it time to say UNCLE?

Does it seem like you just can't get ahead of a particular bug or disease problem? Sometimes you just have to bite the bullet, Say UNCLE!  and start over.

Boo hoo...the tomatoes are goners.
It is hard to call it quits on plants you've spent so much time and effort taking care of - all that watering, fertilizing, spraying etc. It doesn't seem right to just give up and rip them out.

But to prevent residual disease and insect problems as well as interrupt the disease/bug cycle, sometimes you just have to bite the bullet, say UNCLE and rip out some of your plants.

In the home garden it is much easier to put off crying uncle because what you do only affects yourself. In a Community Garden what you do (or don't do) affects everyone else and their success.

There are many reasons why your plants are looking sad and pitiful - weather (too hot, too cold, too wet, too dry), lack of disease resistance in your plants, heavy insect attack, lack of fertilization, not spraying to knock back disease and bugs.

To help you decide, realistically, whether your plants have a chance if you step up and give them a bunch of TLC, ask yourself these questions:

1) How infested/diseased/damaged are my plants.
         If they are over halfway gone with disease and the season is almost over, rip them out.

         How many insect pests are on your plants - look for adults, larva and eggs. Tons? Do you really want to get into the game of coming out every single day and pulling them all off and looking on the backs of every single leaf every single day?

2) What is the weather going to be like for the next 2 weeks? Are you going to be able to spray and have it stick? Or will you be constantly re-spraying.

3) How long before you would most likely be ripping out that plant and working on the soil for the next season's crops?

4) Realistically, how much time do I have and how much effort do I want to expend to fight off whatever my plants problem is.

Think about the Kenny Rogers song  "The Gambler"
                             Know when to fold 'em
                             Know when to walk away

And in Gardener words, when to rip them out and plant again....                        

 You want to be Proactive instead of reactive!
Depending on what your problem was, there are some easy changes that should make your next planting more successful.

Spacing - putting fewer plants in so you have better airflow and access to all parts of the plants. This way when you spray for disease, the spray gets to all parts of the plant, not just the outside and top of your mass of plants.

 June 19, 2012. The tomatoes eventually took over
 half the bed. Way too thick!
Proper spacing means you can also reach all parts of the plant to check for insect pests and can reach and kill those pests. 

Defending against disease and insects - treating for bugs or disease is not a one shot thing. You have to constantly watch, check and retreat with the proper spray when necessary. You need to be able to come out and check on your plants every 2 to 3 days. It is amazing how fast a problem will zoom out of control in just 3 days.

In a community garden you will have more disease and bug problems to contend with versus in a home garden.  More plants, more opportunities. Therefore you have to continually "defend/protect" your plants.

Reduced airflow creates a perfect climate for disease to flourish. It also prevents fungal sprays from getting to all parts and surfaces of a the plant.

If you grow a solid block of tomatoes, beans, cucumbers, etc you can get the outer edges easily but not the middle. When you have a solid mass of plants there is no way you can see inside to check and remove bugs/eggs  so again you get behind.

Increase Airflow -
Remove leaves repeatedly to increase airflow and ability to take care of plants.  You don't have to denude the plant, just thin some of the leaves out from time to time.

There were 5 tomatoes planted in this bed on April29, 2012.
They became a HUGE mass of diseased vegetation by the
end of July 2012. No airflow
Make a garden plan - you don't have to stick to it but if you make a plan it does increase your chances of success. Spending 5, 10 or 15 minutes at the beginning of EACH planting season, planning out where your plants are going will actually save you hours of work in the long run.

 Plant only half your bed in plants with heavy foliage so you can get to all sides. Just by reconfiguring your plantings you will increase your success greatly.
 
Remembering to think about each plants full, mature size makes a world of difference!

Vicki - Bed 41

Wednesday, July 2, 2014

Disease and Insect Control, Part 2

Do not use a glass where
small children will have
access to it.!!
There are several important things to remember when using chemicals.

READ THE LABEL! Use ONLY as much as you need. More is not better.

Use dedicated measuring containers/utensils.

Use proper personal protection - at a bare minimum, use disposable gloves!

Avoid standing where the chemical will drift onto you or you will inhale it with every breath.  If you have a windsock, watch what direction the wind is blowing. Windsock and when to spray

Wash your skin with soap and water when you are finished.

Below is the instruction sheet we use for mixing and using chemicals at the Community Garden.

***********************************************************

Procedure and Directions on how much to mix and spray

Caution: Do not spray if rain is expected within 4 hours. Spraying without having time for the chemical to bond with the leaves means you have to respray. AzaMax stays on better than Actinovate or Serenade as they are water soluble. If it only rains a little bit you are fine. 5 days of rain or a down pour means you should respray for continued protection.  Also water your plants BEFORE spraying any chemicals.

You can combine the pesticide ( Azamax) with1 fungicide (Actinovate  or  Serenade) so that you spray for bugs and disease at the same time. Only use both chemicals if you need both. If you only need one (fungicide or pesticide), only use the one chemical.

Spray every 7 to 10 days depending on how much rain we have and what kind of problems you are having.
                                                       ****************

AzaMax (pesticide to use on plants):
               bean beetles, cucumber beetles, squash bugs, etc.
  Shake concentrate container before measuring out

1/2 gallon - use 1 1/2 teaspoons of concentrate
1 Quart    - use 3/4th  teaspoon of concentrate
  if you can't beat back the bugs, ask about what amount to increase to
                                                                             
Actinovate (fungicide for fungus/disease control for plants)
             powdery mildew, tomato blight, viruses, curly top, etc
1/2 gallon - use  1/2 teaspoon of powdered concentrate
1 quart     - use  1/4 teaspoon of powdered concentrate
   if disease pressure is  high, ask about what amount to use

Serenade ( another fungicide chemical for fungus/disease control for plants)
            powdery mildew, tomato blight, viruses, curly top, etc
Shake concentrate container before measuring out

1/2 gallon - use 2 ounces of concentrate        
1 quart     - use 1 ounce of concentrate
   if disease pressure is high, ask about what amount to use
                                                                 
WEAR GLOVES!! Even when mixing the chemical. Definitely while spraying.

Watch the windsock when spraying to make sure you are upwind from the chemical you are spraying.

Put water in the container and then add the concentrate. Make sure it gets completely mixed/dissolved before using.

Shake very well to mix.

Then pour your chemical solution in one of the half gallon sprayers but only up to the round indented spots towards the top of the sprayer. If you go above those indentions, when you put the sprayer in, the chemical will overflow.

Tighten sprayer and pump to create pressure.  (If pressure doesn’t build, try tightening the sprayer in the bottle again). Test to see if you need to adjust the nozzle before spraying your plants. You want a spray, not a stream.

Once you are finished spraying your plants, you need to empty and rinse out everything you used. Sprayer, mixing bottle/jug, measuring spoons and/or measuring cup.  Be sure to pump clean water through the sprayer to clean out that part as well as the sprayer bottle.

Return everything to the proper shelf in the shed so the next person can find everything.

Thanks! 

Vicki - Bed 41

Disease and Insect Control, Part 1

The one thing I hate about vegetable gardening in Georgia is fighting disease and bugs in the summer. If you are growing your vegetables at home, you won't have nearly the disease and bug pressure that we do at the Community Garden.

If you use the proper chemical at the correct time and use the correct amount you will increase your success.

Of course, you will have even better success if you use IPM (Integrated Pest Management) techniques. Healthy soil. Healthy plants  Watch for bugs. Hand pick bugs when there are only a few. When the numbers get too high, then use the correct pesticide but not too much.

At the Community garden, we have an organic garden and use Serenade or Actinovate for plant diseases and AzaMax for our pesticide. All these products can be ordered through Amazon. Early in the season the prices are much better than during peak demand times.  Pike's does carry a small bottle of Serenade that is premixed and ready to spray. This is economical if you have a small garden or while your plants are small. If you have a large garden, it is more economical to get the large bottle of concentrate.

The sprayer we use is a Flo Master from Home Depot. It holds
a half gallon of mixed chemical and is easy to use.
 As for disease in the garden...well....it is easy for it to spread like wildfire so a good offense is an excellent defense. With as much rain as we've been having, conditions are ripe for all the different blights that affect tomatoes as well as powdery mildew attacking the cucumbers and squashes.

Since the chemicals we use are water soluble,  they wash off after frequent rains or if the rain was especially heavy. The AzaMax does stay a bit longer than the Serenade and Actinovate. Generally, spraying every 7 to 10 days is the recommended time frame. But if you spray on Day 1 and it then rains for 5 days straight, you should spray again as all your chemical has washed off.

Part Two will have the  mixing instructions that we use at the garden.

Vicki - Bed 41

Thursday, February 20, 2014

What is Sifting the Soil?

A number of gardeners have asked "What do you mean when you say sifting when you talk about soil rejuvenation.

Cheryle ready to sift the soil in her bed
That is really a good question and it isn't necessarily obvious. Sift? You sift flour and sugar together when making a cake to lighten the texture but how does that work with soil rejuvenation and bed preparation.

 In the garden we use a huge wheelbarrow as our "bowl" and have a piece of hardware cloth nailed into a wooden frame as our "sifter". Place the frame over the wheelbarrow, shovel dirt on top of it and then move the dirt around with your hands.

Sifting removes lovely critters like these grubs (Yuck).  Grubs are really bad critters to have in your vegetable bed since they eat the roots of your tender seedlings. The other bad bugs you want to look for are wireworms and centipedes.

Wireworms eat into root vegetables which spoils them and centipedes eat tiny earthworms. You want earthworms in your garden bed because they are beneficial to your soil structure. The earthworms aerate and leave behind worm castings which is highly desirable.

The other reason you sift the soil is to remove rocks and sticks as well as make the soil "fluffy". If you are trying to grow carrots the lighter and fluffier the soil the better. Also, if a carrot hits a rock or stick, it has to grow around or over it and you end up with carrots that aren't straight and perfect.

The good news is that once you sift your bed to remove "stuff" you don't have to sift it again unless you add amendments that have large bits of "stuff" in them.

Vicki

Saturday, June 29, 2013

Mosquitoes and Taxes

This year the first mosquito bit me on April 15th. Kind of appropriate I thought since both are vexing issues.

All the rain we've had this year has been good - it means we haven't had to water in the garden as much and all the veggies are doing exceptionally well.

But all this rain is also bad because it is really hard to keep up with dumping out all the rain water that accumulates in anything that will hold water. We don't have too many places in the garden that collects water but there are a few so we still have to be pretty diligent about it  After all, mosquitoes only need a teaspoon of water to lay eggs, hatch and grow to maturity.

Don't forget to keep checking your slug and snail traps - if they aren't refreshed or emptied constantly they can end up raising a crop of mosquitoes instead!  (see picture to the left - oops!) Warm weather makes mosquitoes breed faster because there is nothing to slow down their life cycle.

There are two easy ways of combating mosquitoes. Do mosquito patrol after every rain and try to tip over everything that has caught rain water. (If possible, try not to have anything that does catch rain water. Or at least minimize what does catche rain water.)

Use mosquito dunks to prevent mosquitoes. These work really well to kill any larva present and prevent more larva from hatching.  The dunks are non-toxic to birds, fish, frogs, cats and dogs.  If you have spots that are hard to get to or you catch rain water to reuse when it is dry, just put some of the mosquito dunk in there and voila, your problem goes away. You just have to check every few weeks to see if you need to add more mosquito dunk pieces.

Usually you only have to add pieces every 30 days but because we have had so much rain (6.5 inches since June 1st), it is washing out my mosquito dunk crumbles that I had put in the saucers under my pots with plants.

You do NOT have to put dunks in birdbaths unless you never empty or clean them out. If you are keeping clean water in your birdbath you will never have a problem. If you don't do anything with your birdbath for a week then you will end up with mosquito larva in it.

Mosquito dunks can be found at Home Depot and Lowe's in the insecticide for homes area. At the Lowe's on Dallas Hwy it is found on the same aisle as bird feeders and birdseed.

Thursday, June 27, 2013

Another bad bug to destroy - Leaf-Footed Bug


Today's bad bug to watch for - leaf-footed bug. This particular species is Leptoglossus phyllopus. There aren't high numbers in the garden yet but they are showing up.

If you look at the lower part of his leg there is a big flat/winged spot which looks like a leaf (which is where the common name comes from.) In large numbers they can do a lot of damage just like squash bugs. Unfortunately, leaf-footed bugs aren't specialists like squash bugs and they will feed on tomatoes, bell peppers, egg plant, beans, cucumbers, and squash. They also like blackberry, apple, pears and pecans.

Leaf-footed bugs pierce plant tissue and fruits with their proboscis and suck the juices out. Unfortunately, their saliva injects toxins which do even more damage. And even more unfortunately, these openings create a pathway for secondary pathogens to enter and cause further damage to the fruit and/or plant.

We won't be able to control them on the blackberry bushes or pecan trees but we can control them in the garden. The best thing to do is hand remove them and squish them if you see them to prevent more eggs being laid. Consistent use of an approved insecticide (as in approved for our community garden) will help to control the nymphs and adults.

For more information and to see various stages of their life cycle -Leaf-footed bugs

Tuesday, June 25, 2013

Mexican Bean Beetles

For some reason I thought all lady bugs were good bugs. Unfortunately, there are a few lady bugs that are very destructive to plants. One of them is the Mexican Bean Beetle.  The adult is a yellow to copper color and has 16 black spots on it.  In the garden right now I have found the larva feeding on leaves but not the adult or the eggs even though I know they are there since I've found the larva. So here are two links to show what those forms look like.

This links shows the adult, larva and pupa stages of Mexican Bean Beetles. This link shows eggs through adult stages of development for the Mexican Bean Beetle.

Good lady bug larva
     You really DO want larva that looks like this in your bed! They look mean and fierce but they are not harmful to humans, only other insects. This lady bug larva is a very beneficial predator since it eats aphids and other bad bugs. You need to be careful not to spray pesticides on them because you don't want to kill them.

Good lady bug larva

Bad lady bug larva ie Mexican Bean Beetle
When the leaves of your beans start getting spots that are skeletonized, look on the undersides of the leaves for what is eating them. Just as with the squash bugs, you need to look on the undersides of all the leaves to find and remove the the bad critters.

Bean leaves that have been eaten
 
More than likely you will find a larval form that looks like this (see picture below). They don't sting which means you can just pick them off by hand if you don't have too many. Be sure and take them home and throw them in the trash at home. Or if you enjoy squishing them, do it on a hard surface.

Just as an FYI.....squishing bugs in loose mulch doesn't always kill them. There is too much give in the mulch. You really need a solid hard surface like a rock or a piece of wood.
Mexican bean beetle larva

If you have a bad infestation you need to be very diligent about spraying insecticidal soap, Azamax or Neem oil on them. Be sure to get the undersides of every leaf and spray way down into the plant so every surface is coated. Even then you will have to pay close attention to keep them under control because it is very hard to get an entire stand of beans sprayed properly.

Friday, June 21, 2013

Squash Bug Life Cycle

Squash bugs unfortunately are one of our biggest pests at the garden. For some reason we have been afflicted with them in great numbers ever since the garden first started. Squash bugs are bad because they spread disease from one squash plant to the other and they also reduce the productivity of the squash plant.

It is easy to see the adults but not so easy to see the nymphs when they hatch out.  You have to really examine all your squash plants (leaves, stalks, base of the plant) on a very regular basis to control them. Usually the eggs are found on the undersides of the leaves however in one bed the eggs were found on top of and underneath the leaves.

Look for the adults and  nymphs down in the base of the plants, along stems and the undersides of leaves. If you hand pick (and kill) every adult you see, you won't have nearly as many eggs to remove. And if you remove the eggs as soon as you see them, you won't have any nymphs to deal with either.

Spraying with Azamax will help but you have to be careful not to spray any beneficial insects and to spray at the correct time of day as well as when it isn't windy.

Here is a very handsome specimen, lurking, waiting to find a mate.

Ah ha....several squash bugs have found significant others and are now mating
 
Squash bug eggs are really gorgeous however every one of these eggs will become a pest. All of these need to be removed. The best way to do it is to just cut off the piece of leaf and then take it home to put in the trash. If you just drop the eggs on the ground, throw it in the compost pile or in the woods, the eggs will STILL hatch out!

These eggs are very close to hatching. Notice they have
 turned very translucent and some are almost white.
 
Baby squash bugs that have just hatched out. Soon
they will be adults looking for mates.

Tuesday, May 28, 2013

Why have a windsock?

Besides being fun and pretty, our windsock does have a purpose. I don't know about you, but I like to know which way the wind is blowing before  I start to spray Azamax, compost/worm tea, Actinovate, fishy stuff or mist my plants with the hose.

Spraying in a gale force wind means you end up spraying your neighbors plants instead of yours. Now it is easy to stay up wind just by keeping an eye on the windsock!

Way too windy to spray anything! Even watering with the hose
will get you wet.
Starting to get better but still too windy.


Much better! Anything sprayed will
go on the plants now.

Saturday, May 25, 2013

Serious Squirrel Defense Structures!

Yes....squirrel defense structures are popping up left and right!

If you are lucky, they only dig deep holes that dry out the ground and cover up the plants like in this bed. If you are unlucky...you lose the plants like I've lost a number of carrots in one corner of my bed.

There is no way the sunflowers will survive if we didn't create a structure to keep the squirrels from digging in the bed. They've already destroyed the one sunflower plant we had! This will also protect the seeds and seedlings from the birds as well.

I ramped up my squirrel repelling cage because I didn't want them to destroy my newly planted tomatoes or tear up my lettuce and carrots while I'm gone. Once I'm back I'll put the cages on the tomatoes themselves and figure out exactly how I'm going to protect everything until the plants are bigger.


Thursday, May 2, 2013

Magnifiers to the rescue

 
Sometimes you just need a little extra help to see those pesky spider mites, insect eggs, or to determine, yes those are black aphids in my spinach, not just dirt splashed up from the ground.
 
We now have two small magnifying glasses in a green box in the shed that you can use. And they are right above the yellow sticky traps that you can also use to help monitor if you are developing pest problems in your bed.
 
 
If you don't have a trellis or a metal stake in your bed, just get a stick that has a twig sticking out and you can attach your yellow sticky trap to the twig. (But don't forget to actually push the stick in the ground in your bed!) Lou and Ryan have done that and it seems to be working out just fine for them.

Tuesday, March 26, 2013

Prepping the Garden Beds for Spring!

Hey Everyone,

Isn't this an exciting time of year?  I stand and stare at my little 4 x 8 field of dreams with such anticipation of all the wonderful plants and produce to come.  The last of the carrots have been pulled, the dreaded grub search (Yuk) performed, and I am well on my way preparing for a good old-fashioned spring sow down.

Many have asked why is it so important to check for grubs and for better details on how to revitalize their soil for planting, so I thought it would make an excellent post.  If you look back to the post, "When is it Warm Enough to Plant", I have some details for you there as well.
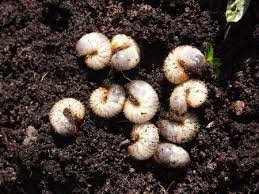
Grubs - feed on the roots of plants in the soil.
Beetles that hatch commonly feed
on the foliage or fruit.
Grubs are known to attract raccoon's.

The main reason to check your soil thoroughly is not just for the grubs, but to assist in promoting a healthy organic garden.  In a garden of this size we will be faced with many a pest and that is why it is so imperative to be preemptive.  We will have two choices, deal with pests now and reduce their numbers, or deal with even more of them later.  Decreasing their numbers and interrupting their life cycles, as best we can, is a proactive approach that will serve us very well down the road.  It will also assist us in growing healthier plants with increased vigor, better disease resistance, and greater yields.

Soil Centipede - While these guys will
feed on the larvae of other insects,
they are especially fond of earthworms.
The soil in your bed can potentially harbor many undesirable pests. Several will either feed on the roots of your plants (decreasing their vigor and potentially killing) while others will hatch and do their damage above ground to foliage and fruit.  Many will also spread disease throughout the garden.  I was surprised to find bugs in my bed that are actually very dangerous to young earthworms.  These
little guys to the right had to go!

In prepping Bed 29 for spring sowing, I felt fortunate not to be loaded with grubs as many have found.  However, in thoroughly checking
the soil, I did find several undesirable pests that had the potential to damage many root crops and other young seedlings.  
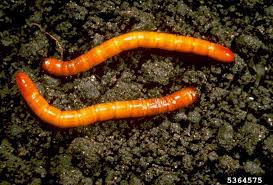
Wireworms- damage the roots of herbs and feed on
potatoes, onions, beets, carrots, and the like.
Can feed for several years.

Aside from the grubs, each of the photos in this post represent what was found and the potential damage it can cause.   I put liquid soap in a five-gallon bucket, added about 3 inches of water, and proceeded to drown to kill all the undesirables.  The total findings were a wealth of earthworms at every stage of growth, including egg cases, four soil centipedes, several wireworms, three carrot beetles, a half dozen carrot rust fly larvae, and a partridge in a pear tree.  Okay, I just wanted to make sure you were still reading.

The only disappointing action I took was to drown several of the earthworm egg cases.  I have not seen these before and followed my instinct to get the undesirables out of the soil.  After running across one hatching, well let's just say, my badness!  You know what they say about those garden lessons learned, that was definitely one of them.  Next time, I will take the unfamiliar egg cases home and identify them first.
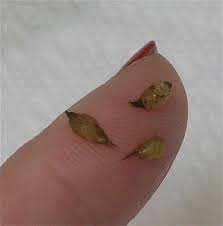
Earthworm Egg Cases - so disappointed
 in my actions!   Hopefully this photo
will keep someone else from making
 the same mistake!

As far as revitalizing the soil, you will notice that everyone has a special recipe, and in time you will find what works the best for you. Mike and Sue of beds 30 & 51 have a wonderful philosophy of feeding the soil and treating the plants if any problems arise.  Jim of beds 34 & 35 has a recipe that requires very little additional fertilization.

I follow this practice both here and at home.  Most often, I will remove a small amount of soil that will be used elsewhere for fill dirt or for tilling into new planting beds (non-vegetable).  Next, a complete and thorough search is done for everything detrimental needing removed. This allows an excellent opportunity to learn from what is in the soil and anticipate what measures to take early on for a more proactive and preventive approach to pests.  Imagine planting carrot seed with rust fly larvae left in the soil.  Now that those are removed, dusting with a little wood ash at planting, inter-cropping with some green garlic or radishes, and using a yellow sticky trap should work at keeping those pests at bay.
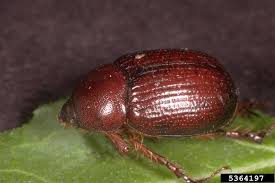
 
Carrot Beetle - form from grubs.  Adults feed on
beets, carrots, corn, parsnips, potatoes,
sunflowers, and sweet potatoes.  Can cause
serious damage to all small seedlings.
The addition of organic matter is next.  It is important to add several types of organic matter into the soil as each will possess different beneficial bacteria and food that create the environment of success for your plants.  Bed 29 was home to several Brassica's this past season, which are very good at depleting the soil of nutrients.  To maintain a high fertility, one bag of Jungle Growth Professional, one bag of Composted Cow Manure, two bags of Mushroom Compost, four cups of dried Pelletized Garden Compost, fifteen cups of coffee grounds, and a dozen or so biodegradable filters, cut into small pieces, were all added.  The coffee filters and coffee grounds are used to feed the worms that are now becoming active as the soil warms.  I also am going to add some of the black gold delivered to the garden as well in specific areas to see how it performs.  Do I need to add all this?  That would be a question for the Master Gardener's; however, this is my recipe that brings me great success.  These amendments are all worked well into the soil until I have a nice loam and consistency for planting.  If my soil isn't crumbly or loamy enough, I will then add some vermiculite to improve its texture.  Some people use peat for this process, however, that can have an effect on your soil's ph, resulting in the need for a lime application.

Carrot Rust Fly Larvae - laid by the carrot rust fly.  Starts
out as a small brown colored pupa, hatches into a
yellowish-white maggot and then feeds on the
roots of carrots, celery, parsley, and dill.
Lastly, is addressing the needs of fertilization.  Once your bed is revitalized with organic matter, you need to make sure food will be available for young plants and seedlings.  Vicki had some excellent information on this at her last class.  Whatever type of fertilizer you choose to utilize, scratch it into the top six inches of your bed before seeding or planting for the best results. Chemical based fertilizers can be appealing based on the claims touted.  And yes, you can get impressive results.  For me the choice is always an organic one. That is just my preference.  I am trying to eat cleaner, if that makes any sense at all.  I like the EB Stone products from Pike's as a starter fertilizer.  However, I will tell you that if you are new to gardening, do not have a soil test, or know how your soil performs, it is best to start with a 10-10-10 fertilizer, and then use something more organic for side-dressing after that.

Much like my soil, I have my own little fertilizer recipe as well.  I use the recommended EB Stone rate on the box for a starter, adjusted for the square footage of my bed.  I then add two products I have much success with.  One is Actino-Iron, the other is Azomite.  I utilize these sparingly and only on beds that have seen several seasons of growth or when I start to notice a decline in yield.  Lastly, are the worm castings for water retention.  One half cup of these goes into each planting hole to retain water for release at night when the plants are recovering from the heat of the day.  After plants are up and flourishing for about 6 weeks, I side-dress with chicken manure and pelletized garden compost every 15th and 30th like clockwork.  I love Vicki's example of making a deposit.  I make a deposit into my garden twice a month, so the produce will be there when I want to make the withdrawal.  I use the monthly rate and break it down to a bi-monthly schedule, as my plants seem to flourish that way.  I keep all side-dressings 6 inches out from any stems to prevent burning.

Newly hatched earthworms (European nightcrawlers)
Newly hatched earthworms will be small and most
often white in appearance.  Many say
they resemble apiece of string. 
Much attention is focused on the soil, its structure, drainage, organic matter, and fertility. I can't tell you if what I do is right or wrong. What I can tell you is in time you will find what works well for you and it will become your "go to" garden prep each season.  I hope this helps our new gardeners prepare their beds for spring and maybe others could post their recipes to share.  This would be a wonderful way for us all to learn from each other.

As we all prepare for spring, may the grubs in your bed be few, your soil be enriched with fertility, and the harvest you reap full of bounty!


Happy Gardening,

Denise, Beds 25 & 29

Thursday, February 28, 2013

Count the Grubs

If you are thinking maybe you are going to skip turning the soil in your bed before you plant this spring, think again! As the two pictures demonstrate, you really SHOULD turn your soil to look for grubs.  Rita completely turned the soil in one bed during the workday and this is what she found.

 All these grubs came out of one bed!
How many grubs can you see in here?
(Don't count the brown mealworms.)
 

A close up of the grubs. Noticed they range in size
 from big fat ones to small white ones.

Sunday, February 24, 2013

Bad Grub Kit

No...we aren't giving out bad grubs. Instead I'll show you my favorite Catch A Bad Grub/Bug method.

What you Need:
1 pair of hands
1 or 2 newspaper bags (or gloves if they are handy)
1 plastic container with a lid
Some bad critters

Put the newspaper bag on one or both of your hands
if you can't stand to touch the bad critters.

Reach for the critter you don't like

Put the bad critter in the container that has a lid

Put a lid on the container so the critter doesn't
escape when you aren't looking

Take the critters home and freeze them to kill them. Or put them in a blue bird feeder so the birds will eat them. I personally like the bluebird feeder by the birdbath because more birds go to it and the bugs get eaten faster.
 
Just keep an empty container stuffed with several empty newspaper bags in your "go the garden" work bag and you'll never find you don't have something to pick the bad critters up with. Or worse yet, let them escape you after you picked them up.

Saturday, February 23, 2013

Grubs in the Garden

Dalita has been thoroughly turning, amending and refreshing her garden bed to prepare it for spring planting. She has found quite a few grubs like the ones in this picture. I know it is easier to just fluff a little and then plant the new plants but these are undesirable grubs and need to come out.

There are two ways you can fluff your bed - with a shovel or digging fork while the dirt/soil stays in the bed or by putting a tarp down and taking all the soil out and then putting it back in.

While you are fluffing your soil, be sure and watch for all the pecans the squirrels planted this fall. If you don't remove the pecans now, you'll be removing baby pecan trees all spring and summer.

The BEST way to remove the grubs is by hand picking. If you use Sevin you will kill all your good bugs and critters like the earthworms which have hopefully started moving into your bed. Sevin is not organic at all and kills everything.

                  Thanks Dalita for sending me this picture to share with everyone.

Monday, February 18, 2013

Yellow Sticky Traps are in!

Mike and Denise have yellow sticky traps set up in their beds already. The traps help you monitor what pests are prevalent. In other words,  they give you an early heads up that you are about to have a problem before it becomes a huge problem.

Denise has found all kinds of interesting critters stuck in hers. There is a great insect book in the shed in the book box that will help you ID what you have caught.

How do you use them you say?
  You need:
   1 yellow Sticky Trap
   1 Binder Clip
   1 twistie, zip tie or cable tie to run through the top of the binder clip and then tie to your plant stake.
   1 plant stake to clip the sticky trap to.
    You can get small plant stakes from Lowe's, Home Depot, etc. to clip them to. (To find them, just look in the garden department in the trellis area). Or use whatever you have handy at home or is already in your bed at the garden.
  Per Denise, you want the trap to hang slightly above the leaves of the plants but not where it can catch the leaves if the wind blows. She also says that as the plants grow, you will need to move the sticky trap higher so it is above the leaves again.

Go in the shed and look for the box that says "Yellow Sticky Traps".

Open the box and find the open package of sticky traps.
Pull out one trap and one binder clip. 

Each side of the sticky trap has a slick white
 paper covering the sticky bits.

But before you pull both sticky bits off, attach the
 binder clip to the end that isn't sticky.
 
It would have been much easier to use a twistie to tie the binder
 clip to the plant stake because my first try caused the
 sticky trap to fall out and get dirt on it
 
 Words of Warning: 
Once you have your stake in place, clip the sticky trap to it.
THEN pull the white paper off both sides.
 
Failure to do that means you most likely will have the sticky trap stuck to something you don't want it to. See above where I got dirt in it.
 
Second word of warning - put the trap in a location you are not likely to lean into. It is a bear getting the sticky stuff out of your hair! (Yes, I've done that too.)
 

Monday, February 4, 2013

Garden Damage after the Freeze

The Good News - the freezing weather is over.
Even better news - we now have 10 days of warm weather.

The Bad News - the freezing weather is over
Worse news - we now have 10 days of warm weather.

Warmer weather is a mixed blessing for plants at this time of year. It gives them time to recover from the cold weather but because it is going to be warm for 10 straight days, we are going to have a huge outbreak of pests (aphids and sucking/chewing critters) and fungal disease outbreaks.

Everyone needs to come out to the garden and check their beds for damaged leaves and killed or melted plants because of the cold weather. Leaving damaged vegetation in your beds creates the perfect climate for disease and bugs to proliferate.  As you can see from the pictures there are a lot of "melted" out plants because the lows were so low.

Removing all damaged plant material now is essential!

Dead plant material just creates hiding places for insects and disease in your bed. If you wait to remove the dead plant material until just before you plant, there will be bad critters lying in wait to attack your newly planted veggies.
Be sure and inspect all your plants closely for eggs and aphid nymphs. Just before the deluge last week, I saw I had some but the rain washed all the azamax off that I had sprayed. I've since resprayed but I still need to keep an eye on the situation because it will be warm so long.

Luckily, I  don't have any cold damage on my plants. However, the frost cover trapped all the rain and high humidity inside so now I have a lot of damage to my Swiss Chard leaves. This week all the damaged leaves need to be removed and the plants that look more dead than alive need to be pulled out.

Next year I think I'll plant my Swiss chard so it will be outside the cover since the majority of the Swiss chard grown in the open is doing very well. My carrots and spinach are thriving under the cover but the Swiss chard, not so much.

               VickiBed41