Looking at the long range (10 day forecast) there is going to be a serious dip in the temperatures next week.
If anyone is looking for Frost Cloth/Blanket material, the Pike's on Barrett Parkway (near the Lowe's/Home Depot) still had two rolls of the material on Sunday morning. If you want to call before you go - 770-423-1650.

Green Meadows Community Garden
Tuesday, January 15, 2013
Monday, January 14, 2013
Make Your Own Seed Tape

Seed tape picture
from Pine Tree Seeds
If you want to go the really cheap route and make your own without buying anything special - here is a link to do that from the Instructables website. Be sure to read the comment section as there are many good hints to increase your success. It might be worth trying with some carrot or raddish seeds. Make-Your-Own-Seed-Tapes

Items need to make a seed tape using the Instructables tutorial
The Garden Betty Blog had a great blog entry on making seed tapes too. Lots of step by step pictures of how to make the seed tapes, what patterns to use, and then how to plant the seed tape. Garden Betty.make-your-own-seed-tape A nice rainy day like today would be a good day to make experimental seed tapes to use this spring.

One of the seed spacings demonstrated by Garden Betty
What to Plant and When!
Hey Everyone,
Knowing what to plant and whether to start the seeds indoors or direct sow in the garden can sometimes be a challenge. In looking for some charts to help develop my seed starting skills, I ran across this link and thought many would find it beneficial.
If you scroll down a bit and utilize the link on the page, they even have charts for each month of the year.
http://www.motherearthnews.com/What-to-Plant-Now-Southern-Interior-Gardening-Region.aspx - link to Mother Earth News
Looks like I am going to be busy, although starting seeds now is always such a joy! What a nice reminder that spring is just around the corner. I don't know about you, but for me, gardening tends to be much more fun when it is warm!
How would anyone feel about growing certain cultivars specifically to save seed and then setting up a system where we could actually collect and grow our own plants or have a seed exchange among the garden? Could be a fun party! Planting or swapping!
Thoughts and opinions?
Denise, Beds 25 & 29
Knowing what to plant and whether to start the seeds indoors or direct sow in the garden can sometimes be a challenge. In looking for some charts to help develop my seed starting skills, I ran across this link and thought many would find it beneficial.
If you scroll down a bit and utilize the link on the page, they even have charts for each month of the year.
http://www.motherearthnews.com/What-to-Plant-Now-Southern-Interior-Gardening-Region.aspx - link to Mother Earth News
Looks like I am going to be busy, although starting seeds now is always such a joy! What a nice reminder that spring is just around the corner. I don't know about you, but for me, gardening tends to be much more fun when it is warm!
 |
| Collecting Seed From Broccoli |
How would anyone feel about growing certain cultivars specifically to save seed and then setting up a system where we could actually collect and grow our own plants or have a seed exchange among the garden? Could be a fun party! Planting or swapping!
Thoughts and opinions?
Denise, Beds 25 & 29
Sunday, January 13, 2013
Carrot Top Flower Arrangement
I was cutting off the tops of my carrots the other day when I said this foliage is too nice to throw out. So I stuck it in a blue tea pot. After a couple of days, I decided I'd find some flowers to stick in as well. Voila...a beautiful arrangement. Next time I'm going to cut off a tiny bit more of the carrot top so it stays in the teapot better.

Even more amazing, 2 weeks after I took this picture, the arrangement is still looking pretty good.
Even more amazing, 2 weeks after I took this picture, the arrangement is still looking pretty good.
Self Centering Tape Measure
Denise & Rick,
Here are two pictures of the Self-Centering Tape Measure Vic got me. He says he got mine from Sears but he also saw it yesterday (Sat 12th) at the Ace Hardware Store in the Seven Hills Shopping Center on Cedar Crest Drive in Paulding County. There is a Publix and a Wild Birds Unlimited in that shopping center. But he says he bets you could find it at any Ace since Ace Hardware carries Sears tools.

 I can see why a self centering tape measure would be handy! I never knew there was such a thing. Nothing like creating a little tape envy.
Vicki
Here are two pictures of the Self-Centering Tape Measure Vic got me. He says he got mine from Sears but he also saw it yesterday (Sat 12th) at the Ace Hardware Store in the Seven Hills Shopping Center on Cedar Crest Drive in Paulding County. There is a Publix and a Wild Birds Unlimited in that shopping center. But he says he bets you could find it at any Ace since Ace Hardware carries Sears tools.
I can see why a self centering tape measure would be handy! I never knew there was such a thing. Nothing like creating a little tape envy.Vicki
Saturday, January 12, 2013

Compost Stew; An A to Z Recipe for the Earth
I received a children's book to pass on to a school in Belize from the Master Gardener Volunteers of Cobb County Education Chair, Linda Hlozansky. Before the book gets away, let me share some of the story in Compost Stew; An A to Z Recipe for the Earth. It's a bit long, and sorry I cannot share the pictures! Here goes . . .
 Apple Cores
Bananas, bruised
Coffee grounds
with filters used
Dirt clods, crumbled
Eggshells, crushed
Fruit pulp left behind, all mushed
Grass clippings
Hair snippings
and an Insect or two
Just add to the pot
and let it all rot
into Compost Stew. Save:
Save:
Jack-o'-lanterns
Kitchen scraps
Laundry lint
from dryer traps
Mulch removed
from garden beds
Nutshells
Oatmeal
Paper shreds
Quarry dust
Rye bread crust
and Seaweed strands (a few)
Just add to the pot
and let it all rot
into Compost Stew. Take:
Take:
Teabags plucked from
long, hot swimmings
Underbrush prunings
Vegetable trimmings
Wiggly works with compost cravings
Xmas tree needles
Yellow pine shavings
and Zinnia heads
from flower beds
whose blooming days are through
Just add to the pot
and let it all rot into Compost Stew.
Moisten.
Toss lightly.
Cover.
Let brew.
And when the cooking is complete,
Mother Earth will
have a treat,
dark and crumbly,
rich and sweet . . .
Now open the pot
and what have you got?
Compost Stew!

Finished Compost Stew - Black Gold for the Garden
"Environmental Chefs,here's a recipe for you
to fix from scratch
to mix a batch
of Compost Stew.
Ingredients:
Bananas, bruised
Coffee grounds
with filters used
Dirt clods, crumbled
Eggshells, crushed
Fruit pulp left behind, all mushed
Grass clippings
Hair snippings
and an Insect or two
Just add to the pot
and let it all rot
into Compost Stew.
Save:Jack-o'-lanterns
Kitchen scraps
Laundry lint
from dryer traps
Mulch removed
from garden beds
Nutshells
Oatmeal
Paper shreds
Quarry dust
Rye bread crust
and Seaweed strands (a few)
Just add to the pot
and let it all rot
into Compost Stew.
Take:Teabags plucked from
long, hot swimmings
Underbrush prunings
Vegetable trimmings
Wiggly works with compost cravings
Xmas tree needles
Yellow pine shavings
and Zinnia heads
from flower beds
whose blooming days are through
Just add to the pot
and let it all rot
into Compost Stew.Moisten.
Toss lightly.
Cover.
Let brew.
And when the cooking is complete,
Mother Earth will
have a treat,
dark and crumbly,
rich and sweet . . .
Now open the pot
and what have you got?
Compost Stew!
Finished Compost Stew - Black Gold for the Garden
Let's Talk Lettuce
Hey Everyone,
I thought with the amount of bolting we experienced growing lettuce this past fall; it might be nice to write a post to assist us in achieving greater yields this spring.
First, it is important to note that all lettuce will eventually bolt, as its life cycle will be complete. However, most lettuce should not bolt as rapidly as what many in the garden experienced. Furthermore, the lettuce grown during the cooler temperatures of brisk fall days should be different to that chosen for the warmer weather that will rapidly approach in mid-spring and early summer.

How to Choose the Correct Variety
Choosing the appropriate varieties that can take some heat, having a few tricks up your sleeve, and avoiding the common mistakes which lead to premature bolting, can go a long way to increasing your yields for a wonderful harvest.
Much like we look at cars in the same class and weight, one may have a timing chain, one might have a drive belt, and one may get better gas mileage over and above the other. Each vehicle will have certain characteristics that may stand out and be more desirable. Okay, so I threw this analogy in there for the guys! Lettuce is much the same and it is amazing how different many of the varieties are.
In choosing a lettuce variety for spring and early summer planting, it is imperative to look at varieties touting things such as bolt-resistance, heat-tolerance, and resistance to tip-burn, etc. Any downy mildew resistance is a plus for some protection against warm and damp weather. Keep in mind the darker color the lettuce, the more heat it will absorb. The darkest reds and greens should be grown in the fall. The more subtle reds and limey greens are a better choice for spring plantings. Looking at these simple characteristics starts stacking the deck in your favor for success at a wonderful and lengthy harvest.

In doing any research you will see many of the loose-leaf varieties recommended to be the best for growing in the spring and early summer. However, it is important to note that there is a wide range of heat-tolerances within those varieties. This is where the comparison charts will come in handy at helping you to choose the more appropriate ones for our climate.
This year I want to try some of the more heat-tolerant Batavian's from Kitchen Garden Seeds and see where that takes me. I cannot wait to challenge myself and get these seeds going for a spring trial run. Once you have a type in mind, it is important to understand what causes the bolting process and then utilize some tricks up your sleeve to get around it. This enables you to get as much out of your lettuce as possible and then let nature take its course to give you some viable seed for a few years to come. Remember only to save the seed of non-hybrids.
Bolting is the term used when the plant is past its prime, starts to send up a stalk, and goes into seed setting mode (see picture below). Dreadful, of course, as this renders the leaves bitter and inedible unless using some of the bitter lettuce recipes found in Asian cuisine.

I thought with the amount of bolting we experienced growing lettuce this past fall; it might be nice to write a post to assist us in achieving greater yields this spring.
First, it is important to note that all lettuce will eventually bolt, as its life cycle will be complete. However, most lettuce should not bolt as rapidly as what many in the garden experienced. Furthermore, the lettuce grown during the cooler temperatures of brisk fall days should be different to that chosen for the warmer weather that will rapidly approach in mid-spring and early summer.
Lettuces that bolted this fall at the garden
How to Choose the Correct Variety
Selecting the right variety to plant on a scale of 1 to 10 importance's, is a 10. I love the resource comparison charts on High Mowing Seeds. The High Mowing Seeds Lettuce-comparison-chart has lettuce listed by variety and type, days to maturity, disease resistance, and tolerance to heat and cold.
The second link from High Mowing Seeds is a direct comparison of how well the special characteristics of one variety (such as Nevada Summer Crisp) will perform against others within the same type or class. (Click on a variety and then click the second tab, comparison chart.) High Mowing Seeds - Organic Seeds Nevada
Much like we look at cars in the same class and weight, one may have a timing chain, one might have a drive belt, and one may get better gas mileage over and above the other. Each vehicle will have certain characteristics that may stand out and be more desirable. Okay, so I threw this analogy in there for the guys! Lettuce is much the same and it is amazing how different many of the varieties are.
This picture has unbolted lettuce in the first bed and the bed in the background
has bolted lettuce. Notice how deep red the lettuce is as well.
In doing any research you will see many of the loose-leaf varieties recommended to be the best for growing in the spring and early summer. However, it is important to note that there is a wide range of heat-tolerances within those varieties. This is where the comparison charts will come in handy at helping you to choose the more appropriate ones for our climate.
This year I want to try some of the more heat-tolerant Batavian's from Kitchen Garden Seeds and see where that takes me. I cannot wait to challenge myself and get these seeds going for a spring trial run. Once you have a type in mind, it is important to understand what causes the bolting process and then utilize some tricks up your sleeve to get around it. This enables you to get as much out of your lettuce as possible and then let nature take its course to give you some viable seed for a few years to come. Remember only to save the seed of non-hybrids.
Bolting is the term used when the plant is past its prime, starts to send up a stalk, and goes into seed setting mode (see picture below). Dreadful, of course, as this renders the leaves bitter and inedible unless using some of the bitter lettuce recipes found in Asian cuisine.
Common Mistakes that Cause Bolting &
Tricks to keep your lettuce producing as long as possible.
- Choosing the wrong variety for the season - See discussion above.
- Mishandling of seedlings - Lettuce will bolt more readily if exposed to temperatures below 50 degrees during the first few weeks of germination and growth. Keep all seedlings growing at temperatures above 50 degrees and transplant into the garden at 3 - 4 weeks.
- Purchasing stressed seedlings - Has anyone walked by the seedlings at a big box store or nursery and seen them completely wilted and limp? Unfortunately, more often than not, this happens on a daily basis. Seedlings are set out on concrete lots with intense full sun, they wilt, and then someone will eventually douse them with a hose and they are ready to go. It is wise to call ahead and see when the deliveries arrive to get them fresh off the truck or grow your own from seed. Stressed seedlings tend to bolt more rapidly no matter how heat tolerant the variety.
- Improper transplanting - Make sure your lettuce is properly hardened off before moving to the garden and avoid transplanting in the morning or heat of the day. Transplanting your lettuce during the late afternoon or evening allows the most time for plants to settle in before faced with the next day's sun and heat. This avoids transplant shock that leads to plant stress and setback.
- Spacing - It has been shown that lettuce can bolt when overcrowded. Keep lettuce well trimmed and leave a little space between plants. Most varieties will tolerate 5 to 6 inch spacing in intensely planted beds if they are maintained properly.
- Temperature - The upper end of temperatures that most lettuces will tolerate is the low 80's. When exposed to this temperature for a week, lettuce will start the bolting process. To get around this keep the air temperature around your plants cooler. Full sun is only essential when it isn't too hot. Mulch your plants well to keep the soil temperature cooler and tuck your plants either behind or under some taller ones to cut temps 5 to 10 degrees. One trick I use is to put some type of shade cloth over the area to dapple the light. Simple cheesecloth, window screen, and bait netting all work incredibly well.
- Water and nutrient stress - Lettuce is shallow rooted and can dry out easily. In addition to providing a steady supply of water, it also needs to have a consistent supply of nutrients. Any lack of water or food will cause stress and setback. As I am sure you have picked up by now; stress and setback only lead to two things in lettuce, premature bolting and poor quality eating. I often use water retention crystals when transplanting to have a steady supply of moisture available or I water my plants every other day if they are mulched well and protected from intense sun. I provide nutrients on a systemic approach that is repeated small doses of a fertilizer with lower numbers on a strict schedule.
- Lack of proper harvesting - Trick your loose-leaf lettuces into thinking they haven't matured yet by continuously harvesting the outer leaves when they are 4 to 6 inches long. This keeps the plants focus on producing more food and not seed.
Park Seed Company has a general seed starting guideline on their website Park Seed -Seed Starting for those that may need some help.
I hope this gives some insight on how to achieve a longer and more bountiful harvest from your lettuce. I cannot wait to see what we all grow. If I missed anything, or if anyone has some additional tricks up your sleeve that work well, please let us know.
Take care and strive to eat healthy this New Year!
Denise, Beds 25 &29
Wednesday, January 9, 2013
Water, Water, Water and more Water
We have been getting rain over the past month but not enough for those of us wintering plants for spring production. I know it's cold out but that is one of the best reasons to water. The ground stays warmer and the plants still need water and food.
So get out there and water. Your plants will love you now and in the spring.
Friday, January 4, 2013
Yeah for Melon and Squash Cradles
I
got these in the mail today and am so pleased I had to share a picture.
 |
| Melon & Squash Cradles |
I have grown watermelons and cantaloupes the last two years and
have been looking for a product that will prevent the rotting on the ground
that can occasionally occur.
My first year out I turned cool whip containers upside down and
put holes in the bottom. While it did
drain incredibly well around the base of the melons, mold and mildew formed
under the containers due to a lack of airflow.
Eventually it did have an impact on the underside of a few melons just
as they were ripening. The melons were
still good for fresh off the vine eating; however, they lacked the storage
capability I strive to achieve. In
addition, it made a wonderful safe haven for the most undesirable of insects.
Last year after doing a little research into some alternative ways
of growing watermelon, I decided to trellis the watermelons and cantaloupes on
a tall pea fence I have from Gardener’s Supply.
Aside from being a little taller, it is identical to the one in bed #29. This worked extremely well as I just
made little hammocks for the melons out of fishing bait nets and zip ties. Cheap and resourceful!
 |
| Sugar Baby Watermelon at 11 Days |
The only downside to this method was that some growth points of
the melon vines still ramble about and I needed something for those that ultimately
end up on the ground. Back to square one
and trying several different methods.
Out of trying numerous things, I ended up placing squares of black
landscape fabric under the melons on the ground for a protective layer against
the earth that would drain well. This is
what I seem to see in many of the videos on field production. I only lost a few melons to any type of rot
from ground to melon contact and did not have any issues with garden insects.
This year, I cannot wait to try the melon and squash cradles to
increase yields. They are sturdy and should
solve all common problems from having fruit in contact with the ground. I plan on using the trellis method once again
as you cannot beat vertical growing for small spaces, but for those that end up
on the ground, crises adverted!
Sugar Baby did quite well on a trellis. The vines were six feet at their max. Four vines (one hill at the base of a
trellis) yielded seven edible melons ranging from four to seven pounds each. The others (five or six) were lost due to
inexperience with their growth habit and handling those on the ground.
I put a link below if anyone is interested as these are nice
quality supports that will last for seasons to come. They ran me $9.95 for a set of six. I hope to put all 12 to use! :-)
http://www.gardeners.com/Melon-and-Squash-Cradles/8586837,default,pd.html?start=13&cgid=NewProducts_Dept
Denise, Beds 25 & 29
Denise, Beds 25 & 29
Thursday, December 20, 2012
Fun in the Garden
Wednesday was such a gorgeous day Denise, Dalita and I decided to take advantage of it and meet at the garden for Fun. Absolutely NO work was done. We just sat there in the sunshine enjoying the warmth and chatting.
Mike was driving by, saw our cars and decided to stop and see what we were doing. He probably wondered if we were doing another squirrel surprise. Nope, we were just eating cranberry muffins and talking.
Wesley stopped by to put kitchen scraps on the compost pile and found a party going on!
Though I think the soap smelling was a surprise for everyone. I needed help figuring out what one soap smelled like so brought all the little soaps for analysis. None of us can put a name to the mystery one, not even me and I made it. Most of the soaps smelled like they were supposed to: lemon, peppermint and lemon peppermint. Sooner or later someone will come up with the name of the scent for the mystery soap! It is some kind of baked good I think....
Denise, Dalita, Wesley and Vicki
By the way, only one thing on this table is food!
The rest is soap and Mike's pottery.
Rain at the Garden
Lots of rain! Thursday we got 1.2 inches and on Monday we got 1 inch. Yippee.....a total of 2.2 inches of rain! We don't have to worry about watering for the next few days during the current cold spell. What a great Christmas present that is.
Vicki
Vicki
Lost & Found
Three tools with turquoise and orange handles were left by Bed #17. They were there at 5:00 on Thursday pm.
The time is 3 hours off if you look to see when a post was made!
Vicki
The time is 3 hours off if you look to see when a post was made!
Vicki
Christmas is coming - with a hard freeze
The totally unseasonal beautiful warm weather is over! Luckily for us we are having lots of rain this week at the garden so all the plants will be nicely hydrated for the hard freeze that is going to happen over the next few days.
Fri 21st low 29, high 45
Sat 22nd low 25, high 52
Sun 23rd low 30, high 56
Our Christmas present will be no freezing temperatures Mon, Tues, Weds but we will get more rain.
But starting with Thursday the 27th we are back in that cycle of freezy, frosty weather.
Thurs 27th low 35, high 48
Fri 28th low 28, high 51
Sat 29th low 29, high 54
Sun 30th low 33, high not announced yet
Subject to change of course! The above predictions are based on what The Weather Channel was saying at 8:30 am Thursday morning. It is best to check frequently if you are planning on putting your frost cover on. Also remember to vent your frost cover if the temperatures are going to be above 50 for very long! This will help prevent disease and heat problems.
http://www.weather.com/weather/tenday/Marietta+GA+USGA0353:1:US
Easy link to take you to the 10 day forecast for 30064 Marietta Georgia
(I'm putting this link on the right sidebar of the blog as well)
Just remember that when The Weather Channel shows the high/low for each day the high is for the day indicated, the low is for the NEXT morning! It is sooo easy to get confused and cover too soon or not soon enough.
Safe Travels and Have a Merry Christmas
Vicki
Wednesday, December 12, 2012
Flo-Master Garden Sprayer
Hey Vicki,
Here is a photo of the sprayer I have been using. I purchased it through the Home Depot and I
want to say the cost is right around $8.00.
It never clogs and the quality is great for what I need. I like the fact that it doesn't leak as
well.
 |
| Flo-Master from Home Depot |
Initially, I had bought the one on the left (in the photo below) at Lowe’s for a
couple bucks cheaper; however, I don’t even use it at all anymore. I would take it back if I could find the receipt. The brass nozzle leaks down
your arm the whole time you are spraying and when you let the pressure out, it
leaks back on you at the point where the paper towel is placed. Maybe mine is defective or something but it
is not great for anyone wanting to keep the chemical solution off his or her
skin.
 |
| Garden Plus from Lowe's & Flo-Master from Home Depot |
If you were asking Santa for one, I would choose the
Flo-Master at Home Depot. It seems to
do a pretty good job for small-scale spraying. I found both in the isles where they sell the household pesticides. Hope hubby gets you one!
Hey, I figured out the photos! Duh, a button with a picture on it...... Sometimes I have to laugh at myself!
Denise, Beds 25 & 29
Tuesday, December 11, 2012
Bed 41 (Vicki's Frost Cover Method)
My frost row cover structure is a cross between the easiest one (just lay it on the ground and anchor it) and Denise's where you build a very sturdy structure. I searched on the web until I found what I wanted so I could show Vic since he was going to be the builder. Vic added the fence staple to the idea and this improvement made it work perfectly. Not a single piece flapped in the 20-30 mph winds of Sandy during the 4 days she blew.
MATERIALS NEEDED (and can be found locally):
Galvanised wire and Fence Staples found at the Lowe's on Dallas Hwy near Publix on Aisle 16 - General Hardware
Frost Blanket found at Pikes with landscape fabric and landscaping cloth
9 gauge galvanised wire
Aisle 16, in Section 13: Hangers, Hooks & Wire. Maybe a third of the way up from the floor.
On the package it is called Multipurpose Wire, Single Strand, Item #52685 - 50 feet for $9.88. It will make 5 hoops (5 pieces of wire) - I only made 4 but had enough for a 5th hoop.
Fence Staples
Aisle 16, in Section 23: Construction Nails
Item # 69233 Fence Staples 1 lb of 1 1/2 " galvanised fence staples is $3.46. Used 8 fence staples for entire project, one on each side of the bed for each hoop to sit in (only made 4 hoops so only needed the 8 staples.)
Frost Blanket
I used a frost blanket that comes in a roll 6 ft by 50 foot and is good for a light frost. This means this particular frost blanket/cloth provides 2 - 4 degrees of extra protection. You can find it at Pike's for $11.99. Or you can also order the light weight cover from Row Cover - Pine Tree Seeds for 33 cents a foot plus shipping. Or you can order a heavy duty frost blanket from Gardener's Supply Garden Quilt - 6' x 20'
The first thing we did was decide how far apart to make the hoops in the bed. They are spaced about 2 feet apart. The one thing you have to be watch out for is your placement of fence staples - put in the bed away from the corner posts. Vic put in fence staples one on each side of the bed for each wire hoop (2 staples for each hoop).

Because my frost cloth was only 6 feet wide I placed my hoops inside the bed so it would be easier to cover and securely anchor the cloth to the ground. I also chose to have only 4 hoops this fall as that was all I needed. If I were to cover the whole bed I would use 5 hoops.

To make the hoops be 16-18" tall in the center, cut the wire about 91 inches long (7 ' 7")
If you make the hoops too tall in the middle, your 6 ft wide cloth will be too narrow and you won't be able to anchor it.
Push one end of the wire through a fence staple until it hits the ground. Then bend the wire hoop over to go through the 2nd fence staple on the opposite side of the bed and push it through until it hits the ground.
My frost cloth is 122" long (10 feet 2 inches) which covers the 6 feet of bed very nicely length wise with enough on each end to anchor it down firmly. I also have enough cover on each side to pin down securely with rocks or landscape pins.
Originally I used landscape pins but now, I just use clothes pins (5-6 per wire hoop) and rocks. Everything has stayed in place very nicely. If you do use landscape pins, put twisties or something colorful on them that sticks up so you can find them which will make it easier when you want to pull them out.


Think about how tall various plants will be so that plants that need more height get put towards the center of the hoop. I also will use something like this piece of lattice work to make the sides of the frost cover go up straighter for the first 12 inches. But don't use anything rough that would rub a hole in the frost blanket when the wind whips it around!

The wire hoops are an excellent support frame for putting bird netting over the bed and keeping the dratted squirrels out while they are in a frenzy burying nuts. As you can see in the picture below, you can just put the frost blanket on top of the netting when you need to.

 I found that water did not go through my frost cloth to my satisfaction. Luckily it was very easy to just unpin the end of the frost cloth (see picture to the left) and stick my water wand inside to water.
As well, I have two methods of venting when the temperature goes above 50 degrees. If you leave your frost cover on too long when the temperatures are above 50 degrees, you create the perfect environment for disease to grow. You need air circulation to keep diseases from running rampant.
IMPORTANT: depending on the frost cloth you use, only 85-60% of available light is getting through to your plants.Plants need light to grow and thrive.
Frost cover vented at both ends but
left over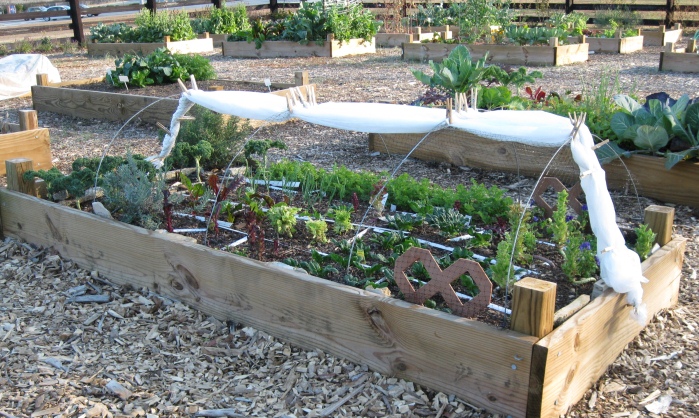 the frame.
MATERIALS NEEDED (and can be found locally):
Galvanised wire and Fence Staples found at the Lowe's on Dallas Hwy near Publix on Aisle 16 - General Hardware
Frost Blanket found at Pikes with landscape fabric and landscaping cloth
9 gauge galvanised wire
Aisle 16, in Section 13: Hangers, Hooks & Wire. Maybe a third of the way up from the floor.
On the package it is called Multipurpose Wire, Single Strand, Item #52685 - 50 feet for $9.88. It will make 5 hoops (5 pieces of wire) - I only made 4 but had enough for a 5th hoop.
Fence Staples
Aisle 16, in Section 23: Construction Nails
Item # 69233 Fence Staples 1 lb of 1 1/2 " galvanised fence staples is $3.46. Used 8 fence staples for entire project, one on each side of the bed for each hoop to sit in (only made 4 hoops so only needed the 8 staples.)
Frost Blanket
I used a frost blanket that comes in a roll 6 ft by 50 foot and is good for a light frost. This means this particular frost blanket/cloth provides 2 - 4 degrees of extra protection. You can find it at Pike's for $11.99. Or you can also order the light weight cover from Row Cover - Pine Tree Seeds for 33 cents a foot plus shipping. Or you can order a heavy duty frost blanket from Gardener's Supply Garden Quilt - 6' x 20'
The first thing we did was decide how far apart to make the hoops in the bed. They are spaced about 2 feet apart. The one thing you have to be watch out for is your placement of fence staples - put in the bed away from the corner posts. Vic put in fence staples one on each side of the bed for each wire hoop (2 staples for each hoop).
Wire hoop put through the fence staple and pushed as far into the ground as it will go
Because my frost cloth was only 6 feet wide I placed my hoops inside the bed so it would be easier to cover and securely anchor the cloth to the ground. I also chose to have only 4 hoops this fall as that was all I needed. If I were to cover the whole bed I would use 5 hoops.
Notice the first hoop is to the right of the square post inside the bed!
To make the hoops be 16-18" tall in the center, cut the wire about 91 inches long (7 ' 7")
If you make the hoops too tall in the middle, your 6 ft wide cloth will be too narrow and you won't be able to anchor it.
Push one end of the wire through a fence staple until it hits the ground. Then bend the wire hoop over to go through the 2nd fence staple on the opposite side of the bed and push it through until it hits the ground.
My frost cloth is 122" long (10 feet 2 inches) which covers the 6 feet of bed very nicely length wise with enough on each end to anchor it down firmly. I also have enough cover on each side to pin down securely with rocks or landscape pins.
Originally I used landscape pins but now, I just use clothes pins (5-6 per wire hoop) and rocks. Everything has stayed in place very nicely. If you do use landscape pins, put twisties or something colorful on them that sticks up so you can find them which will make it easier when you want to pull them out.
My philosophy is many clothes pins is better than one!
Lessons Learned:
Next year, don't plant to the edge of the bed. I need to leave a 2 or 3 inch unplanted border on the inside of the bed so I can use rocks/pins to anchor my cloth without worrying about smashing the plants.
12 inch by 12 inch piece of lattice work
Netting over hoops defeating the squirrels
The wire hoops are an excellent support frame for putting bird netting over the bed and keeping the dratted squirrels out while they are in a frenzy burying nuts. As you can see in the picture below, you can just put the frost blanket on top of the netting when you need to.
When you need extra warmth inside, use hot water in milk jugs and strategically place them.
As well, I have two methods of venting when the temperature goes above 50 degrees. If you leave your frost cover on too long when the temperatures are above 50 degrees, you create the perfect environment for disease to grow. You need air circulation to keep diseases from running rampant.
IMPORTANT: depending on the frost cloth you use, only 85-60% of available light is getting through to your plants.Plants need light to grow and thrive.
Frost cover vented at both ends but
left over
the frame.
I just gathered the frost blanket into a rope that created ponytails at each end.
The clothes pins gave the ends enough weight they didn't fly in the breeze.
This method lets all available light in yet the cloth is still easy
to let down as needed.
Updated October 22, 2013
Cookie Party and the Winner is......
Saturday morning dawned gray and gloomy and turned down right rainy! Horrors! Not another event with horrid weather. All day I watched the weather radar and the sky. Finally at 2:00 pm I saw with a sigh of relief the sun pop out and a bit of blue sky was seen. Yippee! The party was on.
It was a small group but we had a great time talking and laughing, eating fresh from the oven cookies with warm melty chocolate in them and strolling the garden. If you weren't there you missed a good time and definitely delicious cookies. And a prize winning game.


It was a small group but we had a great time talking and laughing, eating fresh from the oven cookies with warm melty chocolate in them and strolling the garden. If you weren't there you missed a good time and definitely delicious cookies. And a prize winning game.
Mike, Mark, Renee and Sue were very cooperative and posed for this picture!
Tonia obviously can tell I'm taking pictures! So much for my "stealth mode".
The easy part of the party - talking and eating delicious cookies. Winnie brought the beautiful pointsetta which certainly added a lovely splash of color to our festive table.
Poor Abby, is on the outside looking in at all those people eating yummy things while she can only sit and wait. When is Jim finally going to leave so we can walk some more!
But at least Abby didn't have to do math! Math you say? Oh yes...math...
Don't you always have to do math at parties?
Mike very generously provided one of his handmade pottery bowls filled with locally produced (and hand collected) pecans and black walnuts with a sprinkling of chocolates to sweeten the prize. The goal was to guess how many items were IN the bowl and you could win the bowl (including all the items in it.) It was a very serious business where math skills were needed. As you can see, there was intense concentration which resulted in agonized guessing. And even more agonizing over the original guess or two. It looks like Tonia is reconsidering her guess and asking Ray, so...what do you think? I think Ray is trying not to say anything!
And the winner is.......
Victor!
He was only one off from the correct number.
Monday, December 10, 2012
Weather Warning
Thank goodness we got a good rain today. That will help prepare the plants for the cold snap that is coming up.
According to The Weather Channel towards the end of the week we are going to have a little cold snap. You might want to check the weather every day to keep an eye on the temperatures. By the way, they don't post frost warnings on The Weather Channel until around 4:00 pm!
The predicted lows are:
Weds am - 35
Thurs am - 33
Fri am - 30
When in doubt...cover up. And when cold is predicted ALWAYS water well!
Vicki
Tuesday, December 4, 2012
The Harvest is Coming in...
It has been fun watching the harvest come in and quite amazing to see how much food is being produced in each 4' by 8' bed. When we have visitors at the garden everyone is very impressed with what we are growing. More and more people are stopping by to see what we are doing. Just this past weekend I talked to 4 separate sets of visitors and I'm sure there were more when I wasn't there.
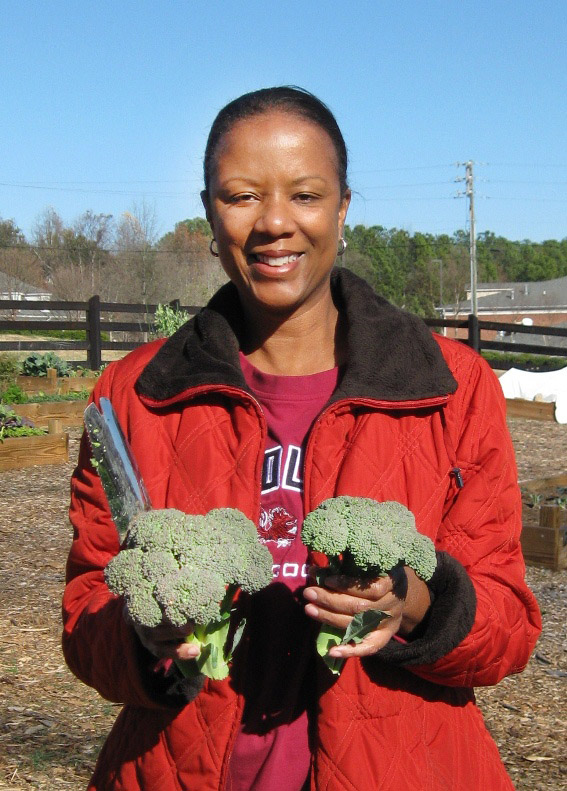 I wish I had taken a picture of Leah with her broccoli that she harvested this weekend. She was so excited about her first broccoli head that was ready to eat. However, I do have a picture of Dalita and her broccoli harvest.

Saturday Mike and Sue harvested their first carrot of the season.
Caully's Festive Attire
I'm not sure if Caully is really his name but he certainly is dressed appropriately for the season!

Why look...he is dining on a freshly pulled carrot. Maybe this is where all the vegetables in Mike's bed have gone recently. Pretty soon Mike will be finding caully-doo to help fertilize the remaining vegetables.
snicker snicker
Subscribe to:
Posts (Atom)