Friday, June 13, 2014

Summer of 1864

JUNE

The Sounds of Battle drew closer and closer. Cannon Fire. Rifle and Musket Fire. Drums pounding out the beat. Feet thudding on the ground. Battle Yells. Screams.

Smoke and the stench of fighting filled the air.

Regardless of which side you were on, it was a horrific time.  It didn't matter if you were a civilian or a part of the military. It was pure hell.

Visualize Green Meadows Preserve and Community Garden as it is today. Then think back 150 years ago today - this area was a constant battlefield. All through the month of June, West Cobb County was a battlefield with thousands of Confederate and Union soldiers marching to and fro.

As the summer progressed, the war crept closer.

Military action
New Hope Church - May 25
Picketts Mill - May 27
Lost Mountain - June 5-9
Gilgal Church June 15 - 17
Mud Creek Line - June 17
Kennesaw Mtn - June 27


Picture a summer like this one in 2014. Lush foliage. Crops growing well. Rains coming every afternoon.

Then imagine what it looked like after the battles in 1864. Splintered and cut down trees. Torn up earth. Buildings destroyed to make fortifications. Gilgal Church was dismantled and used (as well as the pews)  to build fortifications by the Confederate Army.

As the crow flies, small battles and military actions weren't far from the Green Plantation marker in front of the house at Green Meadows Preserve.

Military Action at Gilgal Church (1.1 miles)
Due West Community (1.2 miles)
Battle of Gilgal Church (1.3 miles)
Mud Creek Line (1.6 miles)
Battle of Pine Knob (1.7 miles)
Darby Plantain  (.8 miles)
Main Confederate Battle Line (2 miles)

To visualize the movement of the various armies using current roads, zoom in to see all the Historical markers in Cobb County.

Visit Kennesaw Mountain National Battlefield Park between June 26 and June 29 to learn more about how the Civil War impacted the civilian population, medicine was practiced on the battlefield, hear music from the era and see demonstrations of cannons and rifles being fired. Kennesaw Mountain National Battlefield Park is having a huge series of events and programs (link to schedule)  commemorating the 150th Anniversary of the Battle of Kennesaw Mountain.

The City of Marietta is also having a variety of events all summer long as is the The Southern Museum of Civil War and Locomotive History.

All clipart images proved by Classroom Clipart. Photo provided by Victor Williams.

Saturday, June 7, 2014

2nd Annual Ice Cream Social - Saturday June 21st

Last year we had such a great time, we decided to make the Ice Cream Social a yearly event. Below are the details for our event this year.
 
When: Saturday, June 21, 2014
 
Time: 11:30 am to 1:30 pm
 
The concept is simple. Bring your frozen home made ice cream  to the garden with a label saying what kind it is. (And an ice chest to keep it cold until the end of the meal!)
 
We will happily supply hot dogs, buns, chips and water. If you want to bring a side dish to round out your hot dog and ice cream, please do.
 
Vote for your favorite flavor to find the best of the garden! Last year we had 10 flavors I think - yum yum.
 
Prizes to be awarded for Best Ice Cream and Most Unusual Ice Cream.


Tuesday, June 3, 2014

Black Gold - Your Compost at Work

Look what was under all the green compost in Bin #1 !  Rich black soil, roly-poly composters and microbes, then most likely worms under that!  This soil was moved to Bin #2 where partially composted material belongs to give it more time for the compost process to complete.  The next step (which could have been done today) is to screen the dirt through a coarse screen in the shed and send it to garden beds.  Thanks to all who've contributed to Bin #1 and SPECIAL KUDOS to those who chopped the waste material before tossing it in!  I wish I had a LEGO prize to give little Wayne who did just that today ... without even being told! 


Friday, May 30, 2014

Toasted Slaw & Cheese!

Hey Everyone,

Simple and Delicious!
I don't know if anyone has ever tried these but I found the recipe a few weeks back and it has been screaming fix me ever since!  Days have come and gone where the simplest of a toasted cheese sandwich has stuck with me as something I haven't had in a while.  As most Fridays go, I wanted something easy and fast and the fridge seemed to be barren of anything remotely resembling a left over meal.  Its time had come.

For ease in preparation, I did purchase a ready - made slaw mix and found the one Kroger's carries with the kale to have worked quite well.  Yes Rick, you did eat kale and loved it!  Nobody spill the beans on that one, our little secret!

Ingredients:

1 cup coleslaw mix per sandwich, no dressing.  The pre-packaged one with kale blended flavors quite well with the Havarti cheese.
Sprouts - Optional
1- 2 slices of Havarti cheese per sandwich
Sourdough bread - thick slices
Honey mustard
Margarine

Directions:

Mix together the slaw mix and sprouts if using.  I left the sprouts off as I didn't have any fresh in the jar and wasn't sure which ones would provide the best mix of flavor with the kale.

Spread margarine on the outside of sandwich slices.  Spread the opposite side with a light covering of honey mustard.  Place the slaw mixture on top of the honey mustard and top with Havarti cheese.

Skillet grilling on medium heat took about 2 - 2 1/2 minutes per side for the cheese to melt thoroughly and the butter to brown.

Dinner was delicious..........  Does anyone have some ideas what type of side dish would go well with this?

Happy Gardening,

Denise, Beds 25 & 29

Friday, May 23, 2014

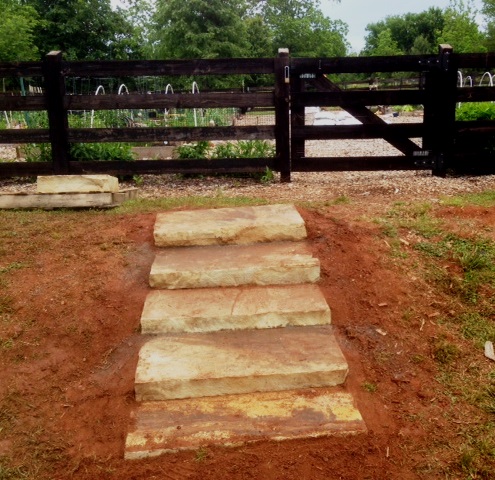
YES! Steps and another Picnic Table!


Last weekend Austin Flippo made our dream come true...we got a set of steps put in the terrace at the garden! We've been wishing, whining and wailing for ages and then they appeared.  Or at least that is how it may have appeared to anyone who wasn't at the May 17th workday.
 
Thanks very much goes to Austin Flippo for choosing us as his Eagle Scout Project and for all the hard workers in his Scout Troop. They did a great job! And thanks also to Rusty Simpson and John Purcell with Cobb County Parks, Recreation and Cultural Affairs for finding a way to make our dream come true.
 
Actually, the construction of the steps wasn't that easy as there was a lot of hard work to dig out the spots for the steps and then move those heavy slabs of stone into place. I truly love how the steps are so broad and easy to walk on - you don't have to worry about where to place your feet, even when carrying a basket. Even better, now we don't have to worry about tumbling down the hill when it is wet.

We had been wishing we had a second picnic table to give us more seating when we have events in the garden. Voila! Now we do. Luckily for us, they are positioned so one is in morning shade and the other in afternoon shade.  Good thing since summer is here.

I didn't watch how the table was made since I was busy doing work day tasks but it was amazing how fast it came together from just a pile of lumber to a finished product.

It made our workday end on a wonderful note.

Yes - the steps are off set from the gate on purpose.
They didn't want to accidentally puncture the water line.


Saturday, May 10, 2014

It's Tea Time!

Hey Everyone,

One of the best ways to enhance the growth of your plants while fostering long-term soil fertility is with the use of compost teas.  For organic gardeners, these teas are excellent tools for providing the bacterial nutrition that vegetables seem to love.  The beneficial microbes and organisms found in these teas also work hard as a first line of defense against many of the pathogens that can cause disease.  In addition, they work extremely well at keeping many pesky insects at bay.

There are several applications where compost and/or worm teas can be effective:

Both effective and inexpensive!
  • A seed treatment - Soaking seeds in a solution of compost tea prior to planting inoculates your seeds against harmful fungi and speeds the germination process. 
  • Transplant time - When the time comes to move plants up in pot size or transplant directly into the garden, this is a wonderful opportunity to use a compost tea solution.  The tea's not only provide a healthy dose of nutritious food but go a long way in preventing transplant shock as well as disease resistance, getting your plants off to a fast and healthy start.
  • Foliar applications - Whenever you need nutrition to plants in a hurry, a foliar application of tea gets the nutrition there immediately.  Foliar applications are also an excellent method for awakening your plants defense mechanisms early.
  • Root and/or soil drenches - Using compost teas as a root and/or soil drench promotes healthy plant development and growth as well as long-term soil fertility.  
  • Standard fertilization - Compost teas are wonderful as part of a standard fertilization practice. Routine applications not only keep plants healthy and happy but are also known to increase both flower and fruit production.  
For the home gardener, there are two simple methods for brewing compost tea with an aerated system providing the best quality brew.  For those who may be interested a link is below to a previous post with instructions on how to make the tea using both methods.  I also included a link to One Yard Revolution that has an informative video on making the tea with worm castings and using it appropriately.

My Favorite Recipes for Simple 5-Gallon Bucket Brew's
Worm Based -
  • 5 gallons de-chlorinated or rain water
  • 2 1/2 - 3 cups quality worm castings
  • 1 - 2 oz. Grandma's Original All Natural Unsulphured Molasses
Compost Based -
  • 5 gallons de-chlorinated or rain water
  • Good quality compost - Biodynamic Blends such as Malibu Compost or Farmer D Compost are incredible for the garden and provide increased production.  Biodynamic blends also provide some systemic insect resistance due to their ingredients.  It is also possible to use things as simple as Black Kow Composted Cow Manure and make additions depending on your specific needs.
  • 1 - 2 oz. Grandma's Original All Natural Unsulphured Molasses
  • Extra additions of worm castings, liquid fish, seaweed, or kelp depending on application and foliar manipulation desired.

Green Meadows Healthy Garden Tip:

For compost teas to be effective, it is important to cover at least 70% of all plant surfaces. The pores or tiny openings on the leaves (mainly the underside) and stems called stomata act as a catalyst for the uptake of nutrients as well as aid in photosynthesis and transpiration.  When the temperatures reach 80 degrees, the stomata start to close and at temperatures above 85 degrees, they close completely as part of a defense mechanism to prevent moisture loss within the plant.  Therefore, by using teas in either the morning or early evening and making sure to coat the undersides of all vegetation, your plants will get the most value from the application.   Please keep in mind that compost and/or worm teas are not a substitute for good soil fertility practices but rather a partner in the process of keeping your vegetables healthy and productive.
Yummy!

For those who enjoy additional reading, the book "Teaming with Microbes" by Jeff Lowenfels & Wayne Lewis has excellent information on compost teas and their use.  The National Sustainable Agriculture Information Service also has some reading that is interesting on teas at the agricultural level.  This information is easily applicable to home garden practices. Their links are excellent and also below for your convenience.


Links:

http://greenmeadowscommunitygarden.blogspot.com/2013/04/making-worm-tea.html - link to previous post on making worm tea

http://www.youtube.com/watch?v=_4VKLtDuzD8 - link to One Yard Revolution's video on making worm tea and using it appropriately 

https://attra.ncat.org/attra-pub/viewhtml.php?id=125 - link to "Notes on Compost Teas" from the National Sustainable Agriculture Information Service

https://attra.ncat.org/attra-pub/viewhtml.php?id=286 - link to "Foliar Fertilization" from the National Sustainable Agriculture Information Service

Happy Gardening,

Denise, Beds 25 & 29

Wednesday, May 7, 2014

Maybe, possibly your Fig Tree is still alive

This winter was disastrously cold and one plant that is still showing signs of it are fig trees My neighbor has a huge fig tree that is taller than my (and his) 2 story house and it has JUST this week decided to attempt to leaf out. It will be interesting to see how much of it does leaf out.

Notice how sparse the leaves are so far. A couple here and there. I'm
wondering if the light colored branches are in fact dead as a door nail.

This morning my friend Rita emailed me telling me the status of  her two figs. Her fig trees are only 1 year old and therefore more twiggy than big like my neighbors tree.  One shows signs of leafing out and the other is still..... waiting.....  thinking.... maybe..... going to leaf out.

Walter Reeves was asked about figs being slow to leaf out this year in his column in the Atlanta Journal Constitution several weeks ago. His reply was - wait until the end of May to see if the figs really are going to come back or not. There was also a post about figs not leafing out on the Cobb County Extension Blog  Figs Slow to Leaf Out?  It has links to various publications and websites that talk about figs in Georgia and the southeast.

It will definitely be interesting to see what DOES happen with the figs this year. The next questions are - Is there even going to be any fruit if they do leaf out? And the 2nd question is -how much of the plant will leaf out?

Monday, May 5, 2014

Master Gardener Garden Tour Saturday May 10, 2014


Through the Garden Gate
 
Presented by

Master Gardener Volunteers of Cobb County

2014 art-Electa
 
Garden Tour

Saturday, May 10, 2014

10 am – 5 pm

Tour Tickets: $15.00 in advance – $20.00 at the gate

Available at Cobb Extension Office: 770-528-4070 or

Monday, April 14, 2014

And The "Chilly Nilly" Prize Goes To.........

Hey Everyone,

And this year's "Chilly Nilly" prize goes to Ken of Bed 5 and Mark of Bed 45!

That's right you two!  Both of you tied for the coolest beds in the garden right now having a temperature of 65.3 degrees Fahrenheit.  It has been so nice to see the steady rise in temperatures this week and hopefully the few nights of approaching cold weather won't take us back too far from what we have gained. A special THANK YOU goes out to Reagan for helping me take all the temperatures Sunday evening. You were such a good helper!

Ken & Mark's Prize
Bu's Brew Bio-Dynamic
 Compost Tea Bags from Malibu Compost!
http://malibucompost.com/goods/layin - for awesome tips
 and a link to information on the brew.
The week started off with a garden average of 64.7 degrees.  As of Sunday evening, we are currently right at 70 degrees for an overall garden average.  Temperatures run from our chilliest at 65.3, to our warmest at 77.4 degrees.  As always, I take temperatures late day between 5:00 and 6:30 p.m. to maximize any heat we may gain throughout the afternoon hours.  The temperatures of each bed are recorded with a digital meat thermometer, added together, divided by the total number of beds, giving us an overall average for the garden.  This gives us a pretty good idea of where our temperatures stand for planting purposes.

Here are the results for this week of recording:

Our chilliest section of the garden remains the area near the pecan tree and picnic table.  All beds in this section remain under 70 degrees with Ken being one of our "Chilly Nilly" prize winners at 65.3. This section actually has an advantage over others in the garden when growing cool weather vegetables in the spring as they can hold onto the chillier ground temperatures a bit longer.  This gives them the opportunity for a greater length of time harvesting before the heat takes over and causes the plants to end their life cycles. The overall average for this section as of Sunday is 69.0 degrees Fahrenheit.

The section of the garden that houses our special needs area is still the most consistent with their temperatures running from 67.1 to 74.2 degrees.  The average for this section is now at 70.2 as of Sunday evening.  When ground temperatures in this area climb, they tend to fluctuate less with the ups and downs that are common of early spring weather.  The largest advantage in this section is that both soil life and plant growth experience less stress due to fluctuating ground temperatures, which does go a long way in keeping plants healthy and productive once they get started.

The largest surprise was the warmest area of the garden at the last recording is now the second to the coldest when dividing the garden up into four sections.  It also houses one of our "Chilly Nilly" prize winners (Mark) at bed 45.  The temperatures in this uppermost right-hand section closest to the orchard have an overall average of 69.1 degrees.  The lowest is Mark at 65.3 and the warmest is 72.3 degrees.  In looking back at last year's recordings this scenario was the same as another bed in that section was also a "Chilly Nilly" prize winner.  It looks as if when looking towards the future at garden trends, this area has a distinct advantage for winning our "Nilly" prizes, grin!

Our last section on the right hand side of the gate closest to Dallas Hwy is still the warmest area overall. In fact, our "Garden Hotties" remain the warmest bed in the garden at 77.4 degrees.  The temperatures in this section range from a low of 67.2 to a high of 77.4 degrees.  The average for this section is 71.7 overall.  Many beds in this section have the advantage with the temperatures needed to support "tomato territory" and once the nights stabilize and the beds are prepped they will be off and running.

I am hopeful that this next little spell will be the last of the cold weather.  It is always a nice reminder though to respect those last frost dates for our area as planting too early can cause quite a bit of damage to our plants.  I will continue to keep us all posted!

A great big CONGRATULATIONS to Mark and Ken, you are sooooooo cool!  I'll drop the prizes by the shed my next trip over.

Happy Gardening,

Denise, Beds 25 & 29  

Thursday, April 3, 2014

Grafting Fruit Trees Class

Are you interested in growing fruit trees but have limited space to raise different cultivars?

Come to the class that Master Gardener Eddie Rhoades will be presenting on Saturday April 12 from 10:30 to 11:30 at the orchard behind the Green Meadows Community Garden.

Eddie is a master at grafting different cultivars on one "parent" tree. Persimmon, pear, peach and apple are just a few of the  fruit trees he has grafted multiple cultivars onto.

Where:
Green Meadows Preserve Community Garden
3780 Dallas Highway
Powder Springs, GA 30127
  (The garden is at the intersection of Old Hamilton and Dallas Highway, near The Avenues of West Cobb. Look for the white house on the corner with a sign out front that says Green Meadows Preserve)

When:
Saturday, April 12, 2014
10:30 to 11:30 am

Wednesday, April 2, 2014

Secrets To Growing A Healthy Garden!

Hey Everyone,

Growing that healthy vegetable garden really doesn't take the green thumb that so many feel they need. 
It only takes a little knowledge of a few basic concepts.  The equation is simple.  
                         Healthy Soil = Healthy Plants = Bountiful Harvest of Nutrient Rich Food.

Determine what your vegetable plants need:  

Every type of vegetable plant family has specific needs or preferences in order for them to be healthy and productive.  Some vegetables can be a little more finicky than others can.  However, if you provide the basics below they tend to be less sensitive to their specific needs and perform well under most conditions.
  • The correct soil fertility and pH - Most vegetables prefer a soil pH between 6.0 and 7.0.  Make sure to amend properly with the correct amount of organic matter and perform a soil test to correct any imbalances in soil pH.  As a rule of thumb, gardeners need to add at least a 3-inch layer of compost/organic matter unless you will be heavily dependent on fertilizers.  If you garden bio-intensively or use other methods to maximize your harvest, then you will need a little more to replenish the depleted nutrients in your soil. 
  • Healthy microbial soil life - Healthy soil isn't just dirt.  It is a complete active ecosystem full of life with a well-balanced system of bacteria, organisms, and fungi that all interact with the roots of your plants.  Getting it right often fends off many of the diseases and pests that plague vegetable gardens.  As your soil builds, worms will come to the surface as if they were dolphins grazing on organic matter taking it deeper into the soil where it will be readily turned into nutrition for your plants.  If you do not see signs of life in your soil, this can be a red flag that conditions are not conducive for healthy plant growth. 
  • Sunlight and moisture - Intense sunlight maximizes the photosynthesis in plants.  In tomatoes, this process allows the plants to make carbohydrates that later turn into the sugars and acids for that rich old-time flavor we so desire.  Both plant labels and seed packets have the light conditions required for optimal growth and production.  For healthy plants, it is also imperative to keep your water schedule consistent.   Disease is far more likely to occur in plants that are water stressed.  Raised beds do dry out much quicker than conventional in-ground gardens and need watered more often.  
  • Ideal temperatures - One of the top ten mistakes gardeners make is planting out at the wrong time.  When plants are placed in soils that haven't warmed properly they will most often sit idle waiting for the signal that it's time to grow.  During this idle phase they are more susceptible to insects and harmful soil pathogens that cause disease.

Happy Gardening,

Denise, Beds 25 & 29

Friday, March 28, 2014

Who's Our "Hottie"?

Hey Everyone,
And the "Garden Hottie" Prize goes to Susan & Steve Phillips of Bed 18!

Susan & Steve's "Garden Hottie" Prize!
Farmer D's Bio-Dynamic Blend Organic Compost
 providing a wealth of versatility in the garden!
Yes Susan & Steve, it's you!  You have the hottest bed in the garden right now!  Taking the garden temperatures this past week has been rather interesting.  While our desire is to see the ground temperatures consistently on the rise, we have experienced exactly the opposite.  Unfortunately, the few nights of extremely cold weather has taken our temperatures from the start of the week at 64.3 degrees Fahrenheit down to an average of 59.8 degrees as of Thursday.

I took all readings late day between 5:00 p.m. and 6:30 p.m. to maximize any heat we may have acquired throughout the afternoon hours.  I use a digital meat thermometer when taking temperatures as these do provide very accurate results.  The temperatures of each bed are taken, divided by the total number of beds, and the result is the garden average.  If you have two beds, I utilize the warmest or coldest one depending on which serves you the best for the purpose of contest prizes. 

As one may expect the chilliest section of the garden remains the area that receives the most shade near the pecan tree and picnic table.  This section had only one bed breaking the 60-degree mark.  That was John and Maxine's with a soil temperature of 61.8 degrees.  The overall average in this section is 58.1 degrees Fahrenheit.  

The most consistent section where the temperatures show the least fluctuation is the area of the garden that also includes special needs.  I believe that when we do obtain our heat, it is lost at a lower rate based on some insulation from the surrounding woods.  This scenario was also the same last year during the period at which temperatures were monitored on a regular basis.  The overall average for this section is 58.6 with those who cover on a regular basis having temps in the low 60's.

Now let's look at the garden's hottest areas!  The overall warmest section in the garden is the uppermost right hand side closest to the orchard.  The average for that area is 61.4 degrees with only a couple beds under the 60-degree mark.  This area continues to warm the fastest when looking at trends in the garden. However, this section also experiences the greatest fluctuations due to the openness of their bed locations.

The section that houses our "Garden Hottie" prize winners has both the warmest and coldest beds in the garden.  Steve and Susan's bed was 68.2 degrees Fahrenheit, which has to do with the fact that they remain diligent in their covering during periods of cold weather.  This allows them not only the ability to retain most of the gains in any ground temperatures they acquire but also the option to get an early start on warm season vegetables when the time arrives.  The coldest bed was number 22 belonging to Carol. Her temperature was 53.6 degrees.  It is always interesting to see how two beds right next to each other can have such a difference in micro-climates.  The temperature of Carol's bed is due to the mulch layer she has surrounding the garlic.  This will serve her very well during the bulbing stage, as if the soil temperatures get too high the garlic tends to shut down affecting its final size during the end game.  The overall average for this section is 60.9 degrees with only a couple beds under the 60-degree mark as well.

I am hopeful that the last of the really cold weather is behind us and we will start to see the warming trend that we look forward to with anticipation of great summer produce.  I will continue to keep us all posted! Congratulations Susan & Steve, you are the hottest!  

Happy Gardening,

Denise, Beds 25 & 29  

Tuesday, March 18, 2014

Free Onion Sets!

Hey Everyone,

I thought it might be nice to kick off the spring planting season with some free onion sets.  Onions do extremely well in the garden and are among the variety of crops that require very little care and maintenance.
Get them while they last!

For spring planting, it is important to get them in the ground as soon as possible.  The sets need time to produce some green top growth before nature gives them the signal to make a bulb.  Spring planted onions will be substantially smaller than those planted in the fall but the keeping quality and flavor is every bit the same.

The Old Farmer's Almanac has some basic onion care and planting information for those in need.  The link is below for your convenience.  In raised garden beds they can easily go 4 inches apart in all directions.  The spacing between rows mentioned in the article is for those directly planting into the conventional garden.

http://www.almanac.com/plant/onions - link to The Old Farmer's Almanac.

Happy Spring,

Denise, Beds 25 & 29

Monday, March 17, 2014

Conducting a Proper Electronic Soil Test!

Hey Everyone,

Mike has been so kind to provide an Electronic Soil Testing Meter to assist us in keeping an eye on our pH and fertility.  The photo below shows our first inclination to conduct the test.  Take the probe and stick it in the dirt!  Unfortunately, using the method shown in the photo will not always provide the most accurate results.  To obtain the best reading possible when conducting a soil test make sure all equipment is clean.  Directions are below for your convenience.


This method will often provide mixed results!
Materials Required:
  • Small container for mixing that is able to hold at least 4 -5 cups of soil
  • A qt. or slightly larger size container that is narrow and deep.  The container must be watertight. Something about the size of a small plastic coffee can works well. 
  • Shovel
  • Stirring utensil
  • Either rain or distilled water
  • Polishing cloth and electronic soil tester - the polishing cloth is the small green felt looking pad in the shed by the tester.


Procedure:
  • Gather 1/4 cup of soil from several different parts of your garden bed paying close attention to gathering from about 6" deep.  It is also wise to omit taking a sample from any areas that look off in color.  The final quantity needed is approximately 4 - 5 cups.  
  • Remove any large pieces of things such as pebbles or sticks.
  • Remove any earthworms to prevent drowning.
  • Mix all samples until well blended.
  • Placed mixed soil into a clean watertight container.  Add enough distilled or rainwater to fill to the same height as the soil.  Stir with a clean utensil and allow the soil to become thoroughly saturated for about 15 minutes.  
  • Once the soil is thoroughly saturated, pour off the excess water.
  • Make sure probes are clean and free of debris.  Polish if necessary.
  • Insert probes into the muddy water and slide the selector switch to the desired test.  Wait two - three minutes for the most accurate reading. 
  • Clean meter, remember to turn it off, and return to shed.
  • Make adjustments to bring your soil back into balance.   

Green Meadows Healthy Garden Tip:

Electronic soil testing meters are a wonderful option for keeping an eye on things and providing a ballpark of where your soil stands.  The downside to these meters is they are only able to test pH and give a general overview of nutrient availability.  

The Burpee meter has a scale function of 16 nutrients required for optimal plant growth.  However, it is not able to express how much of which element is deficient or in excess. 

Adding elements to the soil that are already in excess can do more harm than good not only to the soil, but to the plants as well.  While these meters are an excellent tool in our chest for keeping the garden healthy and productive, nothing replaces periodic soil testing by the Extension Service for more accurate lab based results as well as a total soil picture.  

The link below takes you to the Burpee site that has information on the Electronic Soil Tester as well as their recommendations for what to add based on your results.  There is also a wealth of many sustainable organic options for adjusting the pH level as well as nutrients in many of the garden references.

http://www.burpee.com/gygg/content.jsp?contentId=sunandsoil - link to Burpee's information and recommendations based on results.

Happy Gardening,

Denise, Beds 25 & 29

Thursday, March 13, 2014

Eagle Watch 2014

Hey Everyone,

American Bald Eagles were removed from the
endangered species list in 2007!
Berry College in Floyd County is very fortunate to house the only live video stream of nesting bald eagles in the state of Georgia.  This is the second successful nesting season for the pair with an eaglet named B3 capturing the attention of many.

The 2014 nesting season is at its peak according to a recent article posted by National Geographic.  The article features Berry's eagle cam as one of five to watch across the nation.

B3 is growing rapidly and according to the Bald Eagle Facts below the nest cam, will gain approximately 1 pound every four or five days.  By six weeks of age, B3 should be close in size to his parents.

Not only is this an environmental success story but such an honor to witness these magnificent birds in action.  Even though removed from the endangered species list, life is still an uphill battle for them.    

I have placed a link to the nest cam below for those who want to enjoy.  We have so many children in the garden and this is quite educational to view.  Vicki originally sent the link to me and B3 has been part of my daily routine ever since.

I have also placed a link to the National Geographic write up with the links to other cams containing eaglets to watch as well.  The Florida nest has an eaglet very close to fledging.

http://www.berry.edu/eaglecam/ - link to the live video feed of the bald eagles nesting at Berry College.

http://news.nationalgeographic.com/news/2014/03/140306-animals-bald-eagle-cams-environment-endangered-species/ - link to the National Geographic article on these iconic birds and the five cams to watch across the nation.

Hope you enjoy,

Denise, Beds 25 & 29

Wednesday, March 12, 2014

Additional Gardening Classes to Attend

Direct from the Cobb County Extension Blog,  here are several more classes you might be interested in taking this spring. (Two were in a previous post but this post contains more information).

If you are interested in taking a class be sure and call to preregister! Don't forget, you can also subscribe to the Extension Blog by email.

Home Yard and Garden Equipment: Use and Care
Saturday, March 22, 1:00 p.m. Free and open to the public. Presented by Agriculture Agent Neil Tarver at UGA Extension/Cobb County, in the second floor classroom at 678 South Cobb Drive, Marietta, GA, 30060. Please preregister by calling 770-528-4070.

Evergreen Groundcovers for Sun and Shade
Tuesday, March 25, 7:00-8:00 p.m. Free and open to the public. Presented by Master Gardener Shirley Priest, as part of the ongoing Gardeners Night Out presentation series of the Master Gardener Volunteers of Cobb County, at South Cobb Regional Library, 805 Clay Road, Mableton, 30126.

Bluebird Trail Tour
Saturday, March 29, 10:00 a.m. Free and open to the public. Cobb Master Gardener and Bluebird expert Jim Bearden will conduct a guided walk of the Bluebird Trail at Green Meadow Preserve Park, at 3780 Dallas Hwy., Powder Springs, GA, 30127. Follow the Bluebird Trail blog at bluebirdtrail.blogspot.com.

UGA Extension in Cobb County Open House
Tuesday, April 1, 9:00 a.m. – 3:00 p.m. Free and open to the public. Drop in to discover what Extension in Cobb County has to offer! From Horticulture and Natural Resources, to 4-H for youth, to Family and Consumer Sciences, we provide up-to-date, researched information from UGA to the citizens of this county. Open House with displays and snacks at UGA Extension/Cobb County, second floor, 678 South Cobb Drive, Marietta, GA, 30060. For information, call 770-528-4070.

Garden to Table
Thursday, April 3, 6:00 – 8:00 p.m. Agriculture Agent Neil Tarver and Family and Consumer Sciences Agent Cindee Sweda present a class growing and then using food crops. UGA Extension/Cobb County, second floor, 678 South Cobb Drive, Marietta, GA, 30060. Preregistration is required; $10 fee for class and materials. Call 770-528-4070 for information and to register.

Moving Toward Organics in the Vegetable Garden
Tuesday, April 8, 7:00 – 8:00 p.m. Free and open to the public. Learn what organic gardening and farming really means and steps you can take to have a more environmentally friendly garden.  Presented by Amy Whitney, of UGA Extension/Cobb County, as part of the ongoing Gardeners Night Out presentation series of the Master Gardener Volunteers of Cobb County, at Mountain View Regional Library, 3320 Sandy Plains Road, Marietta.

The Beauty of Bulbs! From Amaryllis to Zephranthes
Friday, April 11, noon to 1:00 p.m. Free and open to the public. Presented by Master Gardener Debra Stockton as part of the ongoing Lunch & Learn series of the Master Gardener Volunteers of Cobb County, at the Training Room of the Cobb County Water lab, 662 South Cobb Drive (at the intersection with Atlanta Rd.). Debra will give us the ABCs of bulbs with a focus on Georgia favorites: daffodils, gladioli, and tulips.

Monday, March 10, 2014

Should I Test My Soil?

Hey Everyone,

We have often heard that the secret to growing great vegetables starts with the soil.  Having the proper nutrients readily available and a pH in balance so plants can attain them is imperative for a healthy and productive garden.  The pH range for most vegetables to thrive is between 6.0 and 7.0, although they will tolerate a range from 5.0 to 7.5.  This pH range is also favorable for earthworms, microbes, and soil organisms to flourish.
Soil Test Bags
Soil Sample Bags are available
 in the shed
for your convenience!

Soil tests can save you time and money, as they are an excellent tool for identifying deficits as well as extremes in your soil.  They also provide a snapshot of the overall balance of nutrient levels enabling you to add only what your soil really needs.  For healthy plants to thrive there are 16 essential elements required.  Over a dozen of these are in the form of macro and micronutrients coming primarily from the soil.  If shortages or excesses are present or a pH is out of balance preventing plants from getting the nutrients they need, problems can and will occur.  Plants are much more likely to develop disease and nutritional deficiencies since they lack what is necessary for proper growth and development.  Yield and vigor will also undoubtedly be less.   

Many often ask how often and when should soil be tested. According to the U.S. Department of Agriculture as well as many extension offices across the U.S., these are some general guidelines as a rule of thumb for vegetable gardeners.
  • Test before gardening in any new area.  The results of a soil test are invaluable for providing an accurate baseline to identify any potential problems that need addressed. 
  • Conventional home gardeners - usually every couple of years is sufficient for keeping soils in prime condition unless you are experiencing difficulties.  If you have done a soil test requiring a correction in soil fertility, special elements, and/or pH, it is also wise to retest the following year to make sure the problem is rectified.  As a special note - UGA as well as a few others do recommend testing vegetable gardens on an annual basis for optimum production and soil health.
  • Test any time you suspect a nutrient or pH problem.
  • Test any time you plan to make a major change in what you are growing in that particular area.  An example would be if you are growing vegetables and want to make a change to blueberries, raspberries, etc.  These have different pH and fertilization requirements.
  • Test at the same time of the year to maintain a comparative analysis of where your soil stands.  
For those who are interested in having a lab based soil test, the link below is for your convenience.  I have also placed a link with the fee schedules for the different types of tests that the extension service currently offers.  If you scroll down to page 12 and beyond the prices for the individual tests are listed. Basic routine tests are as low as $6.00 and more often than not pay for themselves since you are only adding what your soil really needs.

http://aesl.ces.uga.edu/ - link to the Agricultural & Environmental Services Laboratories home page with soil testing information and links.

http://aesl.ces.uga.edu/FeeSchedule.pdf - link to the fee schedule for soil testing at UGA's Extension Service.  Scroll down to page 12 and beyond.

Happy Gardening,

Denise, Beds 25 & 29

Sunday, March 9, 2014

End of May

Just to give us some hope that winter will go away, here are a couple of pictures from May 30th, 2013 at the garden. Now true, it was a WARM winter last year so everything started growing faster. But soon, we'll see similar sights at the garden.

We might even be wishing it for it to be cooler too!


Friday, March 7, 2014

Check your engines, errr Onions

Notice how the thumb is mushing INTO
 the onion bulb. It should be firm
and hard, not mushy.
Unfortunately for us, all the rain that we continued to get at the end of 2013 has contributed to another problem in the garden. It isn't obvious because it looks like the onions are doing good. Healthy green bits are above the ground.

But...below the ground, the bulb is in a sorry state. In fact, the onions are demonstrating what happens if you over water them.

I know John and Denise both checked and found they had mushy onions. The best thing to do is to dig an onion up (or down to the onion bulb) and test to see if it is mushy.

The onion on the left  is still full, plump and firm.
The onion on the right is the one that is mushy.
If it is mushy you have two choices. Dig it up and then remove the mushy bits and use it as you would a green onion. Or, leave it to grow and see what happens.

If you let it continue growing, it may bulb but it won't have good keeping qualities. You would need to eat them right away when you harvest them. (Just remove and toss any mushy bits. The remaining part is fine to use..)

At this point, why not just remove them and have space for more plants this spring.  Or you can replant onions and get another change of growing a nice sized onion. Maybe this is the last of the nasty side effects of too much rain in 2013!

The onion sets in the shed have been removed as they too were past their prime for planting.  Denise is going to put some fresh ones in the shed early next week if you are thinking about planting onions this spring.  Spring planted onions will do very well however the bulbs will be somewhat smaller compared to those planted in the fall. Small size but still great tasting!! Mmmmmm....

                     Vicki

Thursday, March 6, 2014

Daffodils or Jonquils?


Do you call them Daffodils or Jonquils? Actually they are Narcissus but who really cares as they are so cheery, hardy and make everyone happy when they bloom.

There are two words of warning about them, don't eat the bulbs as they are toxic and some varieties may cause a rash from the sap after the flower has been cut. However, it is very easy to keep the sap from dripping on you when you cut the flowers. And once you plant the bulbs no one is likely to eat them.

The potential problems are more than made up for by how long daffodils last as a cut flower and in the yard. The flowers will actually dry in the vase if you ignore them and then you'll have daffodil flowers for months. (Ask me how I know....)  Some varieties even have a lovely smell. But best of all they have that wonderful, cheery yellow color that is so welcome when it is still cold and dreary and you don't think spring will ever, ever get here.

 If bad weather comes along and bends or breaks any stems, you can cut the flowers (as well as any buds.) Bring them in the house, put them in a vase and the buds will open. One year we had quite a bit of bad weather and I ended up with many bent/broken stems. I figured I had nothing to lose so I cut the stems with buds just above the bend, stuck them in a vase and 99% of them opened. Those that didn't they weren't even close to opening when I cut them. But I figured why not try. I had nothing to lose and a lot to gain. 

Daffodils come in a wide variety of colors, shapes, sizes, bloom times, doubled and single flowers. I have one clump that tends to bloom several weeks before any others have buds starting to swell. If you want to learn all about the different bloom times ,Gibbs Gardens  up in Ball Ground has a magnificent planting of daffodils. Actually, more than magnificent as they have 50 acres planted with 20 million daffodil bulbs and they used 60 different cultivars in their plantings. Right now is prime time to go visit and marvel.

The daffodils in these pictures are from my yard as I went on a daffodil binge 15 or 20 years ago and planted them everywhere. I really enjoy looking out at this time of year and there is a spot of color out every window.