Monday, April 29, 2013

Pestiferous Wild Onions

The wild onions we have in the garden are pestiferous to the max.

We are going to experiment with several new ways of getting rid of them but in the mean time, the best way to get rid of them is to dig down to the very bottom of the stem and gently extract the onion bulb and all its bulbils.

If you don't, you leave the big bulb and all the baby bulbs  behind to resprout. It does take longer to get them all out but if you do you are rewarded by not having to get mess with them in the future.


We have new neighbors!

We now have another nest to watch at the garden. Last week I noticed a Carolina wren nest had been built in the corner of the ventilation window on the side of the shed. It actually is a really good place for a wren nest because it has a cool breeze, is totally protected from the elements and has a wide ledge for the nest to sit on.

Wren nests are very hard to peer into to count how many eggs are there. Cavity nesters (bluebirds and American kestrels) and birds such as osprey, great blue herons and peregrine falcon's that nest repeatedly in a particular place, are much easier to observe.

Even though bluebirds nest in boxes, you can wire the boxes with a nest cam and see all the activity in them. Last year my husband and I were addicted to watching an American kestrel nest cam in Boise Idaho.

Nest cams are video systems that you set up to live stream all the activity that occurs at the nest location. Most nest cams only work during daylight hours but some use an infrared camera so you can watch all night.

There are many local nest cams (just search for nest cams in Georgia). One that I know will be active for at least another month is in downtown Atlanta.  The peregrine falcon nest is on the the Sun Trust Plaza building, approximately 50 stories up. Since the nest is on a tall building, it is well lit so it can be seen in the sky. It certainly makes it easy to watch this nest 24/7.  Peregrine Falcon Nest -Downtown Atlanta.

Cornell Lab of Ornithology in New York has two nest cams and links to others (Cornell University Nest Cams). This year they have links to 2 osprey nests, a red-tailed hawk and a great blue heron.  The American Kestrel Nest Cam just went live so there will be activity for the next 2 1/2 to 3 months for that box.

On the Green Meadows Bluebird Trail we have Carolina Chickadees, Eastern Bluebirds, Tufted Titmice and Tree Swallows nesting in the boxes.  There aren't any nest cams on those boxes but here is a link to the Bluebird Blog Nest Cam post if you want to watch bluebird nest cams.

Sunday, April 28, 2013

Saturday Workday Fun

We lucked out and had beautiful weather for Saturday's work day- okay it was beautiful because it didn't rain and it wasn't cold! In fact, as of 8:30 Saturday night it still hadn't rained.

The Bluebird Fundraiser was a resounding success. Mike and Sue did a wonderful job preparing the food for the Bluebird Blue Plate Special . If you weren't there, you really did miss out on some delicious food! And you missed out on getting to just sit and chat with your fellow gardeners while at the garden.

Everyone was already a winner after eating that delicious lunch but went home as double winners after the Bonanza Door Prize Drawing.

The garden looks 200% better than it did at noon on Monday. Spreading a huge pile of mulch, moving a huge pile of dirt, tilling up a huge sections of weeds besides digging weeds makes the entire garden look new and fresh. Yes!

There are still a couple of sections of the main paths that still need work before the next load of mulch gets delivered.


Above: The sunflower border after the first 2 passes with the tiller. To the right: The sunflower border after the tilling has been completed. Quite a difference, isn't it!  Thanks Denny for tilling it for us and Mike for using his truck to bring the tiller to the garden.

Everyone is hard at work at some task or the other


Chuck spend all morning moving sifted soil back and forth. Either to the sunflower borders or into the compost bin while Jennelle and Susie sifted, sifted, sifted... Jennelle was very happy to use the gloves she had gotten as a door prize after a previous workday. Susie wished she had some. Lucky her, she managed to snag a new pair of gloves at today's Door Prize Drawing!


        Team 1 - aka The Blues Sisters                                                   Team  2 - Mary & Carol

 It was sad work removing all the fruits and flowers from the apple, pear and plum trees but it had to be done. The trees will be much stronger now that they can devote all their energy to making roots versus making fruit while their roots aren't established yet.

Field Trip to LCCL Strawberry Farm!

Mike and Sue go to LCCL Strawberry Farm every year to pick strawberries. Last weekend they did a trial run up to see how many berries were on the plants (lots even though it was early in the season.)  The strawberries they brought back with awesomely delicious.

Now that the strawberries have come in, it is time to plan a field trip to get some!

When: Saturday May 4th

Time to meet: 7:30 am

Where to meet: Green Meadows Community Garden Parking Lot

Destination:   LCCL Strawberry Farm in Rome Georgia to pick strawberries.

We will probably only be gone about 3 1/2 hours. But if you want to stay longer to pick more feel free to.


Saturday, April 27, 2013

Ariel Hardy the 1st has spines

 
Ariel Hardy the 1st and her daughters have beautiful foliage. They look very soft
and wonderful to touch but beware........


If you touch the tops of the leaf you are fine. If you grab a handful of the leaves and stroke you will get lots of spines to pull out of your hand. They now have warning signs in front of them to remind us to be careful.

Ariel the 1st survived her move from Jane's bed - even through several hard freezes right after she was moved. Her two daughters are struggling a bit since it has been warm and sunny since they got moved. It will be interesting to watch them grow and hopefully produce artichokes.

Workday and Bluebird Fundraiser are still on!


We are still going to have the workday and the Bluebird Fundraiser today. Looking at the radar it looks to be mostly rain free from 10:00 am onwards. Be sure to come out and join us!

Friday, April 26, 2013

Better Seed Storage

You bought seeds, you planted 5 squares of carrots, 2 squares of radish, 6 squares of lettuce and now what are you going to do with the remaining 600 seeds?

How you store your seeds determines how viable the seeds are the next time you want to plant that variety.  (Viable just means how well they germinate.)

To test the germination rate, get a damp paper towel, put 10 seeds in it, fold the papertowel over and put it in a ziplock bag. Let it sit for a few days (actually, as long as the germination time listed on the seed packet). Then you check and see how many sprouted.  If only 30% (3 seeds) sprouted you might as well just get another packet of seeds. Seed Germination video link

The way I've been storing my seeds is to open the seed packet, pour all my seeds into a tiny plastic bag - you can find them at the Plastic Bag store and the craft stores in the bead sections. I label my tiny bags and then put them back into the seed packets.

You need an air tight, dark, cool spot to store the seeds. If you have an old ceramic canister with a seal (like those used to store flour and sugar on a counter top), you can use that. If you don't have one, just go to Goodwill and you can find them for a very good price. That is where I got mine when I decided I needed a better way to store my seeds last year.

Anywhere in your house is a good place to keep the seeds because we do heat and cool to keep it comfortable for us. The nice thing about using a ceramic container it is much harder to put the seeds in a safe place where you can't find them next time you want them.

Thursday was a Gorgeous Day

The weather for Thursday was absolutely gorgeous! You couldn't have asked for better for a workday. Pollen was bearable, temperatures were perfect and it was sunny. We made a dent in the list of tasks to do this month but there is still plenty more to do.

Almost a third of the garden has had a fresh layer of mulch spread on it and it is starting to look really nice. Another couple of piles of mulch and we'll be weed free - except for pesky onions and the occasional intruder. Thanks to everyone who came out Monday, Tuesday, Wednesday AND Thursday to help spread the mulch.

Bridget working hard on the mulch
Please come out to join us on Saturday!

With lots of hard work all week from many dedicated
people and the mulch crew on Thursday, this is all
 that was left of the huge pile we got on Monday.


Vicki weeding, weeding weeding
Lisa and Bridget moving and spreading mulch

Digging for Gold!
Actually, sifting the dirt pile and removing
earth worms before moving the dirt over
to the compost pile to finish composting.
Carol and Sandra doing hard labor planting
rose bushes around the sign.
 

Thursday, April 25, 2013

Weekly Calendar April 26 - May 2

April 27
10:00 am to 12:00 noon
Saturday Workday
Details for Saturday workday

12:00 noon to whenever
Bluebird Fundraiser Details

April 30
5:00 pm to 7:00 pm
Gardener's on Duty


"Hilling" your radish and carrot seedlings

Last fall I learned about "hilling" dirt up around my carrot seedlings. I'd forgotten that tip until I heard Denise mention it to someone at the garden last week. My carrot and raddish seedlings aren't big enough yet but these Dalita's radishes definitely need some "hilling".

Hilling is just pulling up some soil to cover the exposed root. If you don't cover up the exposed carrot or radish root you end up with green shoulders, a bitter taste and a vegetable that really isn't as good as it could be. Or...you end up with no raddish or carrot because it never really got seated in the soil properly.

Generally speaking, you have to pull soil up over the shoulders of carrot and radish seedlings two times.  But if you notice they are getting exposed again, pull a little more soil up.


Look at the first row of radishes - notice that there are varying amounts of red radish sticking up out of the ground. The 3rd one back isn't sticking out as far but it too needs to be covered up.


This is the same row of radishes but now all but one of the radish plants has dirt snugged up next to them.  But don't worry, as soon as the picture was taken the last radish plant got dirt around it as well.

Luckily for me, Dalita was willing to wait to put dirt around the radishes so I could take all the pictures I needed with the proper light. Thanks!

Wednesday, April 24, 2013

Local Farmers Markets

We are lucky to be living in Cobb County because there are so many local Farmers Markets available to visit. Even better, they aren't all in operation at the same time. There is bound to be one somewhere near you which is open on a day and time that works well for you.

Farmers Markets vary in what they offer. They run from offering only food  to  the opposite end of the spectrum where they offer food, plants, art, craft work, live chickens & rabbits, soap,  cooking demonstrations, music, etc. Each market is unique and fun to visit.

The Granddaddy of them all (locally) is the Marietta Square Farmers Market  It is open Saturday year round (9:00am to 12:00pm) and also has Sunday hours April through November (12:00 to 3:00 pm)

Photo provided by Marietta Square Farmers Market

Many other communities offer Farmers Markets besides the ones I've provided links for here. Just search online and you'll find many more. If I'm traveling, I always try to see if there will be one open where I'm going because I always find something interesting.

Acworth Farmers Market
Friday (7:00 am - 11:00 am)   Opens May 24 - Closes Oct 25

Kennesaw Farmers Market
Tuesday (7:00 am - 1:00 pm) Opens May 7 - Closes Oct 29

Paulding County Farm Bureau Farmers Market
Friday (3:00 - 7:00 pm) Opens April 6 - Closes end of November.
They also have Tuesday night hours during the middle of the growing season.
They are at the intersection of Hwy 92 and Dallas Hwy, across the street from Stars & Strikes There location is just a couple miles west of the garden.

Spreading Oaks Farm at the Paulding County Farm Bureau Farmers Market
(Photo provided by market)
 
Dallas Farmers Market
Saturday (8:00 am - 1:00 pm)  year round weather permitting 

Mableton Farmers Market
Thursday (8:30 am - 12:30 pm) Opens May 23 - Closes Sept 5


Typical scene from any farmers market - this one is from the Paulding County
 Farm Bureau Farmer's Market (photo provided by the market)
 
If you are interested in finding U-picks and farms that sell to the public, here are several other resources you can use.

Local Harvest
A great site to find local farms and farmers markets that sell meat, eggs, produce, etc to the public. as well as U-pick's, CSA's, etc.

Pick Your Own.org
I've used this site quite a few times to find places locally and nationally as well.

Farmers & Consumers Market Bulletin
You can subscribe to the Georgia Farmers & Consumers Market Bulletin. I've found some wonderful plants and items through it. 

Saturday Workday with Door Prizes and Bluebird Fundraiser

This Thursday, April 25th and Saturday, April 27thare our April work days. Thursday is from 10:00 to 12:00 and Saturday is from 10:00 to 12:00 also.  So far, here is the list of things we've come up with that needs to be worked on.

· Weeding (ongoing and forever)
· Weed pollinator beds before mulching
· Mulch pollinator beds with mini-pine nuggets
· Spread free or purchased mulch in garden common areas
· Move the compost/dirt pile and sift it as we move it
· Round-up along outside of fence (Thursday only)
· Till the sunflower border area (Saturday only)
· Plant sunflower border area (Saturday only)
· Weed eat/cut onions and Round-up remaining stems
· Weed around sign and plant 4 or 5 Caldwell Pink roses around the GMP sign
· Plant 4 Celeste figs in 1 gallon containers on the upper terrace
· Give the shed a good sweeping and cleaning
· Remove blooms & fruits from the fruit trees (Saturday only)
    (The fruits need to be removed so the trees develop a good healthy root system the first year in the ground)
 
As you can see there is a lot to do and we probably won’t get it all done on Thursday and Saturday unless YOU come help us.   Even if you can only come out for an hour, your contribution of time and effort will be greatly appreciated.
 
On Saturday after the workday is over at 12:00, we will be having a Bluebird Lunch Fundraiser for the Bluebird Trail.  Mike and Sue will be providing a delicious selection of food.  For further details, check the link to the Bluebird Lunch Fundraiser post.

Friends of a Feather -Bluebird Fundraiser


On Saturday at the end of the workday (12:00 noon), there will be a lunch fundraiser for the Bluebird Trail.

The baby blue birds are hungry and your support is very much needed.

We will be providing a delicious selection of food including several salads. We will be doing it like a Bar-b-Que plate fundraiser taking donations for each plate.

Help us help the mother blue birds feed their young.

Mike & Sue

Lavender Lemonade

Hey Everyone,


Just the hint of the 80 degree weather last week had me thinking about planting the lavender.  This is one of my favorite recipes for the long hot days of summer.  
Simply delightful!


Lavender LemonadeCooking Light Magazine


Does this not scream, plant me?

Ingredients:

4 cups water, divided
¼ cup chopped fresh lavender leaves
2/3 cup sugar
1 cup fresh squeezed lemon juice (about 6 – 8 lemons)
Lavender stems and/or flowers

Preparation:

Using a small saucepan, bring 1-cup water to a boil.  Pour boiling water over the chopped lavender leaves, cover, and steep for 30 minutes.   Strain the lavender mixture through a fine sieve into a pitcher; discard the used leaves.

Combine 3 cups water and sugar in a medium saucepan.  Bring the mixture to a boil, and cook 1 minute or until the sugar is completely dissolved.  Mix the lavender water, sugar syrup, and lemon juice in a pitcher.  Cover and chill. 

Serve over ice.  For a special touch, garnish lemonade with lavender flower stems or freeze lavender flowers into ice cubes.   Another nice touch is to add just a couple drops of food coloring.  Blue & red make purple or simply green is beautiful.

Hope you enjoy,

Denise, Beds 25 & 29 

Medication Disposal Day

picture from the CobbLine Newsletter
If you don't subscribe to CobbLine, the weekly eNewsletter that is sent out, you miss out on hearing about important community efforts. This weekend - Saturday only between 10:00 am and 2:00 pm they are having a Medication Disposal Day.

Everyone needs to weed out and purge medications - over the counter and prescription as well as vitamins.  But how do you properly dispose of them. Tossing them in the trash is unsafe. Flushing them down the toilet is also unsafe and bad for the environment when it gets into the rivers and water table.

The best way to dispose of unwanted medications is take them to one of Cobb County's Medication Disposal Day's. You just drive up and hand it over. You don't even have to get out of the vehicle. The first time I went I took stuff from my house, my mom's and my sister's.

If you have time this Saturday I hope you take advantage of this opportunity to purge your medicine cabinet in a safe way. Mother Earth will appreciate it.


Tuesday, April 23, 2013

Another Mulch Pile!

Another HUGE mulch pile was delivered today. Yippee....though I must admit it was more of a tired yip after awhile.

Carol, Rita, Kitty, Denise and Vicki worked very hard weeding under the pecan tree waiting on the mulch to be delivered.  A lot can be achieved during a 2 hour wait.

Once it was delivered Vann and Mark joined us in moving and spreading mulch around the sections of the garden that had been completely weeded.

Obviously we didn't finish because this pile is what was left after we'd mulched the ground around three rows of beds as well as a big chunk of one of the community paths!

Now is the time to rush to the garden to weed  around your bed and then spread mulch around it. Hopefully your energy and enthusiasm lasts long enough to help spread mulch in the community areas that have been weeded as well.

I don't know what it is about mulch piles, but they must send subsonic signals out to Mark because every single pile we've had he has helped spread.

Door Prize Bonanza!

Prizes Galore!

Hey Everyone,

It's back!   Door Prize Bonanza at the next two workdays! Both Thursday & Saturday!

As always, this is a wonderful time to come out and enjoy working as a community while supporting the Master Gardeners who do so much for Green Meadows.

Please remember to enter the raffle.  You can't win, if you don't play!  Drawing will be held at the end of both work-shifts.

Plants, prizes, and so much more!  How fun!

Denise, Beds 25 & 29      

Monday, April 22, 2013

Sunflowers and Pollinators

Last year, I watched and marveled at how many pollinators came to visit the sunflower plants Tucker had growing in her bed. The other amazing thing was all the different species that came to visit.

To get to get a good yield in a vegetable garden or orchard you have to have pollinators to come pollinate the flowers on your plants. True, not all plants need insects since some plants are wind pollinated or self-pollinating but you still need pollinators to help.
When you think of a pollinator you tend to think of just the honeybee. While the honeybee is very important, the native bees, bumblebees, flies and wasps are equally as important for pollination and insect control.

The more I read and talked to experienced gardeners about vegetable gardening, the more I realized how important it was to have even more plants for the pollinators and especially for the beneficial insects (predators).

What is a beneficial insect? An insect (praying mantis, lady bugs, parasitic wasps, spiders, etc.) that eat or parasitize insect eggs and bad bugs (aphids, mites, white flies, hornworms, etc.) .  Predators in the bug world are our best friends.

To make our best friends happy and more comfortable, we need more pollinator beds. Especially beds that have plants specifically for the predators ie, beneficial insects. The more beneficials we have, the less insect and disease problems we will have.  Which means less spraying and higher yields. Definitely win win situations for us, the plants and our insect friends.

This week during the Saturday workday we will be tilling up the beds along the fence facing the orchard. Once they are tilled, if we have time on Saturday, we'll plant sunflower seeds as well as herb seeds and plants. If we don't get them planted, we'll just do it some night next week.

Sometimes when you buy herbs at the nurseries you end up with more than you can use. If you need to find a good home for them, feel free to put them in the new beds going in. If you need to divide any plants, we have a new home waiting for them. The following herbs are what we are interested in: Cilantro, Basil, Fennel, Garlic Chives, Parsley, Mints, Dill, Oregano, Thyme.

I love Citizen Science Projects so later in the year, we'll be doing  citizen science surveys of what pollinators are using our pollinator borders. You'll be invited to participate when the time comes.

In the meantime, I hope you come out and help us put the in the sunflower and herb border during the upcoming Saturday workday.

Saturday, April 20, 2013

Tool Safety

I'm always reminded each season that there is a right way and a wrong way to temporarily leave my tools sitting around. Usually I only manage to trip but there have been a time or two I've managed to knock myself in the head with a tool. Small tools with tines can be just as dangerous as tools with long handles.


Never leave a tool with the tines up!
 If you step on it you can
  • A: Knock yourself in the head with the handle when it flies up
  • B: Leave claw marks on your legs
  • C: End up with a hole in your foot


This is better because you won't step on the tines
but you can still trip over the handle.


Much better! You are less likely to trip over it
 when it is propped up like this.

Friday, April 19, 2013

Weekly Calendar April 19 - April 25

April 20
10:00 am to 12:00 pm
Gardeners on Duty

April 23
5:00 pm to 7:00 pm
Gardeners on Duty

April 25
10:00 am to 12:00 noon
Thursday Monthly Workday

Out and About 9AM-ish April 11, 2013

GM Buddies  4/11/13  9AM-ish

Shinseiki Asian Pear (Pyrus Pyrifolia) Dwarf  4/11/13  9AM-ish

The Tree and Its Companions 4/11/13  9AM-ish
So just for the Record, here's what I saw before the community garden planning meeting - buddies hard at work while a pear tree soaks up the early AM sun.  Looking up, there's that beautifully formed oak.  Sigh ...  Don't be fooled by that 'little' mound of brush in the bottom center right of The Tree - that mound is HUGE.  Thanks, Guys, for your sweat-equity in clearing under and around The Tree!  Hope you three (Mike, Jim, Bruce) have time to sit and sip a tea-toddy nearby soon.

Thursday, April 18, 2013

The Potatoes are growing!


The potato tower is finally starting to send out sprouts.  I was beginning to think that part of our potato experiments wasn't going to be very successful. It certainly has taken a lot longer than the potato bag.  Even the potatoes planted at the very top of the tower have only just come up. So far, I'd have to declare the potato bag as the winner for ease of use and amount of plant growth. Of course, the final winner won't be declared until we've seen the amount of potatoes actually produced.

Making Worm Tea!

Tea Time, Garden Style
Hey Everyone,

I received an email from a fellow gardener regarding the recent post on worm castings.  They were checking to see if I have a specific recipe for making the tea.  Since worm tea is so beneficial to the plants, while acting as an exceptional pest repellent, I thought it would make a wonderful follow-up post for all.

This recipe gives you the option to use aquarium materials for ease and speed, or not.  Based on experience, using the aquarium equipment will produce a higher yield or better quality tea, however, it can be done as long as you are diligent in your aerating efforts without the additional materials.  Worm tea will not burn the plants in any way; however, you should avoid spraying in the heat of the day.

Ingredients:

5-gallon bucket
Tap water
Aquarium pump, air-line tubing, and air stone (optional equipment and runs about $20.00)
1 oz. of corn syrup or molasses (Make sure molasses does not contain sulfur)
2 1/2 - 3 cups worm castings
1 piece of fine mesh like pantyhose for filtering
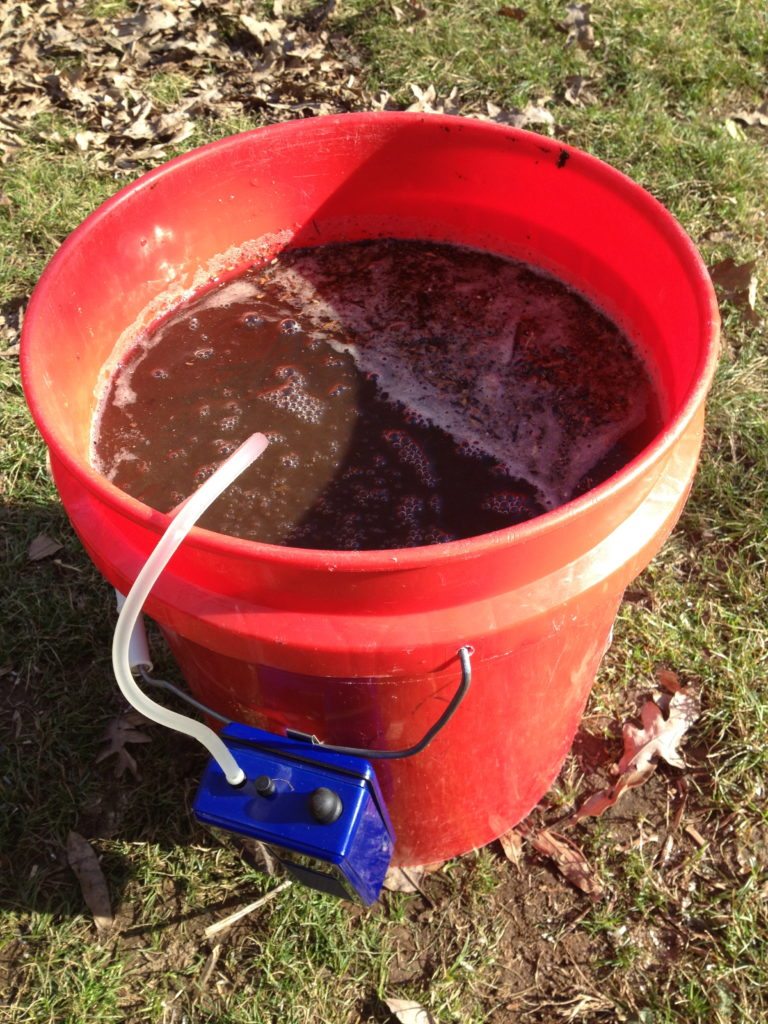
Home Depot 5 Gallon Bucket
With Aquarium Equipment Attached!

Directions Non-Aquarium Equipment:

Fill the bucket with tap water 3/4 of the way full.  See photo to the right.  Let the water stand for 24 - 48 hours in order for the chlorine to evaporate out.  This step is imperative, as chlorine will kill the beneficial micro-organisms rendering the tea useless.  If you are using rainwater, eliminate the standing process.

Remove about one cup of the chlorine free water.  Blend the corn syrup or the molasses into it.  The micro-organisms utilize the corn syrup or molasses for food while your tea is brewing.  Thinning it makes the food more readily available for them.

Add the corn syrup or molasses mixture back to the bucket. Stir until well blended.  Dump in the 2 1/2 - 3 cups of worm castings.  It does not have to be exact.  Mix well, but gently. You don't want to harm all those cute little microbes in there.

Some people will put the castings in pantyhose or a fine mesh teabag like material.  In trying different methods over the years, I have found this does not allow the microbes to move freely in the water and slows their growth tremendously.  This method is only wise if you are using an air stone or bubbler.

Let the worm tea stand for 3 days stirring occasionally to aerate.  Before utilizing aquarium equipment, I would stir four to six times per day.  Once again, do so gently.

Presto, you have just made your first batch of worm tea!  If you are using a watering can for soil application, there is no need to filter your finished product.  However, if you will be applying with a sprayer for foliage feeding, you must strain to remove the particles that will clog the nozzle.  Pantyhose or anything with a 400 micron filtration work exceptionally well for this step.

Use finished tea within 36 - 48 hours while the microbes are the most biologically active.  If any unpleasant odors develop after the initial brewing, do not use the tea, as this signals the death of the beneficial microbes and the mixture should be dumped.  It can go into the compost pile, just don't use it on your vegetation.

Caution:  This tea is not for human consumption.  Just thought I would throw that out there since most gardeners will try anything once!

Additional Directions for an Air Stone or Bubbler System:

Got Tea?
The recipe for aquarium equipment is the same as above aside from these few details.

After filling the bucket 3/4 of the way full, assemble the aquarium equipment.  Place the air stone in the bottom of the bucket and aerate the water using your pump for 3 to 4 hours to remove all chlorine.

Blend the corn syrup or molasses with two cups of chlorine free water to avoid clogging the air-stone.  Trust me on this one!

Add the corn syrup or molasses mixture back to the bucket.  Dump in the castings and let your pump do the rest.  Aerate for 24 hours, filter the finished product and your tea is ready to go.

The thing I like the best about using the aquarium equipment is the speed at which a higher quality tea can be made.  Spraying on a routine basis adds the beneficial microbes and nutrients to the soil and the plants, thus, providing the proper balance they need to help repel insects and fight off disease.  In addition, if you notice your plants are not taking off or they seem to be a little sluggish, this is a wonderful recipe to perk them right up.  Many references on the topic also state that the use of worm or compost tea not only provides the beneficial microbes and nutrients, but also increases the overall fruit and flowering production of the plant.  For those making compost, you can also brew compost tea in much the same fashion.  This is a wonderful link for additional compost tea recipes.

http://www.compostjunkie.com/compost-tea-recipe.html

Happy Brewing!

Denise, Beds 25 & 29