
Isn't this an exciting time of year? I stand and stare at my little 4 x 8 field of dreams with such anticipation of all the wonderful plants and produce to come. The last of the carrots have been pulled, the dreaded grub search (Yuk) performed, and I am well on my way preparing for a good old-fashioned spring sow down.
Many have asked why is it so important to check for grubs and for better details on how to revitalize their soil for planting, so I thought it would make an excellent post. If you look back to the post, "When is it Warm Enough to Plant", I have some details for you there as well.
| Grubs - feed on the roots of plants in the soil. Beetles that hatch commonly feed on the foliage or fruit. Grubs are known to attract raccoon's. |
The main reason to check your soil thoroughly is not just for the grubs, but to assist in promoting a healthy organic garden. In a garden of this size we will be faced with many a pest and that is why it is so imperative to be preemptive. We will have two choices, deal with pests now and reduce their numbers, or deal with even more of them later. Decreasing their numbers and interrupting their life cycles, as best we can, is a proactive approach that will serve us very well down the road. It will also assist us in growing healthier plants with increased vigor, better disease resistance, and greater yields.
| Soil Centipede - While these guys will feed on the larvae of other insects, they are especially fond of earthworms. |
little guys to the right had to go!
In prepping Bed 29 for spring sowing, I felt fortunate not to be loaded with grubs as many have found. However, in thoroughly checking
the soil, I did find several undesirable pests that had the potential to damage many root crops and other young seedlings.
| Wireworms- damage the roots of herbs and feed on potatoes, onions, beets, carrots, and the like. Can feed for several years. |
Aside from the grubs, each of the photos in this post represent what was found and the potential damage it can cause. I put liquid soap in a five-gallon bucket, added about 3 inches of water, and proceeded to drown to kill all the undesirables. The total findings were a wealth of earthworms at every stage of growth, including egg cases, four soil centipedes, several wireworms, three carrot beetles, a half dozen carrot rust fly larvae, and a partridge in a pear tree. Okay, I just wanted to make sure you were still reading.
The only disappointing action I took was to drown several of the earthworm egg cases. I have not seen these before and followed my instinct to get the undesirables out of the soil. After running across one hatching, well let's just say, my badness! You know what they say about those garden lessons learned, that was definitely one of them. Next time, I will take the unfamiliar egg cases home and identify them first.
| Earthworm Egg Cases - so disappointed in my actions! Hopefully this photo will keep someone else from making the same mistake! |
As far as revitalizing the soil, you will notice that everyone has a special recipe, and in time you will find what works the best for you. Mike and Sue of beds 30 & 51 have a wonderful philosophy of feeding the soil and treating the plants if any problems arise. Jim of beds 34 & 35 has a recipe that requires very little additional fertilization.
I follow this practice both here and at home. Most often, I will remove a small amount of soil that will be used elsewhere for fill dirt or for tilling into new planting beds (non-vegetable). Next, a complete and thorough search is done for everything detrimental needing removed. This allows an excellent opportunity to learn from what is in the soil and anticipate what measures to take early on for a more proactive and preventive approach to pests. Imagine planting carrot seed with rust fly larvae left in the soil. Now that those are removed, dusting with a little wood ash at planting, inter-cropping with some green garlic or radishes, and using a yellow sticky trap should work at keeping those pests at bay.
| Carrot Beetle - form from grubs. Adults feed on beets, carrots, corn, parsnips, potatoes, sunflowers, and sweet potatoes. Can cause serious damage to all small seedlings. |
 |
| Carrot Rust Fly Larvae - laid by the carrot rust fly. Starts out as a small brown colored pupa, hatches into a yellowish-white maggot and then feeds on the roots of carrots, celery, parsley, and dill. |
Much like my soil, I have my own little fertilizer recipe as well. I use the recommended EB Stone rate on the box for a starter, adjusted for the square footage of my bed. I then add two products I have much success with. One is Actino-Iron, the other is Azomite. I utilize these sparingly and only on beds that have seen several seasons of growth or when I start to notice a decline in yield. Lastly, are the worm castings for water retention. One half cup of these goes into each planting hole to retain water for release at night when the plants are recovering from the heat of the day. After plants are up and flourishing for about 6 weeks, I side-dress with chicken manure and pelletized garden compost every 15th and 30th like clockwork. I love Vicki's example of making a deposit. I make a deposit into my garden twice a month, so the produce will be there when I want to make the withdrawal. I use the monthly rate and break it down to a bi-monthly schedule, as my plants seem to flourish that way. I keep all side-dressings 6 inches out from any stems to prevent burning.
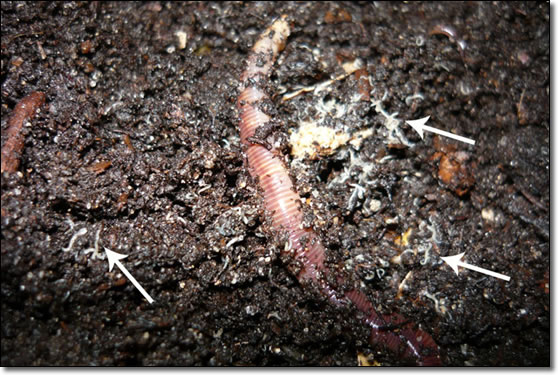 |
| Newly hatched earthworms will be small and most often white in appearance. Many say they resemble apiece of string. |
As we all prepare for spring, may the grubs in your bed be few, your soil be enriched with fertility, and the harvest you reap full of bounty!
Happy Gardening,
Denise, Beds 25 & 29