Friday, April 19, 2013

Weekly Calendar April 19 - April 25

April 20
10:00 am to 12:00 pm
Gardeners on Duty

April 23
5:00 pm to 7:00 pm
Gardeners on Duty

April 25
10:00 am to 12:00 noon
Thursday Monthly Workday

Out and About 9AM-ish April 11, 2013

GM Buddies  4/11/13  9AM-ish

Shinseiki Asian Pear (Pyrus Pyrifolia) Dwarf  4/11/13  9AM-ish

The Tree and Its Companions 4/11/13  9AM-ish
So just for the Record, here's what I saw before the community garden planning meeting - buddies hard at work while a pear tree soaks up the early AM sun.  Looking up, there's that beautifully formed oak.  Sigh ...  Don't be fooled by that 'little' mound of brush in the bottom center right of The Tree - that mound is HUGE.  Thanks, Guys, for your sweat-equity in clearing under and around The Tree!  Hope you three (Mike, Jim, Bruce) have time to sit and sip a tea-toddy nearby soon.

Thursday, April 18, 2013

The Potatoes are growing!


The potato tower is finally starting to send out sprouts.  I was beginning to think that part of our potato experiments wasn't going to be very successful. It certainly has taken a lot longer than the potato bag.  Even the potatoes planted at the very top of the tower have only just come up. So far, I'd have to declare the potato bag as the winner for ease of use and amount of plant growth. Of course, the final winner won't be declared until we've seen the amount of potatoes actually produced.

Making Worm Tea!

Tea Time, Garden Style
Hey Everyone,

I received an email from a fellow gardener regarding the recent post on worm castings.  They were checking to see if I have a specific recipe for making the tea.  Since worm tea is so beneficial to the plants, while acting as an exceptional pest repellent, I thought it would make a wonderful follow-up post for all.

This recipe gives you the option to use aquarium materials for ease and speed, or not.  Based on experience, using the aquarium equipment will produce a higher yield or better quality tea, however, it can be done as long as you are diligent in your aerating efforts without the additional materials.  Worm tea will not burn the plants in any way; however, you should avoid spraying in the heat of the day.

Ingredients:

5-gallon bucket
Tap water
Aquarium pump, air-line tubing, and air stone (optional equipment and runs about $20.00)
1 oz. of corn syrup or molasses (Make sure molasses does not contain sulfur)
2 1/2 - 3 cups worm castings
1 piece of fine mesh like pantyhose for filtering
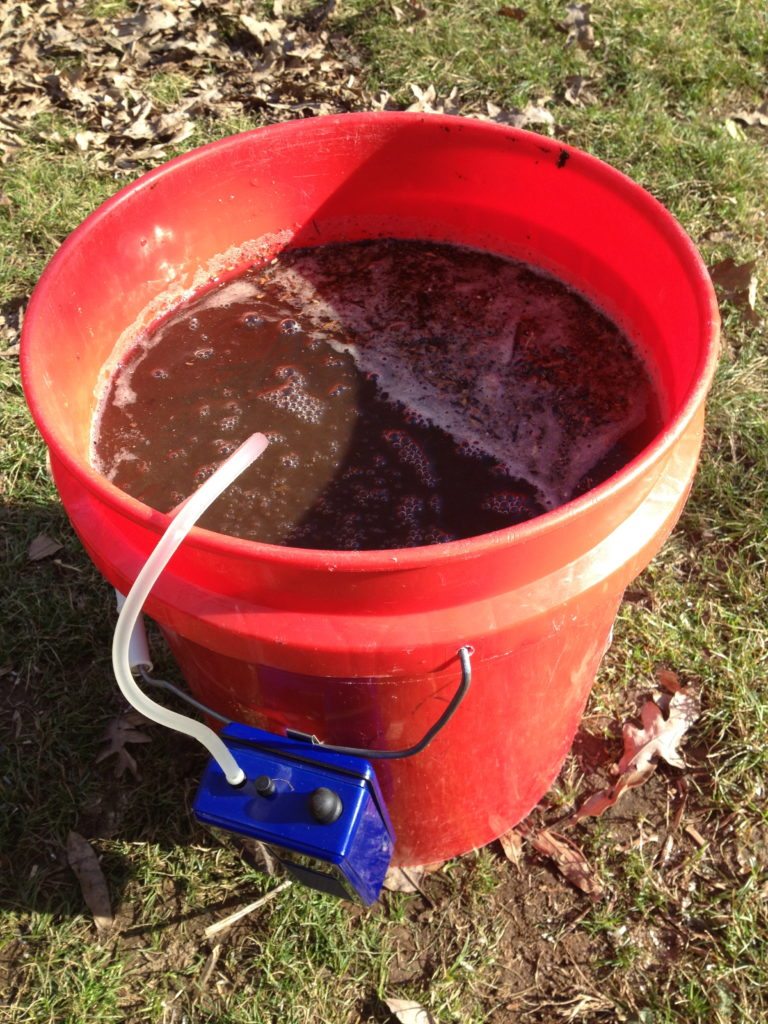
Home Depot 5 Gallon Bucket
With Aquarium Equipment Attached!

Directions Non-Aquarium Equipment:

Fill the bucket with tap water 3/4 of the way full.  See photo to the right.  Let the water stand for 24 - 48 hours in order for the chlorine to evaporate out.  This step is imperative, as chlorine will kill the beneficial micro-organisms rendering the tea useless.  If you are using rainwater, eliminate the standing process.

Remove about one cup of the chlorine free water.  Blend the corn syrup or the molasses into it.  The micro-organisms utilize the corn syrup or molasses for food while your tea is brewing.  Thinning it makes the food more readily available for them.

Add the corn syrup or molasses mixture back to the bucket. Stir until well blended.  Dump in the 2 1/2 - 3 cups of worm castings.  It does not have to be exact.  Mix well, but gently. You don't want to harm all those cute little microbes in there.

Some people will put the castings in pantyhose or a fine mesh teabag like material.  In trying different methods over the years, I have found this does not allow the microbes to move freely in the water and slows their growth tremendously.  This method is only wise if you are using an air stone or bubbler.

Let the worm tea stand for 3 days stirring occasionally to aerate.  Before utilizing aquarium equipment, I would stir four to six times per day.  Once again, do so gently.

Presto, you have just made your first batch of worm tea!  If you are using a watering can for soil application, there is no need to filter your finished product.  However, if you will be applying with a sprayer for foliage feeding, you must strain to remove the particles that will clog the nozzle.  Pantyhose or anything with a 400 micron filtration work exceptionally well for this step.

Use finished tea within 36 - 48 hours while the microbes are the most biologically active.  If any unpleasant odors develop after the initial brewing, do not use the tea, as this signals the death of the beneficial microbes and the mixture should be dumped.  It can go into the compost pile, just don't use it on your vegetation.

Caution:  This tea is not for human consumption.  Just thought I would throw that out there since most gardeners will try anything once!

Additional Directions for an Air Stone or Bubbler System:

Got Tea?
The recipe for aquarium equipment is the same as above aside from these few details.

After filling the bucket 3/4 of the way full, assemble the aquarium equipment.  Place the air stone in the bottom of the bucket and aerate the water using your pump for 3 to 4 hours to remove all chlorine.

Blend the corn syrup or molasses with two cups of chlorine free water to avoid clogging the air-stone.  Trust me on this one!

Add the corn syrup or molasses mixture back to the bucket.  Dump in the castings and let your pump do the rest.  Aerate for 24 hours, filter the finished product and your tea is ready to go.

The thing I like the best about using the aquarium equipment is the speed at which a higher quality tea can be made.  Spraying on a routine basis adds the beneficial microbes and nutrients to the soil and the plants, thus, providing the proper balance they need to help repel insects and fight off disease.  In addition, if you notice your plants are not taking off or they seem to be a little sluggish, this is a wonderful recipe to perk them right up.  Many references on the topic also state that the use of worm or compost tea not only provides the beneficial microbes and nutrients, but also increases the overall fruit and flowering production of the plant.  For those making compost, you can also brew compost tea in much the same fashion.  This is a wonderful link for additional compost tea recipes.

http://www.compostjunkie.com/compost-tea-recipe.html

Happy Brewing!

Denise, Beds 25 & 29

Wednesday, April 17, 2013

Bottle Envy!

 
Jane always has the prettiest things in her garden beds. I've been admiring her latest addition every time I've gone to the garden this week. An old pitchfork with bottles stuck on the tines. That is so clever!

Hedgehog in the Garden

 
Doug and Nancy have acquired the cutest hedgehog for their bed. They are pondering names and want help coming up with a great name for it. It doesn't have to be an H name but it has to go well with Hedgehog.  In other words, have good flow.
 
Denise suggested we should have a contest (kind of like naming a zoo baby) and offer a prize. What the prize is hasn't been determined. But we'll definitely come up with a good one!
 
The way to play is think of a name (or multiple names), go to the comments section of this post and type in the name you've thought of. After two weeks, they will go through all the names and decide which one they think suits their hedgehog best. The name and prize winner will be revealed on the blog.
 
Have fun!

Tuesday, April 16, 2013

Follow the Blog by Email

A number of people have said, oh, I keep meaning to check the Blog but I forget to.

Never fear....there is a very easy way to remember to check the blog - you can follow the Green Meadows Community Garden Blog by email!

If you use a laptop or a desk PC, look on the left hand side of the screen under the picture and name of the blog. The words Follow by Email can be found.

Type your email address in the empty box and click the Submit Button.

Follow the prompts to type in the verification to prove you are a real person. An email is automatically sent to the email address you entered.

The last step is to check your email and click the link in the email that has been sent to you. Clicking on the link activates your email subscription. If you don't click the link, your subscription will NOT be activated.

After that if someone makes a post on the blog, you'll get an email which has the entire post in it. The title of the post is the link that you click on if you want to go directly to the new post on the blog. (You have to go to the blog if you want to see if there are any comments or if you want to make a comment yourself.)


Picture of the blog on a desktop monitor


Saturday, April 13, 2013

Sugar Snap Peas with Tarragon!

Hey Everyone,

I thought with all the wonderful peas and onions growing in the garden I would share a simple recipe that makes an excellent side dish.

Sugar Snap Peas with Tarragon!

I love peas!
Ingredients:

3/4 lb. sugar snap peas
1 Tbsp. chopped green onions
1 Tbsp. unsalted butter
2 teaspoons chopped fresh tarragon leaves
1/2 tsp. finely grated fresh lemon zest
1/2 tsp. salt
1/4 tsp. pepper

Preparation:

Wash, remove string, and cut sugar snap peas in half diagonally; set aside.

Over medium heat, saute green onions in butter until softened, about 1 minute.  Increase heat to medium-high, add sugar snap peas, and stir-fry. Cook 2 to 4 minutes until the sugar snap peas are crisp-tender.

In a separate bowl, combine the tarragon, lemon zest, salt, and pepper.  Add tarragon mixture to the peas, toss well, and serve immediately.

Makes 4 sides

This recipe lends itself quite well to fish and poultry dishes.  I have also substituted shallots for the green onions depending on what looks good in the garden.

Hope you enjoy,

Denise, Beds 25 & 29

Friday, April 12, 2013

Weekly Calendar Post April 12 - April 18

April 13
10:00 am to 12:00 pm
Gardeners on Duty

April 16
5:00 pm to 7:00 pm
Gardeners on Duty

April 17
8:30 am - 12:00 pm
Algae Control in Ponds
Pre-registration required
Cobb County Extension Upcoming Events

Thursday, April 11, 2013

The Benefits of Worm Castings in the Garden!

Hey Everyone,


Product Details
Wiggle Worm
Earthworm Castings
As many know, worm castings are one of the best amendments/fertilizers out there for adding organic nutrients to the soil.  However, many do not use them since they can be slightly harder to find and it is somewhat of a mystery on how to use them appropriately.

One of the best things about using worm castings in the garden is the immediate availability of nutrients and the enhanced ability for your soil to absorb and release water.   This is extremely beneficial in raised bed gardening as the soil will drain and dry out rapidly.  Some will use the water retention crystals; however, the worm castings will provide much the same affect and feed the plants as well for a fraction of the cost.
  
Earthworm Castings
Now Available Local
at Pike's
While I have never tried the theories of one tablespoon feeding a six inch pot for two months, I do find much success using them throughout the garden in a variety of ways.  My favorite is putting ½ - 1 cup in the planting hole under my summer crops and making worm tea.    I follow many of the guidelines found on the link below to the Tasteful Garden.  This short article is one of the best I have run across containing the most applicable information on the topic.


When it comes to brands, I prefer using the Wiggle Worm Castings (readily available on Amazon), as they are superior to many I have tried over the years and the plants just thrive with them.  Pike’s is now carrying the EB Stone Brand, which I think is 1 cubic foot for $19.99.  I haven’t tried these as of yet, but have gotten a bag to trial this year.  I go through, on average, one large bag per year as they can be used throughout the landscape. 
 
For those who enjoy Door Prize Bonanza, come out and play, as I will have some available on the next workday, just sayin’.

Happy Gardening!

Denise, Beds 25 & 29

Wednesday, April 10, 2013

Creating Shade in the Garden

The good thing about gardening in a field is the sun that shines on the vegetables so they can grow tall and be happy.

The bad thing about gardening in a field is the sun that beats down on the gardener making them wilt and be miserable.

If you are going to be working out in the sun a long time and want to create some shade - here is an easy portable method.

All you need is a huge beach umbrella and a bucket full of dirt or rocks. Open the umbrella and poke the spike end in the bucket and voila..instant, portable shade.

And if it is really hot and you want to have deluxe shade, get a box fan and run the extension cord out to where you are working so the fan blows on you while you are under the umbrella weeding.

Tuesday, April 9, 2013

Somebody Has To Be The Average Joe/Jane!

Hey Everyone,

And the "Average Joe/Jane" Prize goes to Vann Gaskin in Bed 44!

If you are following along with the warming of the garden soil temperatures, we have had our "Garden Hottie", our "Chilly Nilly", and now it only seems appropriate to crown a bed that falls somewhere in between as the "Average Joe/Jane!"  I know, I know, where does she come up with this stuff?

Our "Average Joe/Jane" prize goes to the bed whose average temperature is closest to the overall weekly garden average without going over.  All temperatures were taken throughout last week between 4:30 p.m. and 6:30 p.m. using a digital meat thermometer and then cross-checked with the compost thermometer to ensure accuracy.   The overall garden average last week was 63.8 degrees and excellent warming should be anticipated with this lovely weather upon us.

Lemon Thyme and Perpetual Spinach!
Heirloom Chard has a striking appearance and offers a Chard/Spinach
for the summer months when most others have bolted.
 It will not go to seed until the second year.  
With a few chilly nights and some rain mixed in, the ground temperatures were more than sluggish last week.  On Monday, April 1, we were off to a great start.  The lowest temperature was 61.2 degrees and the highest ran 71.9 degrees.  The swing of ten degrees was all in one section of the garden, whereby all the other sections were stable with readings in the mid 60's.  The complete average temperature for the garden on that day was 66.4 degrees.

Tuesday saw a downward trend and everyone was losing quite a bit of heat.  In just one day, our average dropped to 63.1 degrees.  The hottest bed in the garden at 71.9 degrees (Doug & Nancy's #50) on Monday was already down to 65.3 degrees on Tuesday.

By Friday, the temperatures had taken yet another downward turn due to rain and a chilly day and night on Thursday.  The garden average for Friday, April 5, was right at 62.0 degrees.  The highest temperature, once again, was Doug and Nancy's bed at 68.9 degrees.  The lowest bed in the garden was 57.7 degrees.

Our "Average Joe/Jane" winner consistently placed close to the averages all week while most beds were showing great fluctuations.  On Monday, her bed was 66.2, Tuesday it ran 61.6, and Friday it was 63.2 degrees.  Average those together and we have a winner at 63.6 degrees.

The plant is in your bed and the seeds are in the shed for you, Congratulations Vann!

Hope you enjoy,

Denise, Beds 25 & 29

Monday, April 8, 2013

As the saying says....

Necessity is the Mother of Invention.

Recently I got some brand new clipper/scissors and they are very sharp. I knew I was going to stab myself or put a hole in the bag I was using. Usually I wrap a paper towel or a rag around sharp objects but it just so happens I had the inner part of a toilet paper roll sitting there. AH HA!!

After a bit of squishing and using some good packing tape, I now have a holster to keep my sharp implements in.  (But I still have plenty more cardboard rolls to use for cutworms when the time comes.)

The green ones are the super sharp ones


Saturday, April 6, 2013

Water Wands

What are the advantages of using a water wand or an adjustable nozzle? LOTS!

Yes, the "pump" handle on our faucets at the garden help control the water flow that comes out but you need even more control when your plants are small and tender, especially when the seedlings  start coming up. You don't want to beat your new plants to death when you water them.

Shut off valve/water regulator
Water wands are long so they reach further into your bed and you can direct the water exactly where you want it to go.  They also make it easier to get down under the bottom of a plant when the plants get big.

All my water wands have a water regulator/shut off valve on them. In fact, all my hoses have shut off valves to make it easier to control how much water comes out at any given time. If you are standing right next to the faucet the entire time, you wouldn't need a shut off valve but to reach all parts of my bed I have to move around and depending on the plant I'm watering, I adjust the water.

My latest, greatest water wand is from Tractor Supply over on Hwy 278 in Hiram. Besides it being a beautiful color it works like a dream. After Denise tried it out, she really, really wanted it.

Ouch! Ouch cry the seedlings!


Oh, much better the seedlings say.

Ahhhhhh.....the seedlings say

Friday, April 5, 2013

Weekly Calendar April 5 to April 11

April 6
10:00 - 12:00
Gardeners on Duty

April 9
NO Gardeners on Duty

Starting Your Spring Garden Class
6:30 to 7:30 pm
Quick link to class details
Lost Mountain Park

April 11
9:30 am
Monthly Meeting
Warm Weather location: at the garden

April 12
12:00 noon to 1:00 pm
Growing Tomatoes
Cobb County Extension Upcoming Events

Thursday, April 4, 2013

More pictures from our workday

Grub Hunting
Planting tiny seeds


Happy weeders
Eating, talking and holding our
new treasures from the door prize drawing
 

Milk Jug Cloche

It is getting late enough in the season that we might be able to squeak by without having to use more frost covers. For those of you that don't have a frost cover system, you can use milk jugs, buckets or plastic bottles for a temporary system if the need arises. It probably works best if it is only a quick cold spell and is going to be a light frost.

Denise tried it a few years ago but prefers using the frost blankets. But then again, she is covering lots of plants so that makes sense.  She does have a friend that uses milk jugs but the thing you have to watch out for is over heating. You don't want to broil the plants you just saved from freezing so you will need to go out early and move the jugs or figure out a way to vent them easily.

My research on the web shows a multitude of ways to do it.  Here is one link to a how to - Milk jug as cloche. I was curious how well it would fit over Mark's tomato plants so I took my sample up to the garden to give it a try. It went over some of his tomato plants but not all of them.

Leaving the bottom attached really does make it easy to anchor down with a rock or any other heavy object.. But you do want to pull dirt up around the edges so no cold air gets in under the bottom. Letting cold air in is going to counteract the effort to capture the radiant energy coming up from the ground.

Wednesday, April 3, 2013

Nesting material for birds

Spring is the season when birds are frantically gathering nesting material. My yard is not ultra tidy so they find lots of natural material available (leaves, moss, pine needles, twigs, etc.) But over the years I’ve inadvertently provided more nesting material by having cedar branches and hanging baskets available to tear apart.
 
The cedar branch had been made into a suet log but that didn't keep the birds from stripping all the bark fibers off to put in a nest. I enjoyed watching the brown-headed nuthatch strip it actually.
 
This year a Carolina chickadee is working it over again. The hanging basket was one of those wire ones with a coconut fiber liner. Over the years it kept getting holes in it and the dirt would leak out. It puzzled me until I finally caught the culprit in action (Carolina chickadee in that case).
 
Last year when I emptied out a bunch of hanging baskets, I saved the coconut fiber liners so I could set the fiber out as nesting material this year. I've already filled this suet feeder twice with fiber so I know the birds are using it. I was lucky enough to glance out the window in time to see a female eastern bluebird pulling lots of coconut fiber to take away for nest building. Unfortunately, I didn't have a camera nearby.  

Tuesday, April 2, 2013

Compost Sifter

Paulie is shoveling dirt while Eric, Patsy and Cina watch.
And yes, they found some grubs but no pupas.
Thanks to Mike for making a great compost sifter. It fits over the top of the wheelbarrow which makes it handy to transport and dump what you've sifted.

It also work very well if you decide you want to take out ALL the dirt in your bed and sift it looking for lumps, grubs, pupa, pecans and other assorted undesirables.  I'd heard about it and seen the end results but hadn't seen it in action.

If you want your own personal sifter at home I have one that is extremely easy to make and is very light so it is easy to use.  I got the idea from my friend Hal Massie about 20 years ago.

I use an old plant tray I got with plants one year (you want to use one with an open weave - a solid bottom one won't work.) Vic had a piece of hardware cloth that we cut down to size and then I attached it with twisties to the plant tray. Voila...a small, lightweight sifter.

Vicki's compost sifter
Denise  had sifter envy so went home and she made one for herself. She didn't have hardware cloth so she used a mesh with 1/4 inch holes which works well also. She also used zip ties (cable ties) to attach her mesh which I'll do the next time my twisties break.


Starting Your Spring Garden

Tuesday April 9th, 2013
6:30 - 7:30 pm
Lost Mountain Park
Western District Operations Building

You are invited to attend a free (and open to the public) gardening class sponsored by The Green Meadows Preserve Community Garden.

Starting Your Spring Garden
This class will 
be presented by Amy Whitney, who is a Cobb Cooperative Extension Program Assistant in Horticulture, Master Gardener, teacher, blogger and more. Based on Amy’s years of successful experience and teaching, this class will provide gardeners with the basics of what, how, when, and where to plant your spring garden. Planning for insect and disease control will also be covered.


Please RSVP to greenmeadowscg@gmail.com
We want to make sure we have enough handouts for everyone.
Directions From the Community Garden:
  • Take Dallas Hwy West 2.0 miles (to the 2nd traffic light from the garden.)
  • Turn left at the traffic light into Lost Mountain Park
  • Take the first left.
  • Once you turn, go straight and the road dead ends into a parking lot between Boots Ward Recreation Building and the Western District Operations Building. If the parking lot is full, park in the parking lot in front of the ball fields.
Lost Mountain Park
Western District Operations Building
4845 Dallas Highway
Powder Springs, GA 30127