Sunday, July 14, 2013

Spotlight on Something Unique - Malabar Spinach

Hey Everyone,

Red Stem Malabar Spinach
grown by
Kimberly Roberto, Beds 27 & 28!
I hope everybody has enjoyed the opportunity to take a peek at Vann's Indigo Rose tomato plant. For our next stop on the parade of something unique and beautiful in the garden, stroll by Kimberly's bed (number 27) and check out the Red Stem Malabar spinach plant.  Red Stem Malabar spinach is one that catches my eye as it has the beauty of a unique ornamental plant, but the versatility of a very healthful green.

When the days of summer reach 80 degrees or more, gardeners face the challenge to grow fresh greens as most including regular spinach will start to bolt, wither, and complete their life cycles.  Malabar spinach is an excellent green for bridging the gap between spring and fall allowing tasty growth all summer long.      

This particular spinach is a native plant to areas such as India and Indonesia.  It is commonly grown in these places as well as Southeastern Asia, China, and Africa.  As a perennial vine in tropic or sub-tropic climates, it produces an abundant crop of succulent leaves that simply laugh when the temperatures hit the 90's and above.  On hot and humid days, these varieties grow 8 inches or more per day.  In our zone, it is grown as an annual that dies off at the first hint of frost.  However, according to a few journal entries I have read, supposedly it can be overwintered in a greenhouse or a heated sunroom.

Green Malabar Spinach
grown in Denise's
home garden!
Providing a little shade does promote larger leaves that are quite tasty for wraps and such.  If we have any juicer's out there, these varieties of spinach are highly recommended due to their succelent nature.  Keeping the soil consistently moist prevents the plant from flowering, which may occasionally turn the leaves bitter.  All parts of the plant are useful and at seasons end the seed is easy to obtain for future cultivation. The taste is outstanding with a wonderful crisp bite that is so refreshing.  It is almost juicy due to its succulent qualities. The spinach flavor shines through (IMO on the green leaf variety) with maybe a hint of a young chard leaf finish.  We need to get Kimberly to let us know how the Red Malabar variety tastes!  Two cups of cooked Malabar spinach contain approximately 23 calories and less than 1 gram of fat.  This same serving provides a quarter of the Vitamin A you need each day as well as 8 percent of the DVs for fiber, iron, vitamin C, calcium, riboflavin, magnesium, and manganese.

Kudos to Kimberly for bringing us something so wonderful to learn about from the tropics!

For those that would like to read more on Malabar Spinach, the link below has some general information.

http://tcpermaculture.blogspot.com/2011/10/permaculture-plants-malabar-spinach.html.

Kimberly's Red Stem Malabar plants came from Farmer D's on Briarcliff Road in Atlanta.  Mine are from John Scheeper's Kitchen Garden Seeds.

Next stop in the garden - Mexico!

Happy Gardening,

Denise, Beds 25 & 29

Wednesday, July 10, 2013

Spotlight on Something Unique - Indigo Rose Tomato

Hey Everyone,

"Indigo Rose" Tomato
grown by
Vann Gaskin in Bed 44
When taking a walk through the garden it is always such a joy to stumble upon something so unique.  Vann, in Bed 44, has one of the most beautiful cultivars of tomatoes that came out of Oregon State University last year.  What is so unique about some of the new cultivars coming out of Oregon State is they are breeding for a new class of tomato high in antioxidants.  While they are using genetic engineering principles, all are non-GMO practices.

Many of the wild varieties of tomatoes have the anthocyanin's (naturally occurring pigments shown to fight disease in humans) or powerful antioxidants in their fruit. However, until this cultivar was developed, these same compounds were only found in the leaves and stems of homegrown varieties that are toxic to us as well as animals when ingested.

The coloring of this tomato is so distinctive.  As you can see in the photo to the right, the indigo is quite intense.  Only the exposed areas to sunlight develop the deep purple color, while the shaded portions of the tomato remain green until turning ripe.  Upon ripening, the indigo color will dull somewhat while the green portions then turn a rusty red.

Here is an interesting link if anyone might enjoy reading about the background of Indigo Rose.  The link also has a list of suppliers carrying the seed for sale.  If this is a variety you would like to try and are unable to find seed, just let me know.

http://extension.oregonstate.edu/gardening/purple-tomato-debuts

Kudos to Vann for growing such a showstopper!  Please let us know how they taste.

Happy Gardening,

Denise, Beds 25 & 29

Sunday, July 7, 2013

Sauteed Squash with Red Onion & Parmesan Cheese

Hey Everyone,

I know I just threw a recipe out there but with all the rain, the squashes are growing faster than the blink of an eye.  Last night's dinner was truly a farm to table recipe as all I needed from the store was a block of Parmesan cheese to shave.  Everything else came straight from the garden, although a bit wet!

Simply delightful!
Sauteed Squash with Red Onion & 
Parmesan Cheese!

Ingredients:

Squash & zucchini need to measure 6 cups when diced.

3 - 4 medium size yellow crookneck squash
2 - 3 medium size zucchini's 
1 large red onion
1 large or two small minced cloves of garlic

1 - 1 1/2 tablespoons of Bertolli Extra Light Virgin Olive Oil

1/4 tsp. salt
1/4 tsp. of fresh ground black pepper
1/4 tsp. of crushed red pepper

1/4 - 1/2 cup of shaved Parmesan cheese

Directions:

Wash all squashes with a vegetable brush.  Cut the squashes into 1/2 inch round slices and then quarter. Just halve the small round pieces.  You need 6 cups of diced squash all together.

Mince the garlic cloves and thinly slice the red onion into vertical pieces, about an inch in size.

Mix the salt, black pepper, and crushed red pepper together, set aside.

Shave the Parmesan cheese and set aside.

Heat oil in a large non-stick skillet over medium heat for 1 - 1 1/2 minutes.  Add the squashes, onion, and garlic.  Cook 6 - 7 minutes until the onion is tender, stirring gently and frequent.

Remove from heat.  Mix in the salt and both peppers.

Add the Parmesan cheese and serve.

Makes two full plate dinners or 4 - 6 sides.

Hope you enjoy,

Denise, Beds 25 & 29    

Wednesday, July 3, 2013

A 100 year old quote applies to Green Meadows Preserve

Ever hear of John Burroughs, a naturalist companion of Teddy Roosevelt who, incidentally, was old enough to be his father?  Listen to this quote from his book President Roosevelt as a Nature-Lover and Observer.  "Presently we moved on along another path through the woods toward the house.  A large, wide-spreading oak attracted my attention - a superb tree.  "You see by the branching of that oak," said the President, "that when it grew up this wood was an open field and maybe under the plough; it is only in fields that oaks take that form."  I knew it was true, but my mind did not take in the fact when I first saw the tree."  I smiled last night when I read this because it was a perfect description of the neglected and forgotten oak pictured above that Jim, Bruce and Mike have cleared around and made so prominent.  If you ever want your mind to go to quiet places, read John Burroughs' work.  It's so old, that at least a dozen of his short books are free downloads on my Kindle.

Sloppy Joe's With Garden Peppers & Onions

Hey Everyone,

Denise's Family Sloppy Joe Recipe
with Garden Peppers & Onions
As a kid growing up this was one of our family's favorite weeknight suppers.  When the peppers and onions were fresh and cantaloupe was in season, it certainly brought us all to the table. In the winter mom always made coleslaw and fries for the sides.  Simply yummy!

I usually double the recipe for our family of four as this keeps and reheats so well.

Ingredients:

Nice Large Specialty Sandwich Buns -Toasted
Fresh Fruit
Bag of Chips

1 to 1 1/2 pounds of lean ground beef
1/2 cup diced sweet green bell garden pepper
1/2 cup diced yellow or white garden onion
1 can Campbell's Healthy Request Tomato Soup
1-teaspoon mustard
2-tablespoons bottled barbeque sauce (something mesquite flavored or a Jack Daniel's variety)
1/4 cup fresh grated sharp cheddar cheese (optional)

Directions:

Prepare all diced ingredients.

Brown ground beef in a large skillet over medium heat and drain all fat.

Add the diced green pepper, onion, tomato soup, mustard, barbeque sauce, and cheese, if desired, to the ground beef.  (I remove skillet from heat while adding ingredients to prevent sticking)  Mix well and cook over medium heat until the mixture just starts to bubble.

Reduce heat to lowest setting and simmer for 25 minutes.  Stir several times while simmering.

While sloppy's are cooking, broil buns on a cookie sheet at the lowest setting for 4 - 5 minutes or until nicely toasted.  Remove from oven and set aside.

Serve over toasted buns with chips and fresh fruit for an easy weeknight dinner!

Hope you Enjoy,

Denise, Beds 25 & 29

Tuesday, July 2, 2013

Red Potato Harvest of Late June

63 potatoes (about 5 pounds) were harvested 5 days ago using the plastic tote method as taught by Mr. Mike in his Green Meadows class a few months ago.  I used a starter 'soil' mixture of half Nature's Helper and half Georgia red clay as the medium and Stone's Organic Fert. To top dress the stems as they grew, I used the finished, finely sieved soil from the garden's compost bin #3 and applied two additional rounds of very dilute Miracle-Gro.  Plenty of water, loads of sunshine, about two months time and voila! - the photo above!  The spuds range from marble size to fist size, well, my fist, not my husband's.  A simple scrub, a few days drying and we're going to have 31.5 potatoes worth of nutrition.  Why 31.5 and not 63?  Because my garden partner, Ms. Elise, gets half.  Only fair since she baby-sat them as faithfully as Dr. Seuss' Horton the Elephant watched over Mayzie's egg.  
 
Five of the above potatoes will be chosen as seed potatoes for the next crop = $0, my kind of price.  The soil used to grow the potatoes above was returned to Green Meadows' compost bin #2 so, most likely, the next crop will use compost bin #3 soil, also = $0.  This is truly the garden that keeps on giving ............

Monday, July 1, 2013

Increasing the Brix Content of Your Tomatoes!

Hey Everyone,

Who would ever guess that those sweet, beautiful, and delicious tomatoes could even taste better than they already do!

"Sun Gold Cherry Tomato"
Touts a very high brix sugar
content for those that like
them sweet!
Vintners use a Brix scale to determine when grapes are at their peak and ready for processing.  The sugar to acid balance is critical for the industry.  Years ago, the farm trade borrowed the science and it is now commonplace for them to use it as a measurement of when to start the mechanical harvesting process.  Many farmers also test frequently as a means for determining the overall health of plants and quality of their growing medium.  Aside from the science being used as an indicator of an excellent bottle of wine or best time to harvest, many labs across the country are using the scale for the development of new cultivars.  Oregon State for example, is working on many new varieties of tomatoes containing high antioxidants while maintaining a favorable Brix level.  One of these is currently grown in our community garden and will be the spotlight of a separate post.

As more and more are turning to the trend of home gardening, many are finding that the measurable sugars does not remain consistent within the particular variety of tomatoes and can often vary from plant to plant.  Many gardeners find art in fine-tuning and raising the brix levels by the way, you grow your plants, the type of fertilizers you choose, reducing the plant load, and how you feed and care for the soil. Fruits and vegetables containing a higher Brix number will taste better, are more nutrient dense, and provide a longer shelf life, both for the market and home grower.

"Cherokee Purple"
One of the richest tasting heirlooms
with a high Brix content!
I have used Brix scales in the past to choose better tasting varieties to grow, but have never been aware it is possible to take that flavor up a notch by changing common practices during fertilization and growth.  It will be interesting to test the brix levels of my tomatoes as I frequently use some trace minerals (Azomite & Actino-Iron) when planting.  It may even be interesting to test tomatoes picked a day or two out, preventing bird damage, versus those left on the vine until completely ripe.  I ordered a refractometer and if there are any wanting to test for fun or even for "The Sweetest" bragging rights, let me know.  This could be quite interesting and entertaining to compare different varieties within our garden.  Sounds like a Fracto Party with prizes in the works!

The links below have a Brix chart to determine overall vegetable quality and one with general information. It is also interesting to Google, "raising the brix levels in tomatoes" and read some of the common soil recipes.

http://www.healthy-vegetable-gardening.com/brix-scale.html - link to brix chart
http://www.healthy-vegetable-gardening.com/brix-level.html - link to general brix information

This link is one I use frequently for choosing which watermelon varieties to grow.  I love my Sugar Babies!

http://agsyst.wsu.edu/watermelonphotos.html - link to watermelon Brix charts

Happy Gardening,

Denise, Beds 25 & 29

Sunday, June 30, 2013

What a Difference a Year Can Make!

I had an occasion yesterday to take a few pictures of the garden.  Several turned out worthy of saving. When I printed one of them out and placed it in a folder that I keep, I couldn't help but notice that it was a similar shot to one I took just one year ago.   I thought some of you might want to see the comparison of what our garden looked like just one year ago in June of 2012 and what it looks like now.  Amazing.

Green Meadows CG  June 27, 2013
This second photo was taken early in the morning so I didn't have the advantage of the morning sunlight that is lighting up the first photo.  In the first photo the first section of 24 beds had just been finished at the end of April and most of the raised beds were planted in May so the vegetables were just starting to gain some size.  This year our beds were planted in March and early April.

When to pick squash

Can you guess which of these yellow squash has
just been sitting around developing lots of seeds?
At this time of year and with as much rain as we've been getting squash grows like crazy (as do the cucumbers but that is a story for another day.) One day you have tiny barely formed squash and 2 days later you have eating sized squash.

If you are trying to grow baseball bat sized zucchini than just leave them on the vine. But if you want nice tender zucchini, you'll need to pick frequently. And carefully look under every leaf.

The zucchini in this picture range from baseball bat
size to young and tender.


Picking frequently encourages the plant to keep producing and it also keeps the vegetables from getting rotten from sitting on the ground. The goal of all plants is to reproduce by flowering, fruiting and setting seed. The larger you let your veggies get, the closer to completing the life cycle the plant gets. Which means the plant will decide it doesn't have to flower and set any more vegetables for you to eat.


Saturday, June 29, 2013

Mosquitoes and Taxes

This year the first mosquito bit me on April 15th. Kind of appropriate I thought since both are vexing issues.

All the rain we've had this year has been good - it means we haven't had to water in the garden as much and all the veggies are doing exceptionally well.

But all this rain is also bad because it is really hard to keep up with dumping out all the rain water that accumulates in anything that will hold water. We don't have too many places in the garden that collects water but there are a few so we still have to be pretty diligent about it  After all, mosquitoes only need a teaspoon of water to lay eggs, hatch and grow to maturity.

Don't forget to keep checking your slug and snail traps - if they aren't refreshed or emptied constantly they can end up raising a crop of mosquitoes instead!  (see picture to the left - oops!) Warm weather makes mosquitoes breed faster because there is nothing to slow down their life cycle.

There are two easy ways of combating mosquitoes. Do mosquito patrol after every rain and try to tip over everything that has caught rain water. (If possible, try not to have anything that does catch rain water. Or at least minimize what does catche rain water.)

Use mosquito dunks to prevent mosquitoes. These work really well to kill any larva present and prevent more larva from hatching.  The dunks are non-toxic to birds, fish, frogs, cats and dogs.  If you have spots that are hard to get to or you catch rain water to reuse when it is dry, just put some of the mosquito dunk in there and voila, your problem goes away. You just have to check every few weeks to see if you need to add more mosquito dunk pieces.

Usually you only have to add pieces every 30 days but because we have had so much rain (6.5 inches since June 1st), it is washing out my mosquito dunk crumbles that I had put in the saucers under my pots with plants.

You do NOT have to put dunks in birdbaths unless you never empty or clean them out. If you are keeping clean water in your birdbath you will never have a problem. If you don't do anything with your birdbath for a week then you will end up with mosquito larva in it.

Mosquito dunks can be found at Home Depot and Lowe's in the insecticide for homes area. At the Lowe's on Dallas Hwy it is found on the same aisle as bird feeders and birdseed.
Tiny visitor on coneflower aka (also known as) Echinacea

Passiflora incarnata aka Passionflower aka Maypop - waiting for a tiny visitor
Photos from Friday evening (6/28/13) in the pollinator beds. 

Thursday, June 27, 2013

Guess the number of Potatoes! Win a Prize!

Mike digging potatoes
The Ice Cream Social on Saturday has many parts to it.

Eating! Socializing & Fun in the shade of the pecan tree!

Homemade Ice Cream Taste Off !

Guess the Number of Potatoes we grew!


The Fabulous Prize for the Guess the Number of Potatoes Contest


Today and Friday the potatoes are being dug up. During the Ice Cream Social on Saturday you will be given the opportunity to guess how many were produced. There will, of course, be a fabulous prize for the person who comes closest to the correct number.

There will also be a prize for the best tasting ice cream. Be sure and have your ice cream at the garden, ready for tasting by the Judge by 12:30 pm. Also be sure to bring an ice cream scoop or other big spoon to dip it out with.


Another bad bug to destroy - Leaf-Footed Bug


Today's bad bug to watch for - leaf-footed bug. This particular species is Leptoglossus phyllopus. There aren't high numbers in the garden yet but they are showing up.

If you look at the lower part of his leg there is a big flat/winged spot which looks like a leaf (which is where the common name comes from.) In large numbers they can do a lot of damage just like squash bugs. Unfortunately, leaf-footed bugs aren't specialists like squash bugs and they will feed on tomatoes, bell peppers, egg plant, beans, cucumbers, and squash. They also like blackberry, apple, pears and pecans.

Leaf-footed bugs pierce plant tissue and fruits with their proboscis and suck the juices out. Unfortunately, their saliva injects toxins which do even more damage. And even more unfortunately, these openings create a pathway for secondary pathogens to enter and cause further damage to the fruit and/or plant.

We won't be able to control them on the blackberry bushes or pecan trees but we can control them in the garden. The best thing to do is hand remove them and squish them if you see them to prevent more eggs being laid. Consistent use of an approved insecticide (as in approved for our community garden) will help to control the nymphs and adults.

For more information and to see various stages of their life cycle -Leaf-footed bugs

Wednesday, June 26, 2013

Water wand and Shut off valve tips

Shut off valve - either for a single hose or to attach two hoses.
The yellow rings is the gasket. Gaskets can be any color.
Several people have asked me about where to get the shut off valves for water wands if they don't come with them.

My favorite one is made of brass and I get it at Home Depot. It does cost around $6 dollars but it lasts for a long time.

One thing to check on any water wand or shut off valve that you buy is how hard the little on/off lever works. If it sticks or won't turn or is really hard to turn, chances are, it will keep doing that or get worse after you buy it. I always test mine before I buy them.

If your water wand is leaking where you have attached the hose, it could be because the gasket has come loose and needs to be pushed back in place. Or you may actually need a new one. Replacement gaskets are easily found.

One reason the nozzle things don't come off the hoses very well at the garden is they are frequently missing gaskets. Put a gasket in and voila...they come off easily again.

You can also put shut off valves on the water faucet/spigot at home and then you can run two hoses at the same time. Or leave the hose on and still fill a bucket or whatever you want to do.

Weekly Calendar June 26 - July 3

Thursday June 27
8:30 am - 9:30 am
Master Gardeners in the Garden

Saturday June 29
11:30 am - 2:00 pm
Ice Cream Social
Come one! Come All!
Ice Cream Social - Details

Tuesday, June 25, 2013

Mexican Bean Beetles

For some reason I thought all lady bugs were good bugs. Unfortunately, there are a few lady bugs that are very destructive to plants. One of them is the Mexican Bean Beetle.  The adult is a yellow to copper color and has 16 black spots on it.  In the garden right now I have found the larva feeding on leaves but not the adult or the eggs even though I know they are there since I've found the larva. So here are two links to show what those forms look like.

This links shows the adult, larva and pupa stages of Mexican Bean Beetles. This link shows eggs through adult stages of development for the Mexican Bean Beetle.

Good lady bug larva
     You really DO want larva that looks like this in your bed! They look mean and fierce but they are not harmful to humans, only other insects. This lady bug larva is a very beneficial predator since it eats aphids and other bad bugs. You need to be careful not to spray pesticides on them because you don't want to kill them.

Good lady bug larva

Bad lady bug larva ie Mexican Bean Beetle
When the leaves of your beans start getting spots that are skeletonized, look on the undersides of the leaves for what is eating them. Just as with the squash bugs, you need to look on the undersides of all the leaves to find and remove the the bad critters.

Bean leaves that have been eaten
 
More than likely you will find a larval form that looks like this (see picture below). They don't sting which means you can just pick them off by hand if you don't have too many. Be sure and take them home and throw them in the trash at home. Or if you enjoy squishing them, do it on a hard surface.

Just as an FYI.....squishing bugs in loose mulch doesn't always kill them. There is too much give in the mulch. You really need a solid hard surface like a rock or a piece of wood.
Mexican bean beetle larva

If you have a bad infestation you need to be very diligent about spraying insecticidal soap, Azamax or Neem oil on them. Be sure to get the undersides of every leaf and spray way down into the plant so every surface is coated. Even then you will have to pay close attention to keep them under control because it is very hard to get an entire stand of beans sprayed properly.

Monday, June 24, 2013

Water Spigots, Leaks and Pressure Problems


This past week we had a water leak which made the ground around one of the spigots very wet.  The problem was caused by a spigot handle that had become loose.  We were afraid it was about to break off like it did once before and cause a flood.  This time the fix was easy.  The county came out this morning to double check everything and they went over a few tips on handling the spigots.
 

Grasp the faucet with both hands
Lever fully extended correctly
The spigot needs to be turned on in a way that does not push or pull the water pipe. The proper way is to grab the lever with one hand and hold the spigot with the other.  This way the pressure will be even and you will not be pulling or pushing the pipe.  
 
Also, the lever needs to be pulled up until it is completely extended for the water to be on.  If you only pull it up half way, the water with not be on at all or not on fully. 
Lever half way up

Once you have extended the lever fully and the water is flowing, you can always bring the lever partially down to slow the pressure if needed.


Lever at right angle to the hose is
in the closed position
We have put ball valve controls on all of the hoses.  These allow you to turn the water fully on at the spigot and, with the ball valve in closed position, you will not have the water flowing from the hose.  You can then easily get the hose back to your bed before switching the ball valve control to open.
Lever in straight line with hose is in the
open or water flow position

Most of you already know all of these things but I thought it would be worth going over just in case there might be a gardener that is not familiar with the spigots and valves. If anyone notices water leaking or has any kind of problem, please be sure to let us know so we can get the county involved when necessary.  

Thanks, Carol
 

Sunday, June 23, 2013

Pollinators in the Garden

To celebrate National Pollinator week, I spent quite a bit of time chasing bees, beetles, wasps and flies in the garden trying to take their pictures.  It was interesting how few honeybees I actually saw in the garden doing their job. They aren't missing, they just prefer the clover that is blooming in the grass. But don't worry, we do have lots of pollinators working in the garden! 
Most vegetables need something to pollinate their flowers
to form fruit. This tomato obviously has had a visitor or two.

One of the hardest working insects in the garden are the
 bumblebees. Sunday I found them pollinating squash,
 cucumber, tomato, pepper, artichoke and okra flowers.

Notice the pollen sacs on the legs of this bee! It has already visited quite a few flowers
to gather this much pollen. Can you find the tiny little pollinator in this picture? 

Pollen is dusted over the entire body of this bumblebee! It was fun
 watching it circle around and around the artichoke flower and crawl
through the flower gathering as much nectar and pollen as it could.
 
A lady bug (also known as a lady beetle) was busy
inside a cucumber flower.

This sunflower had quite a few different species of native
 bees and wasps busily working away on it. .

Passion vines provide nectar for butterflies and are also a host plant for Gulf Fritillary caterpillars.
Look at the far left of the picture and you can see a  caterpillar  hard at work eating the leaves of the plant.

Two native bees flying in to visit the onion flowers. It really is amazing how many insects
 utilize the them. Next year I'm going to plant onions in the pollinator border just so
 they will flower and attract more pollinators to the garden.

Saturday, June 22, 2013

Harvests from the Garden

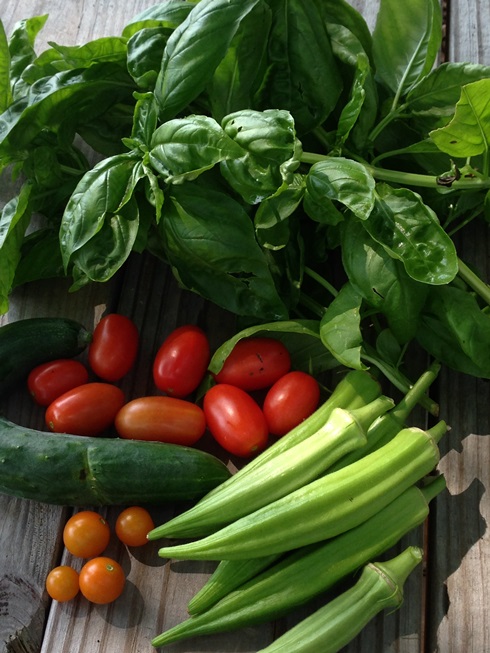
The first of the summer vegetables are coming in -  Thanks to everyone who sent in pictures of some of their recent harvests. I know of other pictures out there...some wonderful onion harvests, carrots galore, tons of lettuce.

Tomatoes, peppers, cucumbers, zucchinis, beans, okra, potatoes, radishes, peas and carrots are starting to come in.

These two pictures are just some of what Mike and Sue have been harvesting recently.
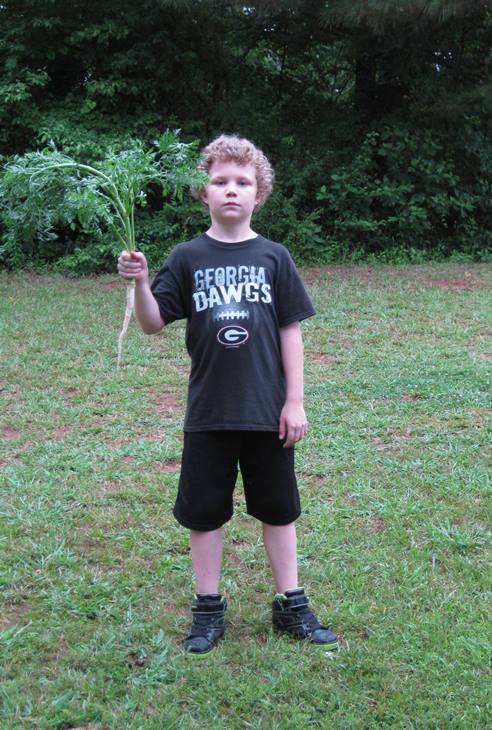
Vann's grandson was very proud of the white carrot they pulled the other day. He was also a huge help when we spread mulch last Monday. We had to work very fast to keep up with him.

Alas for the peas, they are history until the fall. But they were very tasty until it got too hot. Mike,  I love the bowl they are in!

Jim already has okra  to go with his peppers, tomatoes and cucumbers!
Mark had two beautiful garlic bulbs. Awesomely huge ones!   John was so excited about his zucchini. He has been fighting the squash bugs to get them and his plant is doing good right now.

                                                                     
                             These are the potatoes Vann grew in her potato bag. They were gorgeous! Even with a late start she had some nice sized potatoes. I was quite envious of her harvest. Maybe next year I'll get an early start on a potato bag and have this many potatoes.

Sue has tons of onions and garlic to use now that they have all been harvested. And lots of room to put additional plants now that they are all out. Decisions, decisions!

Mark and his Gnome buddy have a nice harvest of cucumbers, tomatoes and beans. The beans are really coming along fast.