Friday, April 5, 2013

Weekly Calendar April 5 to April 11

April 6
10:00 - 12:00
Gardeners on Duty

April 9
NO Gardeners on Duty

Starting Your Spring Garden Class
6:30 to 7:30 pm
Quick link to class details
Lost Mountain Park

April 11
9:30 am
Monthly Meeting
Warm Weather location: at the garden

April 12
12:00 noon to 1:00 pm
Growing Tomatoes
Cobb County Extension Upcoming Events

Thursday, April 4, 2013

More pictures from our workday

Grub Hunting
Planting tiny seeds


Happy weeders
Eating, talking and holding our
new treasures from the door prize drawing
 

Milk Jug Cloche

It is getting late enough in the season that we might be able to squeak by without having to use more frost covers. For those of you that don't have a frost cover system, you can use milk jugs, buckets or plastic bottles for a temporary system if the need arises. It probably works best if it is only a quick cold spell and is going to be a light frost.

Denise tried it a few years ago but prefers using the frost blankets. But then again, she is covering lots of plants so that makes sense.  She does have a friend that uses milk jugs but the thing you have to watch out for is over heating. You don't want to broil the plants you just saved from freezing so you will need to go out early and move the jugs or figure out a way to vent them easily.

My research on the web shows a multitude of ways to do it.  Here is one link to a how to - Milk jug as cloche. I was curious how well it would fit over Mark's tomato plants so I took my sample up to the garden to give it a try. It went over some of his tomato plants but not all of them.

Leaving the bottom attached really does make it easy to anchor down with a rock or any other heavy object.. But you do want to pull dirt up around the edges so no cold air gets in under the bottom. Letting cold air in is going to counteract the effort to capture the radiant energy coming up from the ground.

Wednesday, April 3, 2013

Nesting material for birds

Spring is the season when birds are frantically gathering nesting material. My yard is not ultra tidy so they find lots of natural material available (leaves, moss, pine needles, twigs, etc.) But over the years I’ve inadvertently provided more nesting material by having cedar branches and hanging baskets available to tear apart.
 
The cedar branch had been made into a suet log but that didn't keep the birds from stripping all the bark fibers off to put in a nest. I enjoyed watching the brown-headed nuthatch strip it actually.
 
This year a Carolina chickadee is working it over again. The hanging basket was one of those wire ones with a coconut fiber liner. Over the years it kept getting holes in it and the dirt would leak out. It puzzled me until I finally caught the culprit in action (Carolina chickadee in that case).
 
Last year when I emptied out a bunch of hanging baskets, I saved the coconut fiber liners so I could set the fiber out as nesting material this year. I've already filled this suet feeder twice with fiber so I know the birds are using it. I was lucky enough to glance out the window in time to see a female eastern bluebird pulling lots of coconut fiber to take away for nest building. Unfortunately, I didn't have a camera nearby.  

Tuesday, April 2, 2013

Compost Sifter

Paulie is shoveling dirt while Eric, Patsy and Cina watch.
And yes, they found some grubs but no pupas.
Thanks to Mike for making a great compost sifter. It fits over the top of the wheelbarrow which makes it handy to transport and dump what you've sifted.

It also work very well if you decide you want to take out ALL the dirt in your bed and sift it looking for lumps, grubs, pupa, pecans and other assorted undesirables.  I'd heard about it and seen the end results but hadn't seen it in action.

If you want your own personal sifter at home I have one that is extremely easy to make and is very light so it is easy to use.  I got the idea from my friend Hal Massie about 20 years ago.

I use an old plant tray I got with plants one year (you want to use one with an open weave - a solid bottom one won't work.) Vic had a piece of hardware cloth that we cut down to size and then I attached it with twisties to the plant tray. Voila...a small, lightweight sifter.

Vicki's compost sifter
Denise  had sifter envy so went home and she made one for herself. She didn't have hardware cloth so she used a mesh with 1/4 inch holes which works well also. She also used zip ties (cable ties) to attach her mesh which I'll do the next time my twisties break.


Starting Your Spring Garden

Tuesday April 9th, 2013
6:30 - 7:30 pm
Lost Mountain Park
Western District Operations Building

You are invited to attend a free (and open to the public) gardening class sponsored by The Green Meadows Preserve Community Garden.

Starting Your Spring Garden
This class will 
be presented by Amy Whitney, who is a Cobb Cooperative Extension Program Assistant in Horticulture, Master Gardener, teacher, blogger and more. Based on Amy’s years of successful experience and teaching, this class will provide gardeners with the basics of what, how, when, and where to plant your spring garden. Planning for insect and disease control will also be covered.


Please RSVP to greenmeadowscg@gmail.com
We want to make sure we have enough handouts for everyone.
Directions From the Community Garden:
  • Take Dallas Hwy West 2.0 miles (to the 2nd traffic light from the garden.)
  • Turn left at the traffic light into Lost Mountain Park
  • Take the first left.
  • Once you turn, go straight and the road dead ends into a parking lot between Boots Ward Recreation Building and the Western District Operations Building. If the parking lot is full, park in the parking lot in front of the ball fields.
Lost Mountain Park
Western District Operations Building
4845 Dallas Highway
Powder Springs, GA 30127


Monday, April 1, 2013

Great Big Thanks to All!

Hey Everyone,

Just a great big THANK YOU to all those who came out and supported the workday Saturday afternoon!

It is so nice to assist the Master Gardeners who do so much and provide us with such a nice place to come out and play!  They even feed us yummy cookies.  Those were delicious Carol!

What a wonderful turnout!


We truly hope you had a great time mingling and working as we continue to form a wonderful community of gardeners.

All of us are such a vital part to its success and it is such a pleasure to garden alongside each of you.


Sphinx moth - adult form of
 tomato hornworm

Whether doing battle with the weeds, learning how to prune fruit trees, checking out the hornworm pupa, or simply having fun with Door Prize Bonanza, a great day seemed to be had by all.


Weeding under the shade and door prizes on the table.


Door Prize Bonanza is always fun and it was so nice to see everyone go home a winner.
Hope you enjoyed!


Have a great week and thanks again for all your help!

Denise & Vicki, Beds 25, 29, and 41

Gardeners on Duty

Gardener on Duty Time Change
 
In April the Gardeners on Duty spring forward and fall back at the same time! It is warmer and stays light longer so it was time for a schedule change.

The New Hours are:

Tuesday evenings 5:00 to 7:00 am

Saturday mornings 10:00 to 12:00 am


Easter Bunny

The Easter Bunny came to the garden! It was kind of fun walking around
this evening to see where he had been and all the fun things that were left.

Sunday, March 31, 2013

Pruning the Fruit Trees

Carol is teaching them the correct way to prune fruit trees. Right now she is working on a fig.
 All participants got a chance to prune a tree.

Tomato Hornworm Pupa

During Saturday's workday Wendy found 3 pupa and Mark found one. At first we thought they were luna moth pupa but after consulting the bug book in the shed we discovered they were HIGHLY undesirable pupa as they are tomato hornworms waiting to emerge.

If you want to learn more about tomato hornworms in all stages of their life cycle, this link tomato hornworms has great pictures and information about hornworms.

Notice the handle like thing on the pupa on the left. Hornworms
 have "handles" and luna moth pupa don't. Also, hornworm pupa are
 found in the soil and luna moth pupa are found in cocoons above ground.

Saturday, March 30, 2013

Checkbooks, Stools and the Three Bears


Growing Vegetables is like:

Maintaining a healthy checking account

A 3 legged stool – all legs have to be in balance to stay up right

Using the 3 Bears scale

Out of balance means unhappy and unproductive plants


Remember we talked about the Three Bears Scale previously when it came to the soil level in the garden beds? Well, the Three Bears scale applies to all aspects of gardening.

  Too much       –       Too little         –             Just right 
 

 Too much or too little water. Too much or too little fertilizer. Too much or too little sun.  To achieve that Happy Medium (as in getting the scales to balance to Just Right) think of your bed as a checking account.

 
  You have to make regular deposits because the soil only holds a finite amount of water and fertilizer. When the plant uses fertilizer and water (makes withdrawals) you need to make deposits again.  When the plant has a negative balance in the account….it suffers, quits producing fruit and ultimately dies if no deposits are made. Even if deposits are made to prevent death, the health of the plant has been harmed.

Besides watering and fertilizing, there is a 3rd component to a happy garden. Mulching.


                                                                 photo by Bob Myers

 Gardening is a never ending cycle of adding water, fertilizer and mulch to maintain the health and productivity of the plants we are growing. There is one more aspect you could add to this so that instead of a 3 legged stool it is a 4 legged table - amending the soil.

To amend your soil properly every year, work in 1 – 2 inches of organic matter into the top 6-8 inches of soil. Adding organic amendments increases moisture holding capacity in sandy soils and drainage in clay soils. It also breaks down further to stabilize soil structure and feed microorganisms and add micro nutrients. Denise talked about her favorite method of amending her soil a couple of days ago in her post on Prepping Garden Beds.

Amy Whitney at the Cobb County Extension Office made a post on her blog about Plant Health Management. It is really excellent reading about how important it is to prevent problems from occurring in the first place.

If we water, fertilize, mulch and choose the right plants for the right time of year, we can prevent many of our problems. 

Tomatoes - to Plant or Not to Plant

That is the question. In our zone (7b) it is generally advised to wait until April 15th before planting out tomato plants. Soil and air temperatures aren't dependably warm until then and even then  it can be iffy.

If you do decide to go for it and risk it, read these two articles to make an educated decision.
Cold weather effects on Tomatoes
Cold Damage to Tomato Plants

If cold weather does move back in you really DO need to cover any warm weather crops with row covers and anchor the cover completely to the ground so that no air gets in. You want to trap the radiant heat energy coming up from the ground and not let in any cold drafts.  Just like you wrap a scarf around your neck tightly to keep drafts from going down your back.

I found a really interesting article Temps for tomatoes and peppers that details what various low temperatures do at various stages of the life cycle of tomato and pepper plants.  The article mostly has temperatures in C versus F degrees but it does show enough F degree temps to use it. To convert any temperature from C to F - here is a Temperature Converter.

Friday, March 29, 2013

FACES - a GREAT resource for us to use

FACES ? A resource? Yes, it is a great resource to use.

Georgia FACES is the online news service of the University of Georgia College of Agricultural and Environmental Sciences, including UGA Cooperative Extension and the Georgia Agricultural Experiment Stations. They publish all kinds of great research based articles and information.

Here is a link to the Spring Garden 2013 media kit. I haven't had time to look at everything in it but I've included links to three of the interesting articles in the kit.

Remove all blossoms on new fruit trees and bushes
I hate the idea of having to remove ALL the blossoms on my 3 blueberries that I just planted but I guess I'll be out there cutting them off this weekend. And I'm thinking we'll have to go up to the orchard at the garden and remove ALL the blooms that appear on our pears, plums, apples, & figs as well. Boo hoo hoo.

Adding Organic Matter and Growing Tomatoes
This article addresses the importance of adding organic matter to your garden as well as fertilizing and watering tomatoes to make them healthy.

Deadheading pansies
Why should you deadhead pansies? Because if you don't deadhead them, they convert their energy into making seeds versus blooms.

How many pansies do you see in this picture that have started this process? (By the way, after this picture was taken, they were cut off!)

This is actually important to remember all year round.  The purpose of a plant is to make seeds and fruit.

If you don't dead head flowers (zinnias, marigolds, etc.) or pick the fruit (tomatoes, cucumbers, beans, etc.) the plant says AH HA! I'm going to succeed and quits making new flower buds.

Once you've dead headed the plant or picked the fruit, the plant goes Dang It! and starts making new buds to make new flowers.

Don't be seduced by this warm weather

This warm weather makes you want to go out and plant! plant! plant!
Soil Temperature probe - Photo by Sharon Dowdy

Read this great article about Soil Temperature and why it is so crucial to wait to plant our warm weather crops (tomatoes, beans, squash, cucumbers, etc) until the soil temperatures have risen.

In other words, if you plant now, you'll end up crying later.

Have a little patience, no crying later. But patience is hard to have when there are beautiful plants in the store and beautiful weather outside.

But you can plant the cool weather crops! In fact, now is the perfect time for them.


Weekly Calendar 3/29 - 4/4

March 30
2:00 - 4:00 pm
Saturday Workday
Surprises

April 2
5:00 - 7:00 pm
Gardeners on Duty
(note the time change)

From Your Garden to your Table
6:30 - 8:30 pm
Cobb Extension Program
Pre-registration required
Cost $10.00


Wednesday, March 27, 2013

Door Prize Bonanza!

Hey Everyone,

The upcoming weather for the workdays on Thursday and Saturday looks wonderful!  How nice would it be to come to the garden and support the Master Gardeners who do so much for us and assist with the spring clean-up.  This month is a Gardener's Door Prize Bonanza!

Thought you were getting a sneak peek, didn't ya?
Whether working on your beds or helping in the garden, this is always a wonderful opportunity to socialize, share ideas, get advice if needed, and put your name in a drawing for some great door prizes.  This month is a bonanza of
a giveaway and the prizes are more than delightful!  It may be wise to bring your own garden tools for working as we are expecting a good turnout.

Happy Gardening,

Denise, Beds 25 & 29

Tuesday, March 26, 2013

Prepping the Garden Beds for Spring!

Hey Everyone,

Isn't this an exciting time of year?  I stand and stare at my little 4 x 8 field of dreams with such anticipation of all the wonderful plants and produce to come.  The last of the carrots have been pulled, the dreaded grub search (Yuk) performed, and I am well on my way preparing for a good old-fashioned spring sow down.

Many have asked why is it so important to check for grubs and for better details on how to revitalize their soil for planting, so I thought it would make an excellent post.  If you look back to the post, "When is it Warm Enough to Plant", I have some details for you there as well.
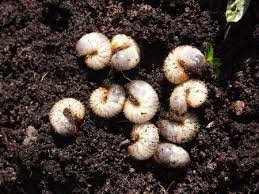
Grubs - feed on the roots of plants in the soil.
Beetles that hatch commonly feed
on the foliage or fruit.
Grubs are known to attract raccoon's.

The main reason to check your soil thoroughly is not just for the grubs, but to assist in promoting a healthy organic garden.  In a garden of this size we will be faced with many a pest and that is why it is so imperative to be preemptive.  We will have two choices, deal with pests now and reduce their numbers, or deal with even more of them later.  Decreasing their numbers and interrupting their life cycles, as best we can, is a proactive approach that will serve us very well down the road.  It will also assist us in growing healthier plants with increased vigor, better disease resistance, and greater yields.

Soil Centipede - While these guys will
feed on the larvae of other insects,
they are especially fond of earthworms.
The soil in your bed can potentially harbor many undesirable pests. Several will either feed on the roots of your plants (decreasing their vigor and potentially killing) while others will hatch and do their damage above ground to foliage and fruit.  Many will also spread disease throughout the garden.  I was surprised to find bugs in my bed that are actually very dangerous to young earthworms.  These
little guys to the right had to go!

In prepping Bed 29 for spring sowing, I felt fortunate not to be loaded with grubs as many have found.  However, in thoroughly checking
the soil, I did find several undesirable pests that had the potential to damage many root crops and other young seedlings.  
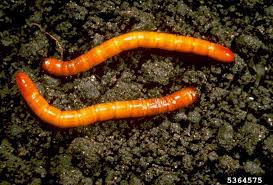
Wireworms- damage the roots of herbs and feed on
potatoes, onions, beets, carrots, and the like.
Can feed for several years.

Aside from the grubs, each of the photos in this post represent what was found and the potential damage it can cause.   I put liquid soap in a five-gallon bucket, added about 3 inches of water, and proceeded to drown to kill all the undesirables.  The total findings were a wealth of earthworms at every stage of growth, including egg cases, four soil centipedes, several wireworms, three carrot beetles, a half dozen carrot rust fly larvae, and a partridge in a pear tree.  Okay, I just wanted to make sure you were still reading.

The only disappointing action I took was to drown several of the earthworm egg cases.  I have not seen these before and followed my instinct to get the undesirables out of the soil.  After running across one hatching, well let's just say, my badness!  You know what they say about those garden lessons learned, that was definitely one of them.  Next time, I will take the unfamiliar egg cases home and identify them first.
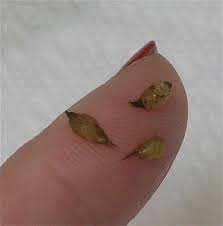
Earthworm Egg Cases - so disappointed
 in my actions!   Hopefully this photo
will keep someone else from making
 the same mistake!

As far as revitalizing the soil, you will notice that everyone has a special recipe, and in time you will find what works the best for you. Mike and Sue of beds 30 & 51 have a wonderful philosophy of feeding the soil and treating the plants if any problems arise.  Jim of beds 34 & 35 has a recipe that requires very little additional fertilization.

I follow this practice both here and at home.  Most often, I will remove a small amount of soil that will be used elsewhere for fill dirt or for tilling into new planting beds (non-vegetable).  Next, a complete and thorough search is done for everything detrimental needing removed. This allows an excellent opportunity to learn from what is in the soil and anticipate what measures to take early on for a more proactive and preventive approach to pests.  Imagine planting carrot seed with rust fly larvae left in the soil.  Now that those are removed, dusting with a little wood ash at planting, inter-cropping with some green garlic or radishes, and using a yellow sticky trap should work at keeping those pests at bay.
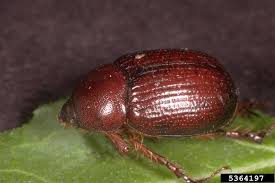
 
Carrot Beetle - form from grubs.  Adults feed on
beets, carrots, corn, parsnips, potatoes,
sunflowers, and sweet potatoes.  Can cause
serious damage to all small seedlings.
The addition of organic matter is next.  It is important to add several types of organic matter into the soil as each will possess different beneficial bacteria and food that create the environment of success for your plants.  Bed 29 was home to several Brassica's this past season, which are very good at depleting the soil of nutrients.  To maintain a high fertility, one bag of Jungle Growth Professional, one bag of Composted Cow Manure, two bags of Mushroom Compost, four cups of dried Pelletized Garden Compost, fifteen cups of coffee grounds, and a dozen or so biodegradable filters, cut into small pieces, were all added.  The coffee filters and coffee grounds are used to feed the worms that are now becoming active as the soil warms.  I also am going to add some of the black gold delivered to the garden as well in specific areas to see how it performs.  Do I need to add all this?  That would be a question for the Master Gardener's; however, this is my recipe that brings me great success.  These amendments are all worked well into the soil until I have a nice loam and consistency for planting.  If my soil isn't crumbly or loamy enough, I will then add some vermiculite to improve its texture.  Some people use peat for this process, however, that can have an effect on your soil's ph, resulting in the need for a lime application.

Carrot Rust Fly Larvae - laid by the carrot rust fly.  Starts
out as a small brown colored pupa, hatches into a
yellowish-white maggot and then feeds on the
roots of carrots, celery, parsley, and dill.
Lastly, is addressing the needs of fertilization.  Once your bed is revitalized with organic matter, you need to make sure food will be available for young plants and seedlings.  Vicki had some excellent information on this at her last class.  Whatever type of fertilizer you choose to utilize, scratch it into the top six inches of your bed before seeding or planting for the best results. Chemical based fertilizers can be appealing based on the claims touted.  And yes, you can get impressive results.  For me the choice is always an organic one. That is just my preference.  I am trying to eat cleaner, if that makes any sense at all.  I like the EB Stone products from Pike's as a starter fertilizer.  However, I will tell you that if you are new to gardening, do not have a soil test, or know how your soil performs, it is best to start with a 10-10-10 fertilizer, and then use something more organic for side-dressing after that.

Much like my soil, I have my own little fertilizer recipe as well.  I use the recommended EB Stone rate on the box for a starter, adjusted for the square footage of my bed.  I then add two products I have much success with.  One is Actino-Iron, the other is Azomite.  I utilize these sparingly and only on beds that have seen several seasons of growth or when I start to notice a decline in yield.  Lastly, are the worm castings for water retention.  One half cup of these goes into each planting hole to retain water for release at night when the plants are recovering from the heat of the day.  After plants are up and flourishing for about 6 weeks, I side-dress with chicken manure and pelletized garden compost every 15th and 30th like clockwork.  I love Vicki's example of making a deposit.  I make a deposit into my garden twice a month, so the produce will be there when I want to make the withdrawal.  I use the monthly rate and break it down to a bi-monthly schedule, as my plants seem to flourish that way.  I keep all side-dressings 6 inches out from any stems to prevent burning.
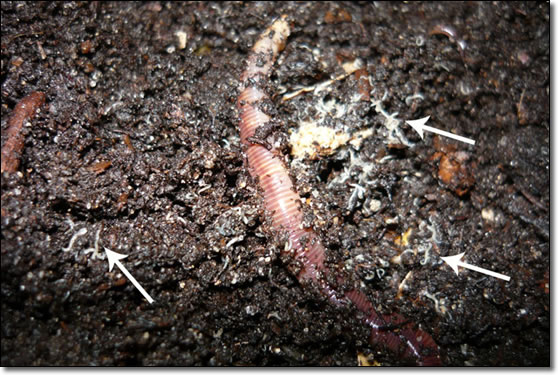
Newly hatched earthworms (European nightcrawlers)
Newly hatched earthworms will be small and most
often white in appearance.  Many say
they resemble apiece of string. 
Much attention is focused on the soil, its structure, drainage, organic matter, and fertility. I can't tell you if what I do is right or wrong. What I can tell you is in time you will find what works well for you and it will become your "go to" garden prep each season.  I hope this helps our new gardeners prepare their beds for spring and maybe others could post their recipes to share.  This would be a wonderful way for us all to learn from each other.

As we all prepare for spring, may the grubs in your bed be few, your soil be enriched with fertility, and the harvest you reap full of bounty!


Happy Gardening,

Denise, Beds 25 & 29

Sunday, March 24, 2013

Harvest Soup With Garden Fresh Veggies!

Hey Everyone,

This is a wonderful dish for utilizing fresh produce pulled from the garden.  A dear friend of mine gave me this recipe a few years back and it is such a nice one to share.  The touch of lemon really adds elegance and lightness to the dish while enhancing the flavor of the other ingredients.  White Satin carrots can stand alone in this recipe; however, I enjoy throwing in some of my Mokum's for color and added sweetness. Simply delightful!

HARVEST SOUP
Yummy Yum! 

Ingredients:

1 (32-ounce) container fat-free, less-sodium chicken broth, divided (Swanson)
1/2 heaping cup uncooked orzo
2 teaspoons to 1 tablespoon Bertolli Extra Light Tasting Olive Oil
1 cup garden fresh carrots cut into thin rounds
3/4 cup chopped fresh garden onions (yellow granex work well or anything sweet)
1/2 cup diced celery
3/4 pound cooked chicken breast cut into bite size pieces (A fresh roasted chicken from the deli or the Purdue Grilled Chicken Breast available in a box work wonderfully)
1 1/4 cups water
3 garden fresh parsley sprigs
1 extra-large garden fresh lemon thyme sprig
4 - 5 cups washed and dried garden fresh baby spinach leaves
1 heavy tablespoon fresh squeezed lemon juice (1 - 2 lemons)
1/4 tsp. salt
1/8 tsp. fresh ground black pepper

Directions:


Bring 1 3/4 cups chicken broth to a boil in a medium saucepan.  Add the orzo and cook 9 - 10 minutes until barely done.  Remove from heat, set aside, and do not drain.


While the orzo is cooking, heat oil in a 3 qt. saucepan over medium heat.  Swirl to coat the bottom of the pan.  Add carrots, chopped onions, celery, and cooked chicken.  
Sauté 3 minutes, stirring constantly.

Stir in the remaining 2 1/4 cups chicken broth, 1 1/4 cups water, parsley, and thyme.  Bring to a boil. Reduce heat; cover and simmer for about 10 minutes or until the vegetables are tender.  Be careful not to overcook.


Remove and discard the herb sprigs.


Add orzo, lemon juice, salt, and pepper.  Stir thoroughly to break up the orzo.  Add the spinach and simmer 1 minute or just until it barely wilts.


Serve with nice quality Italian bread from the deli.

Serves 3-4

I always take the above recipe and make a batch and a half since this soup holds so well for up to a week.  I go heavy on all the garden ingredients as they just melt in your mouth.  The batch and a half makes four good size entrees like the photo above with a couple sides left over for lunch!  This recipe lends itself quite well to entertaining.

Hope you enjoy,

Denise, Beds 25 & 29
   

Friday, March 22, 2013

Weekly Calendar March 22 - March 29

Rue-anemone (Thalictrum thalictroides)
A native wildflower blooming now.
March 23
2:00 - 4:00
Gardeners on Duty

March 26
4:00 - 5:30
Gardeners on Duty

March 28
10:00 - 12:00
Thursday Monthly Workday

March 30
2:00 - 4:00
Saturday Monthly Workday